Konica Minolta AccurioPrint 2100 GBC Binder G1 User Manual - Page 14
Problem Solving
 |
View all Konica Minolta AccurioPrint 2100 manuals
Add to My Manuals
Save this manual to your list of manuals |
Page 14 highlights
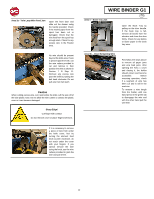
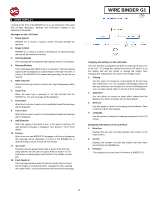
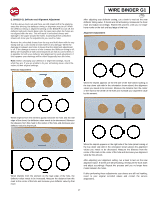
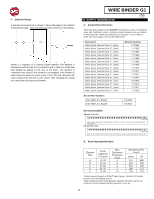
9. PROBLEM SOLVING A. Common Problems: Problem Probable Cause No power, No Operation Power cord not attached to back of machine or not properly plugged into the wall. Power On/Off Switch not activated Close Door/Close Tray/Close Cover message appears Ensure that the doors and cover are properly closed and latched. Press the door or cover firmly into place. If message appears repeatedly, adjust the Interlock flag. Twin-Loop jamming repeatedly wire Avoid damage to the spool by taking care during storage and loading. Remove the excess wire and re-feed wire into the element feed module. Follow the installation instructions in Section 4. If necessary, remove a length of wire from the spool and reinstall the spool. Sheets jamming repeatedly on the Stacking area (Area 2) J202, J203, J244 Confirm that an appropriate BINDER G1 die is installed on the PUNCH G2. Using an unbound sheet, confirm the punched hole accuracy using the guidelines in Section 9 C-D. If the accuracy of the punched holes is not in spec, make adjustments to the PUNCH G2 alignment settings. If problem persists, see Section 9 E Wire jamming in feeder. (Area 3a) J361 J361 jams on the BINDER G1 may be caused by dust on the film cover on the element sensor (S22). Clean the film by wiping a dry cloth across the film covering the element sensor shown below. J361 jams can also be caused by the wire end being positioned incorrectly when installing a spool. Refer to Section 7 B step 16. WIRE BINDER G1 GB Broken paper carrier If the carrier paper between the wire spool and rewind spool breaks, rotate the wire spool clockwise until you have enough paper to reach the rewind spool, then follow the spool installation steps starting on step 12. You may need to cut off the excess wire if there is too much slack in it. Broken carrier paper (continued) Alternatively, you may be able to repair the carrier paper when it tears. Unwind the rewind spool until you have enough slack to overlap 2 inches (50mm) of the paper ends. Wrap the overlapped section in packaging tape and follow the spool installation steps starting on step 12. Wire failing to trigger slack sensor. (Area 3a) J320 J320 jams on the BINDER G1 may be caused by the carrier paper between the wire spool and rewind spool breaking or by becoming entangled on the wire. Refer to Section 7 B steps 1-5 and steps 11-19 for reinstalling the spool. Note: It may be necessary to trim off excess wire if the length of carrier paper is not sufficient to reach the rewind spool or if the wire has been damaged by stretching. J320 jams on the BINDER G1 may also be caused by debris collecting on the element slack sensor and restricting its motion. Clear the debris with a cloth or vacuum. Full Rewind Spool J320 J320 jams can occur when the rewind spool becomes too full. The rewind spool has a window cut into it. When paper reaches this window, cut the paper where it leave the rewind spool and perform steps 16-17 in Section 7 A to empty the hub and then reattach the cut end to the now empty spool 14
-
 1
1 -
2
-
3
-
4
-
5
-
6
-
7
-
8
-
 9
9 -
 10
10 -
 11
11 -
 12
12 -
 13
13 -
 14
14 -
 15
15 -
 16
16 -
 17
17 -
 18
18 -
 19
19 -
20
-
21
-
22
-
23
-
24
-
25
-
26
-
27
-
28
-
29
-
30
-
31
-
32
-
33
-
34
-
35
-
36
-
37
-
38
-
39
-
40
-
41
-
42
-
43
-
44
-
45
-
46
-
47
-
48
-
49
-
50
-
51
-
52
-
53
-
54
-
55
-
56
-
57
-
58
-
59
-
60
-
61
-
62
-
63
-
64
-
65
-
66
-
67
-
68
-
69
-
70
-
71
-
72
-
73
-
74
-
75
-
76
-
77
-
78
-
79
-
80
-
81
-
82
-
83
-
84
-
85
-
86
-
87
-
88
-
89
-
90
-
91
-
92
-
93
-
94
-
95
-
96
-
97
-
98
-
99
-
100
-
101
-
102
-
103
-
104
-
105
-
106
-
107
-
108
-
109
-
110
-
111
-
112
-
113
-
114
-
115
-
116
-
117
-
118
-
119
-
120
-
121
-
122
-
123
-
124
-
125
-
126
-
127
-
128
-
129
-
130
-
131
-
132
-
133
-
134
-
135
-
136
-
137
-
138
-
139
-
140
-
141
-
142
-
143
-
144
-
145
-
146
-
147
-
148
-
149
-
150
-
151
-
152
-
153
-
154
-
155
-
156
-
157
-
158
-
159
-
160
 |
 |
