Konica Minolta AccurioPrint 2100 GBC Binder G1 User Manual - Page 8
Cwire Binder G1
 |
View all Konica Minolta AccurioPrint 2100 manuals
Add to My Manuals
Save this manual to your list of manuals |
Page 8 highlights
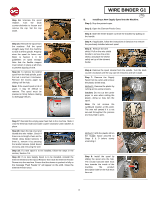
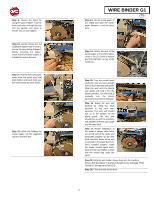
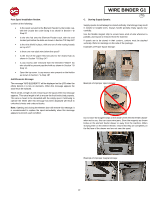
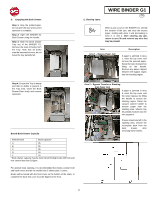
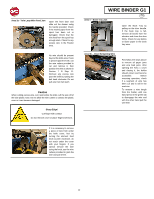
Step 14: Unscrew the spool retainer. Turn the knob counterclockwise to loosen and remove the cap. Set the cap aside. Step 15: Remove the spool from the machine. Pull the spool straight away from the machine to slide it off the spindle. Properly store the spool for future use. Refer to Section 4 C for guidelines on spool storage. Note that the flexible magnet must remain in place at all times to prevent slipping of wire. Step 16: To remove the rewind spool from the feed spindle, push the hub in and turn it clockwise. Remove the excess paper by sliding it off the hub. Note: If the rewind spool is full of paper, it may be difficult to remove. The spool must be pressed in firmly before rotating to disengage the pin. Step 17: Reinstall the empty paper feed hub to the machine. Slide it onto the feed hub shaft and rotate counter clockwise until it latches in place. Step 18: Open the top cover and identify the wire Holder. Check if there is a cut length of wire on the Holder (long boxed section). If there is, remove it by pressing the Holder release (small boxed sections) and removing the wire. Step 19: If a new spool is to be installed, follow the steps in the section, Section 7 B. Step 20: If no new Supply Spool is to be installed, reinstall the Element Shield and the Spool Retainer then slide the Element Feeder Drawer into the machine. Ensure that the drawer is pushed in fully or the message "Push Feeder In" will appear on the LCD. Close the Element Feeder Door. WIRE BINDER G1 GB B. Installing a New Supply Spool Into the Machine: Step 1: Stop the printer/copier. Step 2: Open the Element Feeder Door. Step 3: Slide the feeder drawer out from the machine by pulling on the handle. Step 4: If applicable, follow the instructions in Section A to remove the previously installed element spool. Step 5: Remove the wire shield. Pull on the wire shield handle to remove the entire shield, and place the shield safely on top of the element feeder. Step 6: Remove the spool retainer from the spindle. Turn the knob counter clockwise until the cap can be removed, and set it aside. Step 7: Remove the Supply Spool from its carton and remove the plastic shrink wrap. Method 1: Remove the plastic by cutting across using scissors. Caution: Do not cut the carrier paper or wire when cutting the plastic, doing so may ruin the spool. Note: Do not remove the cardboard retainer at this point. The wire will unwind if it is not secured throughout the process and may lead to jams. Method 2: With the plastic still on the Supply Spool proceed to Steps 8 & 9 before slowly unwinding it. Step 8: Install the spool by sliding the spool onto the hub. The circular barcode label must face towards the inside of the machine. The product description label on the hub must face out. 8
-
 1
1 -
2
-
 3
3 -
 4
4 -
 5
5 -
 6
6 -
 7
7 -
 8
8 -
 9
9 -
 10
10 -
 11
11 -
 12
12 -
 13
13 -
14
-
15
-
16
-
17
-
18
-
19
-
20
-
21
-
22
-
23
-
24
-
25
-
26
-
27
-
28
-
29
-
30
-
31
-
32
-
33
-
34
-
35
-
36
-
37
-
38
-
39
-
40
-
41
-
42
-
43
-
44
-
45
-
46
-
47
-
48
-
49
-
50
-
51
-
52
-
53
-
54
-
55
-
56
-
57
-
58
-
59
-
60
-
61
-
62
-
63
-
64
-
65
-
66
-
67
-
68
-
69
-
70
-
71
-
72
-
73
-
74
-
75
-
76
-
77
-
78
-
79
-
80
-
81
-
82
-
83
-
84
-
85
-
86
-
87
-
88
-
89
-
90
-
91
-
92
-
93
-
94
-
95
-
96
-
97
-
98
-
99
-
100
-
101
-
102
-
103
-
104
-
105
-
106
-
107
-
108
-
109
-
110
-
111
-
112
-
113
-
114
-
115
-
116
-
117
-
118
-
119
-
120
-
121
-
122
-
123
-
124
-
125
-
126
-
127
-
128
-
129
-
130
-
131
-
132
-
133
-
134
-
135
-
136
-
137
-
138
-
139
-
140
-
141
-
142
-
143
-
144
-
145
-
146
-
147
-
148
-
149
-
150
-
151
-
152
-
153
-
154
-
155
-
156
-
157
-
158
-
159
-
160
 |
 |
