Konica Minolta AccurioPrint 2100 GBC Binder G1 User Manual - Page 9
Step 9, Step 10, Step 11, Step 12, Step 13, Step 14, Step 15, Step 16, Step 17, Step 18, Step 19
 |
View all Konica Minolta AccurioPrint 2100 manuals
Add to My Manuals
Save this manual to your list of manuals |
Page 9 highlights
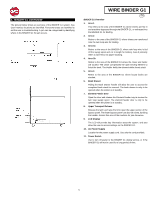
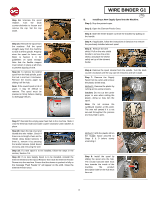
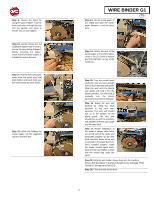
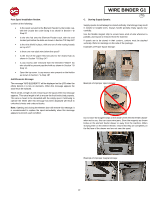
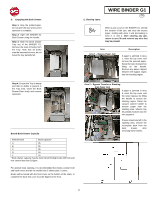
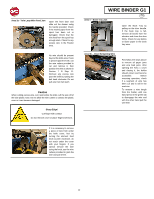
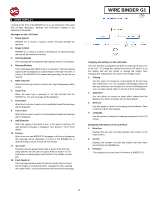
Step 9: Secure the spool by using the spool retainer. Turn the knob clockwise to thread the cap into the spindle until spool is secure. Do not over tighten. Step 10: Gently remove the flat cardboard spacer that is used to secure the wire during shipment. Before removing the spacer, check that the flexible magnet is installed to secure the wire. Step 11: Pull the wire and paper away from the spool and hold them both in one hand. With your free hand install the wire shield. Step 12: While still holding the carrier paper, use the magnetic catch to hold the wire. WIRE BINDER G1 GB Step 13: Lift the metal guide of the shield and slide the carrier paper between it and the lower bars. Step 14: Attach the end of the carrier paper to the rewind spool. Leave 1-2in (2.5-5cm) of excess and fold that back on top of the metal clip. Step 15: Turn the rewind spool clockwise until you have enough wire to reach the blue wire guide. Slide the wire onto the plastic wire guide and feed it into the plastic sprocket. Use the knob to manually turn the plastic sprocket and aid wire installation. Step 16: Adjust the wire end position by using the knob attached to the wire feed sprocket. The wire end should line up in the window on the blade guard. The wire end should line up with the transition line between the blue wire guide and the grey anvil. Step 17: Proper installation of the spool is shown. Wire loose end is fed around the guide and positioned properly on the wire feed sprocket. Paper loose end is secured to the paper feed hub. Once installed properly, rotate the paper rewind spool clockwise until the wire makes contact with the sensor flap under the spool. Step 18: Slide the wire feeder drawer back into the machine. Ensure that the drawer is pushed fully back or the message "Push Feeder In" will appear on the LCD Step 19: Close the wire feeder door. 9
-
 1
1 -
2
-
3
-
 4
4 -
 5
5 -
 6
6 -
 7
7 -
 8
8 -
 9
9 -
 10
10 -
 11
11 -
 12
12 -
 13
13 -
 14
14 -
15
-
16
-
17
-
18
-
19
-
20
-
21
-
22
-
23
-
24
-
25
-
26
-
27
-
28
-
29
-
30
-
31
-
32
-
33
-
34
-
35
-
36
-
37
-
38
-
39
-
40
-
41
-
42
-
43
-
44
-
45
-
46
-
47
-
48
-
49
-
50
-
51
-
52
-
53
-
54
-
55
-
56
-
57
-
58
-
59
-
60
-
61
-
62
-
63
-
64
-
65
-
66
-
67
-
68
-
69
-
70
-
71
-
72
-
73
-
74
-
75
-
76
-
77
-
78
-
79
-
80
-
81
-
82
-
83
-
84
-
85
-
86
-
87
-
88
-
89
-
90
-
91
-
92
-
93
-
94
-
95
-
96
-
97
-
98
-
99
-
100
-
101
-
102
-
103
-
104
-
105
-
106
-
107
-
108
-
109
-
110
-
111
-
112
-
113
-
114
-
115
-
116
-
117
-
118
-
119
-
120
-
121
-
122
-
123
-
124
-
125
-
126
-
127
-
128
-
129
-
130
-
131
-
132
-
133
-
134
-
135
-
136
-
137
-
138
-
139
-
140
-
141
-
142
-
143
-
144
-
145
-
146
-
147
-
148
-
149
-
150
-
151
-
152
-
153
-
154
-
155
-
156
-
157
-
158
-
159
-
160
 |
 |
