Lacie CloudBox User Manual - Page 154
c Set a Static IP Address, Assigning a Static IP Address - Dashboard
 |
View all Lacie CloudBox manuals
Add to My Manuals
Save this manual to your list of manuals |
Page 154 highlights
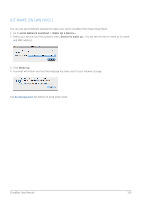
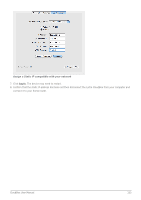
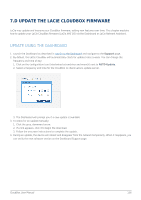
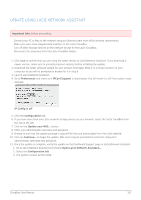
7.C SET A STATIC IP ADDRESS Most home routers are DHCP servers, meaning that your LaCie CloudBox will automatically receive an IP address once it is connected to the network. If a network is not DHCP-managed, the LaCie CloudBox will use APIPA (automatic private IP addressing) to assign itself a valid IP address within the existing network. In some cases, it will assign itself an IP address following the rule 169.254.xxx.yyy/24. Note on Changing Your IP Address Manually: Since the majority of networks use DHCP addressing, LaCie highly recommends that you do not adjust your IP address without contacting your internet provider. ASSIGNING A STATIC IP ADDRESS - DASHBOARD The Dashboard Network page is the preferred method for assigning a static IP address. See Review the Dashboard Network Settings for information on assigning a static IP address. ASSIGNING A STATIC IP ADDRESS - LACIE NETWORK ASSISTANT 1. Download and install the latest version of LaCie Network Assistant on your computer (see Simplify Local Access with LaCie Network Assistant). 2. Connect your LaCie CloudBox directly to the computer via the Ethernet cable. 3. Launch LaCie Network Assistant: s Windows: Select LaCie Network Assistant in Start > Programs. The LaCie Network Assistant icon will appear in the system tray and the program will automatically detect the LaCie CloudBox. s Mac: Go to the Go > Applications to launch LaCie Network Assistant. The LaCie Network Assistant icon will appear in the menu bar and the program will automatically detect the LaCie CloudBox. 4. Right click on the icon in the system tray (Windows) or click once on the icon in the menu bar (Mac) to select Open LaCie Network Assistant... 5. Click the Configuration tab and select Manual. 6. Make sure to provide an IP address that is compatible with your network. As well, it must include the same subnet as your computer's network settings so that the device will be visible to that computer. CloudBox User Manual 154
-
 1
1 -
2
-
3
-
4
-
5
-
6
-
7
-
8
-
9
-
10
-
11
-
12
-
13
-
14
-
15
-
16
-
17
-
18
-
19
-
20
-
21
-
22
-
23
-
24
-
25
-
26
-
27
-
28
-
29
-
30
-
31
-
32
-
33
-
34
-
35
-
36
-
37
-
38
-
39
-
40
-
41
-
42
-
43
-
44
-
45
-
46
-
47
-
48
-
49
-
50
-
51
-
52
-
53
-
54
-
55
-
56
-
57
-
58
-
59
-
60
-
61
-
62
-
63
-
64
-
65
-
66
-
67
-
68
-
69
-
70
-
71
-
72
-
73
-
74
-
75
-
76
-
77
-
78
-
79
-
80
-
81
-
82
-
83
-
84
-
85
-
86
-
87
-
88
-
89
-
90
-
91
-
92
-
93
-
94
-
95
-
96
-
97
-
98
-
99
-
100
-
101
-
102
-
103
-
104
-
105
-
106
-
107
-
108
-
109
-
110
-
111
-
112
-
113
-
114
-
115
-
116
-
117
-
118
-
119
-
120
-
121
-
122
-
123
-
124
-
125
-
126
-
127
-
128
-
129
-
130
-
131
-
132
-
133
-
134
-
135
-
136
-
137
-
138
-
139
-
140
-
141
-
142
-
143
-
144
-
145
-
146
-
147
-
148
-
 149
149 -
 150
150 -
 151
151 -
 152
152 -
 153
153 -
 154
154 -
 155
155 -
 156
156 -
 157
157 -
 158
158 -
 159
159 -
160
-
161
-
162
-
163
-
164
-
165
-
166
-
167
-
168
-
169
-
170
 |
 |
