Lacie CloudBox User Manual - Page 99
Remote Backup: Offsite, public IP address, Offsite Backup Setup, CREATE JOB, Remote Backup - 99
 |
View all Lacie CloudBox manuals
Add to My Manuals
Save this manual to your list of manuals |
Page 99 highlights
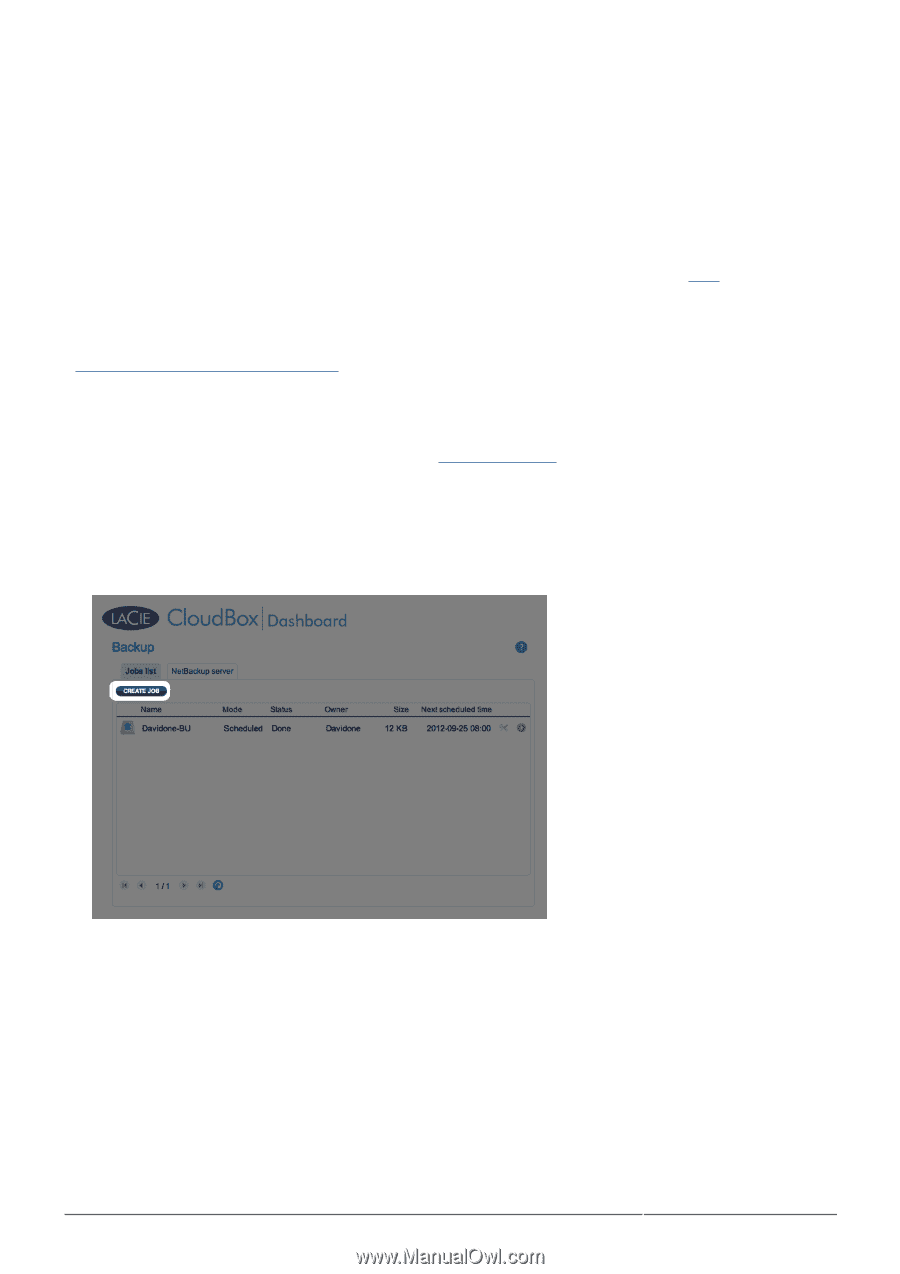
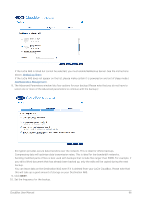
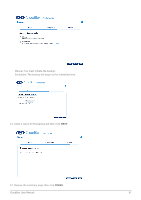
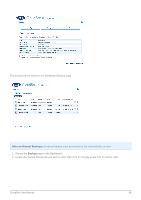
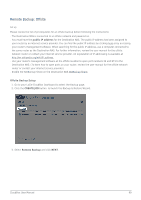
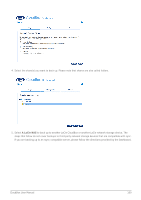
Remote Backup: Offsite Set up Please review the list of prerequisites for an offsite backup before following the instructions: s The Destination NAS is connected to an offsite network and powered on. s You must have the public IP address for the Destination NAS. The public IP address has been assigned to your router by an internet service provider. You can find the public IP address by clicking here or by accessing your router's management software. When searching for the public IP address, use a computer connected to the same router as the Destination NAS. For further information, review the user manual for the offsite network router or contact your internet service provider. An explanation of IP addressing is available at http://en.wikipedia.org/wiki/IP_address. s Use your router's management software at the offsite location to open port numbers 22 and 873 to the Destination NAS. (To learn how to open ports on your router, review the user manual for the offsite network router or contact your internet service provider.) s Enable the NetBackup Share on the Destination NAS NetBackup Share. Offsite Backup Setup 1. Go to your LaCie CloudBox Dashboard to select the Backup page. 2. Click the CREATE JOB button. to launch the Backup & Restore Wizard. 3. Select Remote Backup and click NEXT. CloudBox User Manual 99
-
 1
1 -
2
-
3
-
4
-
5
-
6
-
7
-
8
-
9
-
10
-
11
-
12
-
13
-
14
-
15
-
16
-
17
-
18
-
19
-
20
-
21
-
22
-
23
-
24
-
25
-
26
-
27
-
28
-
29
-
30
-
31
-
32
-
33
-
34
-
35
-
36
-
37
-
38
-
39
-
40
-
41
-
42
-
43
-
44
-
45
-
46
-
47
-
48
-
49
-
50
-
51
-
52
-
53
-
54
-
55
-
56
-
57
-
58
-
59
-
60
-
61
-
62
-
63
-
64
-
65
-
66
-
67
-
68
-
69
-
70
-
71
-
72
-
73
-
74
-
75
-
76
-
77
-
78
-
79
-
80
-
81
-
82
-
83
-
84
-
85
-
86
-
87
-
88
-
89
-
90
-
91
-
92
-
93
-
 94
94 -
 95
95 -
 96
96 -
 97
97 -
 98
98 -
 99
99 -
 100
100 -
 101
101 -
 102
102 -
 103
103 -
 104
104 -
105
-
106
-
107
-
108
-
109
-
110
-
111
-
112
-
113
-
114
-
115
-
116
-
117
-
118
-
119
-
120
-
121
-
122
-
123
-
124
-
125
-
126
-
127
-
128
-
129
-
130
-
131
-
132
-
133
-
134
-
135
-
136
-
137
-
138
-
139
-
140
-
141
-
142
-
143
-
144
-
145
-
146
-
147
-
148
-
149
-
150
-
151
-
152
-
153
-
154
-
155
-
156
-
157
-
158
-
159
-
160
-
161
-
162
-
163
-
164
-
165
-
166
-
167
-
168
-
169
-
170
 |
 |