Lacie CloudBox User Manual - Page 94
Remote Backup: Home, CREATE JOB, Remote Backup
 |
View all Lacie CloudBox manuals
Add to My Manuals
Save this manual to your list of manuals |
Page 94 highlights
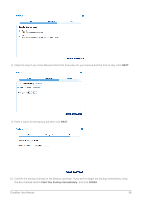
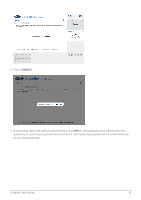
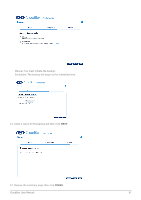
Remote Backup: Home Set up Before following the instructions below, please make certain that: s The Destination NAS is connected to the same network as your LaCie CloudBox and that it is powered on. s The NetBackup Share has been enabled on the Destination NAS. 1. Go to your LaCie CloudBox Dashboard (Log on to the Dashboard) to select the Backup page. 2. Click the CREATE JOB button. to launch the Backup & Restore Wizard. 3. Select Remote Backup and click NEXT. 4. Select the share(s) you want to back up. Please note that shares are also called folders. CloudBox User Manual 94
-
 1
1 -
2
-
3
-
4
-
5
-
6
-
7
-
8
-
9
-
10
-
11
-
12
-
13
-
14
-
15
-
16
-
17
-
18
-
19
-
20
-
21
-
22
-
23
-
24
-
25
-
26
-
27
-
28
-
29
-
30
-
31
-
32
-
33
-
34
-
35
-
36
-
37
-
38
-
39
-
40
-
41
-
42
-
43
-
44
-
45
-
46
-
47
-
48
-
49
-
50
-
51
-
52
-
53
-
54
-
55
-
56
-
57
-
58
-
59
-
60
-
61
-
62
-
63
-
64
-
65
-
66
-
67
-
68
-
69
-
70
-
71
-
72
-
73
-
74
-
75
-
76
-
77
-
78
-
79
-
80
-
81
-
82
-
83
-
84
-
85
-
86
-
87
-
88
-
 89
89 -
 90
90 -
 91
91 -
 92
92 -
 93
93 -
 94
94 -
 95
95 -
 96
96 -
 97
97 -
 98
98 -
 99
99 -
100
-
101
-
102
-
103
-
104
-
105
-
106
-
107
-
108
-
109
-
110
-
111
-
112
-
113
-
114
-
115
-
116
-
117
-
118
-
119
-
120
-
121
-
122
-
123
-
124
-
125
-
126
-
127
-
128
-
129
-
130
-
131
-
132
-
133
-
134
-
135
-
136
-
137
-
138
-
139
-
140
-
141
-
142
-
143
-
144
-
145
-
146
-
147
-
148
-
149
-
150
-
151
-
152
-
153
-
154
-
155
-
156
-
157
-
158
-
159
-
160
-
161
-
162
-
163
-
164
-
165
-
166
-
167
-
168
-
169
-
170
 |
 |

CloudBox User Manual
94
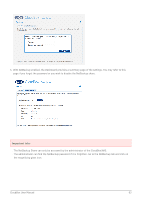
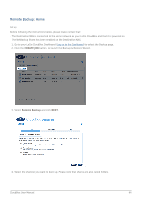
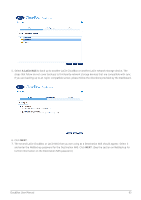
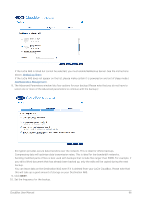
Remote Backup: Home
Set up
Before following the instructions below, please make certain that:
The Destination NAS is connected to the same network as your LaCie CloudBox and that it is powered on.
■
The NetBackup Share has been enabled on the Destination NAS.
■
Go to your LaCie CloudBox Dashboard (
Log on to the Dashboard
) to select the Backup page.
1.
Click the
CREATE JOB
button. to launch the Backup & Restore Wizard.
2.
Select
Remote Backup
and click
NEXT
.
3.
Select the share(s) you want to back up. Please note that shares are also called folders.
4.