Lexmark X644E User's Guide - Page 100
Scanner registration, Cleaning the scanner glass and backing material, Automatic Scanner Registration
 |
UPC - 734646093156
View all Lexmark X644E manuals
Add to My Manuals
Save this manual to your list of manuals |
Page 100 highlights
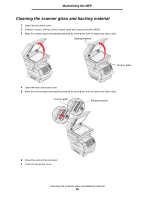
Maintaining the MFP Scanner registration Scanner Registration is a process to align the scan area with the paper location. Two pieces of either letter or A4 dark colored paper are needed for this process. 1 Turn the MFP off. 2 Open the document cover. 3 Clean the scanner glass and backing material. For more information, see Cleaning the scanner glass and backing material. 4 Hold down the number 2 and number 6 keys on the numeric pad. 5 Continue to hold the buttons, and turn the MFP on. Hold the buttons for about 10 seconds while the MFP is powering up, then release the buttons. The MFP will enter the Configuration menu. 6 Touch the down arrow until Automatic Scanner Registration appears. 7 Touch Automatic Scanner Registration. 8 Load the dark colored paper. a Place a blank piece of dark colored paper (A4 or Letter) on the flatbed. Position the paper so it is aligned with the upper corner of the plastic guides. b Close the document cover. c Place a blank piece of dark colored paper (A4 or Letter) in the ADF, and adjust the guides. Make sure the paper guides are snug against the paper; do not bend the paper. 9 Press Start. The registration process will scan the pages in the flatbed and ADF, and then display a sucess or failure message. If a failure message appeared, do another scanner registration, realign the paper, and verify each step as it is performed. If a second failure message appears, contact an authorized service representative. 10 Touch Exit Configuration Menu. The printer will reboot and return to the home page. Scanner registration 100
-
 1
1 -
2
-
3
-
4
-
5
-
6
-
7
-
8
-
9
-
10
-
11
-
12
-
13
-
14
-
15
-
16
-
17
-
18
-
19
-
20
-
21
-
22
-
23
-
24
-
25
-
26
-
27
-
28
-
29
-
30
-
31
-
32
-
33
-
34
-
35
-
36
-
37
-
38
-
39
-
40
-
41
-
42
-
43
-
44
-
45
-
46
-
47
-
48
-
49
-
50
-
51
-
52
-
53
-
54
-
55
-
56
-
57
-
58
-
59
-
60
-
61
-
62
-
63
-
64
-
65
-
66
-
67
-
68
-
69
-
70
-
71
-
72
-
73
-
74
-
75
-
76
-
77
-
78
-
79
-
80
-
81
-
82
-
83
-
84
-
85
-
86
-
87
-
88
-
89
-
90
-
91
-
92
-
93
-
94
-
 95
95 -
 96
96 -
 97
97 -
 98
98 -
 99
99 -
 100
100 -
 101
101 -
 102
102 -
 103
103 -
 104
104 -
 105
105 -
106
-
107
-
108
-
109
-
110
-
111
-
112
-
113
-
114
-
115
-
116
-
117
-
118
-
119
-
120
-
121
-
122
-
123
-
124
-
125
-
126
-
127
-
128
-
129
-
130
-
131
-
132
-
133
-
134
-
135
-
136
-
137
-
138
-
139
-
140
-
141
-
142
-
143
-
144
-
145
-
146
-
147
-
148
 |
 |
