Lexmark X644E User's Guide - Page 30
Setting collation options, Placing separator sheets between copies, Setting paper saving options
 |
UPC - 734646093156
View all Lexmark X644E manuals
Add to My Manuals
Save this manual to your list of manuals |
Page 30 highlights
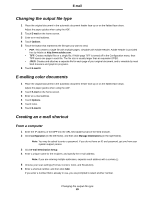
Copying Setting collation options If you want your copies collated, you don't need to do anything; this is the default setting. For example, two copies of three pages will print page 1, page 2, page 3, page 1, page 2, page 3. If you don't want your copies collated, you can change the setting. For example, two copies of three pages will print page 1, page 1, page 2, page 2, page 3, page 3. To turn collation off: 1 Place your original document in the automatic document feeder face-up, short-edge first. 2 Adjust the paper guides. 3 Touch Copy on the home screen. 4 Use the numeric keypad to enter the number of copies you want. 5 Touch Off if you do not want your copies collated. 6 Touch Copy It. Placing separator sheets between copies 1 Place your original document in the automatic document feeder face-up, short-edge first. 2 Adjust the paper guides. 3 Touch Copy on the home screen. 4 Touch Options. 5 Touch Separator Sheets. Note: Collation must be On for the separator sheets to be placed between copies. If Collation is Off, the separator sheets are inserted after the job has been printed. 6 Touch Copy It. Setting paper saving options 1 Place your original document in the automatic document feeder face-up, short-edge first. 2 Adjust the paper guides. 3 Touch Copy on the home screen. 4 Make your duplex choice. 5 Touch Options. 6 Touch Paper Saver. 7 Select the output you want. For example, if you have four portrait-oriented original documents that you want copied to the same side of one sheet, touch 4 on 1 Portrait. 8 Touch Print Page Borders if you want a box drawn around each page on the copies. 9 Touch Copy It. Setting collation options 30
-
 1
1 -
2
-
3
-
4
-
5
-
6
-
7
-
8
-
9
-
10
-
11
-
12
-
13
-
14
-
15
-
16
-
17
-
18
-
19
-
20
-
21
-
22
-
23
-
24
-
 25
25 -
 26
26 -
 27
27 -
 28
28 -
 29
29 -
 30
30 -
 31
31 -
 32
32 -
 33
33 -
 34
34 -
 35
35 -
36
-
37
-
38
-
39
-
40
-
41
-
42
-
43
-
44
-
45
-
46
-
47
-
48
-
49
-
50
-
51
-
52
-
53
-
54
-
55
-
56
-
57
-
58
-
59
-
60
-
61
-
62
-
63
-
64
-
65
-
66
-
67
-
68
-
69
-
70
-
71
-
72
-
73
-
74
-
75
-
76
-
77
-
78
-
79
-
80
-
81
-
82
-
83
-
84
-
85
-
86
-
87
-
88
-
89
-
90
-
91
-
92
-
93
-
94
-
95
-
96
-
97
-
98
-
99
-
100
-
101
-
102
-
103
-
104
-
105
-
106
-
107
-
108
-
109
-
110
-
111
-
112
-
113
-
114
-
115
-
116
-
117
-
118
-
119
-
120
-
121
-
122
-
123
-
124
-
125
-
126
-
127
-
128
-
129
-
130
-
131
-
132
-
133
-
134
-
135
-
136
-
137
-
138
-
139
-
140
-
141
-
142
-
143
-
144
-
145
-
146
-
147
-
148
 |
 |
