Lexmark X644E User's Guide - Page 17
Using the LCD touch-screen buttons, Sample screen one, Information on touch-screen buttons
 |
UPC - 734646093156
View all Lexmark X644E manuals
Add to My Manuals
Save this manual to your list of manuals |
Page 17 highlights
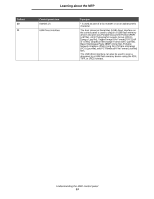
Learning about the MFP Using the LCD touch-screen buttons The following section provides information on navigating through several screens. Only a few are chosen to demonstrate the use of the buttons. Sample screen one Copy from Letter (8.5 x 11 in.) Copy to Letter (8.5 x 11 in.) Plain Paper Scale Auto (100%) Darkness Sides (Duplex) Portrait 1-sided to 1-sided Content Text Text/Photo Photograph Printed Image Scan the ADF Scan the flatbed Back Information on touch-screen buttons Button Button name Select button Function or description Touch the select button to have another screen appear with additional items. On the first screen, the user default setting is shown. Once the select button is touched, and the next screen appears, touching another item shown on the screen changes the user default setting. Left scroll decrease button Touch the left scroll decrease button to scroll to another value in decreasing order. Using the LCD touch-screen buttons 17
-
 1
1 -
2
-
3
-
4
-
5
-
6
-
7
-
8
-
9
-
10
-
11
-
 12
12 -
 13
13 -
 14
14 -
 15
15 -
 16
16 -
 17
17 -
 18
18 -
 19
19 -
 20
20 -
 21
21 -
 22
22 -
23
-
24
-
25
-
26
-
27
-
28
-
29
-
30
-
31
-
32
-
33
-
34
-
35
-
36
-
37
-
38
-
39
-
40
-
41
-
42
-
43
-
44
-
45
-
46
-
47
-
48
-
49
-
50
-
51
-
52
-
53
-
54
-
55
-
56
-
57
-
58
-
59
-
60
-
61
-
62
-
63
-
64
-
65
-
66
-
67
-
68
-
69
-
70
-
71
-
72
-
73
-
74
-
75
-
76
-
77
-
78
-
79
-
80
-
81
-
82
-
83
-
84
-
85
-
86
-
87
-
88
-
89
-
90
-
91
-
92
-
93
-
94
-
95
-
96
-
97
-
98
-
99
-
100
-
101
-
102
-
103
-
104
-
105
-
106
-
107
-
108
-
109
-
110
-
111
-
112
-
113
-
114
-
115
-
116
-
117
-
118
-
119
-
120
-
121
-
122
-
123
-
124
-
125
-
126
-
127
-
128
-
129
-
130
-
131
-
132
-
133
-
134
-
135
-
136
-
137
-
138
-
139
-
140
-
141
-
142
-
143
-
144
-
145
-
146
-
147
-
148
 |
 |
