Lexmark X644E User's Guide - Page 103
Access doors and trays, Understanding jam messages, Doors and trays, Path and locations
 |
UPC - 734646093156
View all Lexmark X644E manuals
Add to My Manuals
Save this manual to your list of manuals |
Page 103 highlights
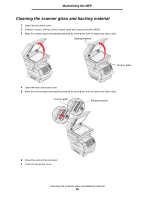
Clearing jams Access doors and trays The following illustration shows the path that print media travels through the MFP. The path varies depending on the input source (trays, multipurpose feeder, envelope feeder) you are using. The numbers in following illustration indicate the numbers that can appear on the control panel and designate the general area of a paper jam. 202 Paper Jam 23x Paper Jam 200 Paper Jam 201 Paper Jam 202 Paper Jam 23x Paper Jam 201 Paper Jam 200 Paper Jam 260 Paper Jam 260 Paper Jam 250 Paper Jam 250 Paper Jam 23x Paper Jam 23x Paper Jam 24x Paper Jam 24x Paper Jam Doors and trays Path and locations CAUTION: Floor-mounted configurations require additional furniture for stability. You must use either a printer stand or printer base if you are using a 2000-sheet drawer. Certain other configurations also must have a printer stand or printer base. More information is available on our Lexmark Web site at www.lexmark.com/multifunctionprinters. Understanding jam messages The following table lists the jam messages that can occur and the action necessary to clear the message. The jam message indicates the area where the jam occurred. However, it is best to clear the entire paper path to ensure you have cleared all possible jams. Message 200 and 201 Paper Jam Remove Cartridge 202 Paper Jam Open Rear Door 23x Paper Jam Check Duplex 24x Paper Jam Check Tray 250 Paper Jam Check MP Feeder What to do* Open the bottom then top front covers, remove the print cartridge, and then remove the jam. Open the rear door on the MFP, and remove the jam. Remove the duplex tray from the duplex unit, raise duplex deflector, and remove the jam. Open the rear duplex door, and remove the jam. Open each tray, and remove any jammed media. Remove all media from the multipurpose feeder, flex and stack the media, reload the multipurpose feeder, and adjust the guide. Access doors and trays 103
-
 1
1 -
2
-
3
-
4
-
5
-
6
-
7
-
8
-
9
-
10
-
11
-
12
-
13
-
14
-
15
-
16
-
17
-
18
-
19
-
20
-
21
-
22
-
23
-
24
-
25
-
26
-
27
-
28
-
29
-
30
-
31
-
32
-
33
-
34
-
35
-
36
-
37
-
38
-
39
-
40
-
41
-
42
-
43
-
44
-
45
-
46
-
47
-
48
-
49
-
50
-
51
-
52
-
53
-
54
-
55
-
56
-
57
-
58
-
59
-
60
-
61
-
62
-
63
-
64
-
65
-
66
-
67
-
68
-
69
-
70
-
71
-
72
-
73
-
74
-
75
-
76
-
77
-
78
-
79
-
80
-
81
-
82
-
83
-
84
-
85
-
86
-
87
-
88
-
89
-
90
-
91
-
92
-
93
-
94
-
95
-
96
-
97
-
 98
98 -
 99
99 -
 100
100 -
 101
101 -
 102
102 -
 103
103 -
 104
104 -
 105
105 -
 106
106 -
 107
107 -
 108
108 -
109
-
110
-
111
-
112
-
113
-
114
-
115
-
116
-
117
-
118
-
119
-
120
-
121
-
122
-
123
-
124
-
125
-
126
-
127
-
128
-
129
-
130
-
131
-
132
-
133
-
134
-
135
-
136
-
137
-
138
-
139
-
140
-
141
-
142
-
143
-
144
-
145
-
146
-
147
-
148
 |
 |
