Lexmark X644E User's Guide - Page 84
Installing memory or option cards, Accessing the MFP system board
 |
UPC - 734646093156
View all Lexmark X644E manuals
Add to My Manuals
Save this manual to your list of manuals |
Page 84 highlights
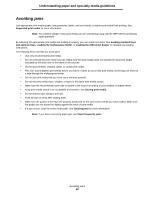
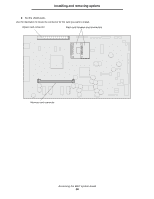
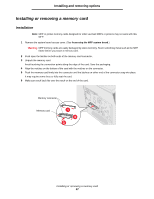
Installing and removing options Installing memory or option cards CAUTION: If you are installing memory or option cards sometime after setting up the MFP, turn the MFP off and unplug the power cord from the wall outlet before continuing. You can customize the MFP memory capacity and connectivity by adding optional cards. The instructions in this section help you install any of the following options: • Memory cards - MFP memory - Flash memory • Firmware cards - Bar Code - IPDS and SCS/TNe - PrintCryption™ • Other options - RS-232 serial interface card - Parallel 1284-B interface card - Ethernet 100BaseFX-SC - Ethernet 100BaseFX-MTRJ - 802g Wireless Adapter Accessing the MFP system board You must access the MFP system board to install MFP memory, flash memory, a firmware card, or an option card. Note: Use a Phillips screwdriver to remove the system board access cover. 1 Push the release latch, and lower the multipurpose feeder. 2 Push both release latches, and open the top front cover. Installing memory or option cards 84
-
 1
1 -
2
-
3
-
4
-
5
-
6
-
7
-
8
-
9
-
10
-
11
-
12
-
13
-
14
-
15
-
16
-
17
-
18
-
19
-
20
-
21
-
22
-
23
-
24
-
25
-
26
-
27
-
28
-
29
-
30
-
31
-
32
-
33
-
34
-
35
-
36
-
37
-
38
-
39
-
40
-
41
-
42
-
43
-
44
-
45
-
46
-
47
-
48
-
49
-
50
-
51
-
52
-
53
-
54
-
55
-
56
-
57
-
58
-
59
-
60
-
61
-
62
-
63
-
64
-
65
-
66
-
67
-
68
-
69
-
70
-
71
-
72
-
73
-
74
-
75
-
76
-
77
-
78
-
 79
79 -
 80
80 -
 81
81 -
 82
82 -
 83
83 -
 84
84 -
 85
85 -
 86
86 -
 87
87 -
 88
88 -
 89
89 -
90
-
91
-
92
-
93
-
94
-
95
-
96
-
97
-
98
-
99
-
100
-
101
-
102
-
103
-
104
-
105
-
106
-
107
-
108
-
109
-
110
-
111
-
112
-
113
-
114
-
115
-
116
-
117
-
118
-
119
-
120
-
121
-
122
-
123
-
124
-
125
-
126
-
127
-
128
-
129
-
130
-
131
-
132
-
133
-
134
-
135
-
136
-
137
-
138
-
139
-
140
-
141
-
142
-
143
-
144
-
145
-
146
-
147
-
148
 |
 |
