Netgear DG834Gv1 DG834Gv2 Reference Manual - Page 123
Leave the Authentication Protocol AH checkbox unchecked
 |
View all Netgear DG834Gv1 manuals
Add to My Manuals
Save this manual to your list of manuals |
Page 123 highlights
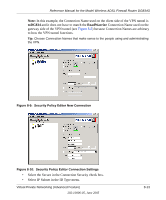
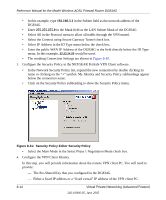
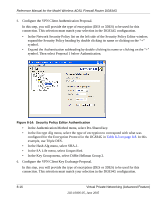
Reference Manual for the Model Wireless ADSL Firewall Router DG834G • Expand the Key Exchange subheading by double clicking its name or clicking on the "+" symbol. Then select Proposal 1 below Key Exchange. Figure 8-15: Security Policy Editor Key Exchange • In the SA Life menu, select Unspecified. • In the Compression menu, select None. • Check the Encapsulation Protocol (ESP) checkbox. • In the Encrypt Alg menu, select the type of encryption to correspond with what was configured for the Encryption Protocol in the DG834G in Table 8-3 on page 8-8. In this example, use Triple DES. • In the Hash Alg menu, select SHA-1. • In the Encapsulation menu, select Tunnel. • Leave the Authentication Protocol (AH) checkbox unchecked. 7. Save the VPN Client Settings. From the File menu at the top of the Security Policy Editor window, select Save. After you have configured and saved the VPN client information, your PC will automatically open the VPN connection when you attempt to access any IP addresses in the range of the remote VPN router's LAN. Virtual Private Networking (Advanced Feature) 202-10006-05, June 2005 8-17
-
 1
1 -
2
-
3
-
4
-
5
-
6
-
7
-
8
-
9
-
10
-
11
-
12
-
13
-
14
-
15
-
16
-
17
-
18
-
19
-
20
-
21
-
22
-
23
-
24
-
25
-
26
-
27
-
28
-
29
-
30
-
31
-
32
-
33
-
34
-
35
-
36
-
37
-
38
-
39
-
40
-
41
-
42
-
43
-
44
-
45
-
46
-
47
-
48
-
49
-
50
-
51
-
52
-
53
-
54
-
55
-
56
-
57
-
58
-
59
-
60
-
61
-
62
-
63
-
64
-
65
-
66
-
67
-
68
-
69
-
70
-
71
-
72
-
73
-
74
-
75
-
76
-
77
-
78
-
79
-
80
-
81
-
82
-
83
-
84
-
85
-
86
-
87
-
88
-
89
-
90
-
91
-
92
-
93
-
94
-
95
-
96
-
97
-
98
-
99
-
100
-
101
-
102
-
103
-
104
-
105
-
106
-
107
-
108
-
109
-
110
-
111
-
112
-
113
-
114
-
115
-
116
-
117
-
 118
118 -
 119
119 -
 120
120 -
 121
121 -
 122
122 -
 123
123 -
 124
124 -
 125
125 -
 126
126 -
 127
127 -
 128
128 -
129
-
130
-
131
-
132
-
133
-
134
-
135
-
136
-
137
-
138
-
139
-
140
-
141
-
142
-
143
-
144
-
145
-
146
-
147
-
148
-
149
-
150
-
151
-
152
-
153
-
154
-
155
-
156
-
157
-
158
-
159
-
160
-
161
-
162
-
163
-
164
-
165
-
166
-
167
-
168
-
169
-
170
-
171
-
172
-
173
-
174
-
175
-
176
-
177
-
178
-
179
-
180
-
181
-
182
-
183
-
184
-
185
-
186
-
187
-
188
-
189
-
190
-
191
-
192
-
193
-
194
-
195
-
196
-
197
-
198
-
199
-
200
-
201
-
202
-
203
-
204
-
205
-
206
-
207
-
208
-
209
-
210
-
211
-
212
-
213
-
214
-
215
-
216
-
217
-
218
-
219
-
220
-
221
-
222
-
223
-
224
-
225
-
226
-
227
-
228
-
229
-
230
-
231
-
232
-
233
-
234
-
235
-
236
-
237
-
238
-
239
-
240
-
241
-
242
-
243
-
244
-
245
-
246
-
247
-
248
-
249
-
250
-
251
-
252
-
253
-
254
-
255
-
256
-
257
-
258
-
259
-
260
-
261
-
262
-
263
-
264
-
265
-
266
-
267
-
268
 |
 |
