Netgear DG834Gv1 DG834Gv2 Reference Manual - Page 124
Check the VPN Connection., and then click OK.
 |
View all Netgear DG834Gv1 manuals
Add to My Manuals
Save this manual to your list of manuals |
Page 124 highlights
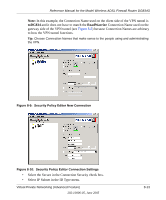
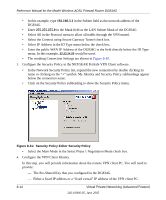
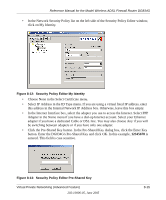
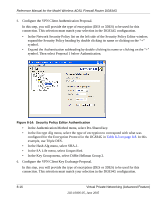
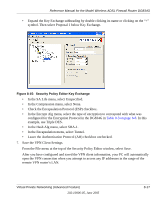
Reference Manual for the Model Wireless ADSL Firewall Router DG834G 8. Check the VPN Connection. To check the VPN Connection, you can initiate a request from the remote PC to the DG834G's network by using the "Connect" option in the NETGEAR ProSafe menu bar. The NETGEAR ProSafe client will report the results of the attempt to connect. Since the remote PC has a dynamically assigned WAN IP address, it must initiate the request. To perform a ping test using our example, start from the remote PC: a. Establish an Internet connection from the PC. b. On the Windows taskbar, click the Start button, and then click Run. c. Type ping -t 192.168.3.1 , and then click OK. Figure 8-16: Running a Ping test to the LAN from the PC This will cause a continuous ping to be sent to the first DG834G. After between several seconds and two minutes, the ping response should change from "timed out" to "reply." Figure 8-17: Ping test results Once the connection is established, you can open the browser of the PC and enter the LAN IP address of the remote DG834G. After a short wait, you should see the login screen of the Router (unless another PC already has the DG834G management interface open). 8-18 Virtual Private Networking (Advanced Feature) 202-10006-05, June 2005
-
 1
1 -
2
-
3
-
4
-
5
-
6
-
7
-
8
-
9
-
10
-
11
-
12
-
13
-
14
-
15
-
16
-
17
-
18
-
19
-
20
-
21
-
22
-
23
-
24
-
25
-
26
-
27
-
28
-
29
-
30
-
31
-
32
-
33
-
34
-
35
-
36
-
37
-
38
-
39
-
40
-
41
-
42
-
43
-
44
-
45
-
46
-
47
-
48
-
49
-
50
-
51
-
52
-
53
-
54
-
55
-
56
-
57
-
58
-
59
-
60
-
61
-
62
-
63
-
64
-
65
-
66
-
67
-
68
-
69
-
70
-
71
-
72
-
73
-
74
-
75
-
76
-
77
-
78
-
79
-
80
-
81
-
82
-
83
-
84
-
85
-
86
-
87
-
88
-
89
-
90
-
91
-
92
-
93
-
94
-
95
-
96
-
97
-
98
-
99
-
100
-
101
-
102
-
103
-
104
-
105
-
106
-
107
-
108
-
109
-
110
-
111
-
112
-
113
-
114
-
115
-
116
-
117
-
118
-
 119
119 -
 120
120 -
 121
121 -
 122
122 -
 123
123 -
 124
124 -
 125
125 -
 126
126 -
 127
127 -
 128
128 -
 129
129 -
130
-
131
-
132
-
133
-
134
-
135
-
136
-
137
-
138
-
139
-
140
-
141
-
142
-
143
-
144
-
145
-
146
-
147
-
148
-
149
-
150
-
151
-
152
-
153
-
154
-
155
-
156
-
157
-
158
-
159
-
160
-
161
-
162
-
163
-
164
-
165
-
166
-
167
-
168
-
169
-
170
-
171
-
172
-
173
-
174
-
175
-
176
-
177
-
178
-
179
-
180
-
181
-
182
-
183
-
184
-
185
-
186
-
187
-
188
-
189
-
190
-
191
-
192
-
193
-
194
-
195
-
196
-
197
-
198
-
199
-
200
-
201
-
202
-
203
-
204
-
205
-
206
-
207
-
208
-
209
-
210
-
211
-
212
-
213
-
214
-
215
-
216
-
217
-
218
-
219
-
220
-
221
-
222
-
223
-
224
-
225
-
226
-
227
-
228
-
229
-
230
-
231
-
232
-
233
-
234
-
235
-
236
-
237
-
238
-
239
-
240
-
241
-
242
-
243
-
244
-
245
-
246
-
247
-
248
-
249
-
250
-
251
-
252
-
253
-
254
-
255
-
256
-
257
-
258
-
259
-
260
-
261
-
262
-
263
-
264
-
265
-
266
-
267
-
268
 |
 |
