Netgear WNDAP660 Reference Manual - Page 34
Test Basic Wireless Connectivity, Apply
 |
View all Netgear WNDAP660 manuals
Add to My Manuals
Save this manual to your list of manuals |
Page 34 highlights
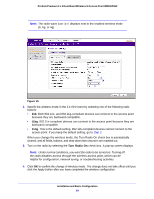
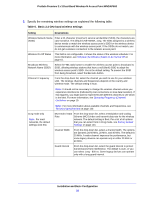
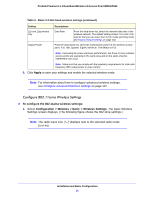
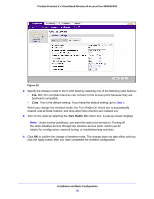
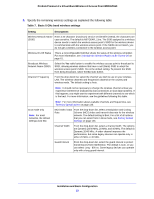
ProSafe Premium 3 x 3 Dual-Band Wireless-N Access Point WNDAP660 Table 7. Basic 5 GHz band wireless settings (continued) Setting 11a mode only Output Power Descriptions Data Rate From the drop-down list, select the transmit data rate of the wireless network. The default setting is Best. For a list of all options that you can select from in 11a mode, see Factory Default Settings on page 143. From the drop-down list, select the transmission power of the wireless access point: Full, Half, Quarter, Eighth, Minimum. The default is Full. Note: Increasing the power improves performance, but if two or more wireless access points are operating in the same area and on the same channel, interference can occur. Note: Make sure that you comply with the regulatory requirements for total radio frequency (RF) output power in your country. 6. Click Apply to save your settings and enable the selected wireless mode. Note: For information about how to configure advanced wireless settings, see Configure Advanced Wireless Settings on page 107. Test Basic Wireless Connectivity After you have configured the wireless access point as explained in the previous sections, test the computers on your LAN for wireless connectivity before you position and mount the wireless access point at its permanent position. To test for wireless connectivity: 1. Configure the 802.11b/g/n and 802.11a/n wireless adapters of your computers so that they all have the same SSID and channel that you have configured on the wireless access point. 2. Verify that your computers have a wireless link to the wireless access point. If you have enabled the DHCP server on the wireless access point, verify that your computers are able to obtain an IP address through DHCP from the wireless access point. 3. Verify network connectivity by using a browser such as Internet Explorer 6.0 or later or Mozilla Firefox 1.5 or later to browse the Internet, or check for file and printer access on your network. Note: If you have trouble connecting to the wireless access point, see Chapter 6, Troubleshooting. Installation and Basic Configuration 34
-
 1
1 -
2
-
3
-
4
-
5
-
6
-
7
-
8
-
9
-
10
-
11
-
12
-
13
-
14
-
15
-
16
-
17
-
18
-
19
-
20
-
21
-
22
-
23
-
24
-
25
-
26
-
27
-
28
-
 29
29 -
 30
30 -
 31
31 -
 32
32 -
 33
33 -
 34
34 -
 35
35 -
 36
36 -
 37
37 -
 38
38 -
 39
39 -
40
-
41
-
42
-
43
-
44
-
45
-
46
-
47
-
48
-
49
-
50
-
51
-
52
-
53
-
54
-
55
-
56
-
57
-
58
-
59
-
60
-
61
-
62
-
63
-
64
-
65
-
66
-
67
-
68
-
69
-
70
-
71
-
72
-
73
-
74
-
75
-
76
-
77
-
78
-
79
-
80
-
81
-
82
-
83
-
84
-
85
-
86
-
87
-
88
-
89
-
90
-
91
-
92
-
93
-
94
-
95
-
96
-
97
-
98
-
99
-
100
-
101
-
102
-
103
-
104
-
105
-
106
-
107
-
108
-
109
-
110
-
111
-
112
-
113
-
114
-
115
-
116
-
117
-
118
-
119
-
120
-
121
-
122
-
123
-
124
-
125
-
126
-
127
-
128
-
129
-
130
-
131
-
132
-
133
-
134
-
135
-
136
-
137
-
138
-
139
-
140
-
141
-
142
-
143
-
144
-
145
-
146
-
147
-
148
-
149
-
150
-
151
-
152
-
153
-
154
-
155
-
156
-
157
-
158
-
159
-
160
-
161
-
162
-
163
-
164
-
165
-
166
-
167
-
168
-
169
-
170
-
171
-
172
-
173
-
174
 |
 |