Nokia N97 Nokia N97 User Guide in English and Spanish - Page 154
Nokia battery authentication guidelines, Authenticate hologram
 |
UPC - 758478016480
View all Nokia N97 manuals
Add to My Manuals
Save this manual to your list of manuals |
Page 154 highlights
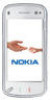
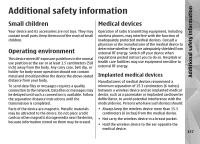
Battery and charger information Leak. Do not dismantle, cut, open, crush, bend, puncture, or shred cells or batteries. In the event of a battery leak, prevent battery liquid contact with skin or eyes. If this happens, flush the affected areas immediately with water, or seek medical help. Damage. Do not modify, remanufacture, attempt to insert foreign objects into the battery or immerse or expose it to water or other liquids. Batteries may explode if damaged. Correct use. Use the battery only for its intended purpose. Improper battery use may result in a fire, explosion, or other hazard. If the device or battery is dropped, especially on a hard surface, and you believe the battery has been damaged, take it to a service center for inspection before continuing to use it. Never use any charger or battery that is damaged. Keep your battery out of the reach of small children. Nokia battery authentication guidelines Always use original Nokia batteries for your safety. To check that you are getting an original Nokia battery, purchase it from a Nokia authorized service center or dealer, and inspect the hologram label using the following steps: Authenticate hologram 1. When you look at the hologram on the label, you should see the Nokia connecting hands symbol from one angle and the Nokia Original Enhancements logo when looking from another angle. 2. When you angle the hologram left, right, down and up, you should see 1, 2, 3 and 4 dots on each side respectively. Successful completion of the steps is not a total assurance of the authenticity of the battery. If you cannot confirm authenticity or if you have any reason to believe that your Nokia battery with the hologram on the label is not an authentic Nokia battery, you should refrain from using it, and take it to the nearest Nokia authorized service center or dealer for assistance. For additional information, refer to the warranty and reference leaflet included with your Nokia device. 154
-
 1
1 -
2
-
3
-
4
-
5
-
6
-
7
-
8
-
9
-
10
-
11
-
12
-
13
-
14
-
15
-
16
-
17
-
18
-
19
-
20
-
21
-
22
-
23
-
24
-
25
-
26
-
27
-
28
-
29
-
30
-
31
-
32
-
33
-
34
-
35
-
36
-
37
-
38
-
39
-
40
-
41
-
42
-
43
-
44
-
45
-
46
-
47
-
48
-
49
-
50
-
51
-
52
-
53
-
54
-
55
-
56
-
57
-
58
-
59
-
60
-
61
-
62
-
63
-
64
-
65
-
66
-
67
-
68
-
69
-
70
-
71
-
72
-
73
-
74
-
75
-
76
-
77
-
78
-
79
-
80
-
81
-
82
-
83
-
84
-
85
-
86
-
87
-
88
-
89
-
90
-
91
-
92
-
93
-
94
-
95
-
96
-
97
-
98
-
99
-
100
-
101
-
102
-
103
-
104
-
105
-
106
-
107
-
108
-
109
-
110
-
111
-
112
-
113
-
114
-
115
-
116
-
117
-
118
-
119
-
120
-
121
-
122
-
123
-
124
-
125
-
126
-
127
-
128
-
129
-
130
-
131
-
132
-
133
-
134
-
135
-
136
-
137
-
138
-
139
-
140
-
141
-
142
-
143
-
144
-
145
-
146
-
147
-
148
-
 149
149 -
 150
150 -
 151
151 -
 152
152 -
 153
153 -
 154
154 -
 155
155 -
 156
156 -
 157
157 -
 158
158 -
 159
159 -
160
-
161
-
162
-
163
-
164
-
165
-
166
-
167
-
168
-
169
-
170
-
171
-
172
-
173
-
174
-
175
-
176
-
177
-
178
-
179
-
180
-
181
-
182
-
183
-
184
-
185
-
186
-
187
-
188
-
189
-
190
-
191
-
192
-
193
-
194
-
195
-
196
-
197
-
198
-
199
-
200
-
201
-
202
-
203
-
204
-
205
-
206
-
207
-
208
-
209
-
210
-
211
-
212
-
213
-
214
-
215
-
216
-
217
-
218
-
219
-
220
-
221
-
222
-
223
-
224
-
225
-
226
-
227
-
228
-
229
-
230
-
231
-
232
-
233
-
234
-
235
-
236
-
237
-
238
-
239
-
240
-
241
-
242
-
243
-
244
-
245
-
246
-
247
-
248
-
249
-
250
-
251
-
252
-
253
-
254
-
255
-
256
-
257
-
258
-
259
-
260
-
261
-
262
-
263
-
264
-
265
-
266
-
267
-
268
-
269
-
270
-
271
-
272
-
273
-
274
-
275
-
276
-
277
-
278
-
279
-
280
-
281
-
282
-
283
-
284
-
285
-
286
-
287
-
288
-
289
-
290
-
291
-
292
-
293
-
294
-
295
-
296
-
297
-
298
-
299
-
300
-
301
-
302
-
303
-
304
-
305
-
306
-
307
-
308
-
309
-
310
-
311
-
312
-
313
-
314
-
315
-
316
-
317
-
318
-
319
-
320
-
321
-
322
-
323
-
324
-
325
-
326
-
327
-
328
-
329
-
330
-
331
-
332
-
333
-
334
-
335
-
336
-
337
-
338
-
339
-
340
-
341
-
342
-
343
-
344
-
345
-
346
-
347
-
348
-
349
-
350
-
351
-
352
-
353
-
354
-
355
-
356
-
357
 |
 |