Samsung SM-T560NU User Manual - Page 14
Set Up Your NOOK Account, Registering an Existing NOOK Account, Creating a New NOOK Account
 |
View all Samsung SM-T560NU manuals
Add to My Manuals
Save this manual to your list of manuals |
Page 14 highlights
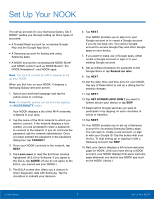
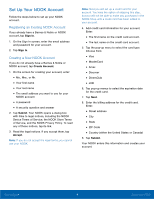
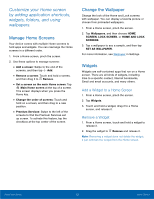
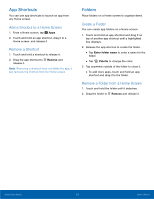
Set Up Your NOOK Account Follow the steps below to set up your NOOK account. Registering an Existing NOOK Account If you already have a Barnes & Noble or NOOK account, tap Sign In. 1. On the Sign In screen, enter the email address and password for your account. 2. Tap Sign In. Creating a New NOOK Account If you do not already have a Barnes & Noble or NOOK account, tap Create Account. 1. On the screen for creating your account, enter: • Ms., Mrs., or Mr. • Your first name • Your last name • The email address you want to use for your NOOK account • A password • A security question and answer 2. Tap Submit. Your NOOK opens a dialog box with links to legal notices, including the NOOK Device Terms of Service, the NOOK Store Terms of Service, and the NOOK Privacy Policy. To read any of these notices, tap its link. 3. Read the legal notices. If you accept them, tap Accept. Note: If you do not accept the legal terms, you cannot use your NOOK. Note: Next you will set up a credit card for your account. You have the option of skipping this step, but you will not be able to make any purchases in the NOOK Shop until a credit card has been added to your account. 4. Add credit card information for your account. Enter: • The first name on the credit card account. • The last name on the credit card account. 5. Tap the pop-up menu to select the card type. Choose from: • Visa • MasterCard • Amex • Discover • DinersClub • JCB 6. Tap pop-up menus to select the expiration date for the credit card. 7. Tap Next. 8. Enter the billing address for the credit card. Enter: • Street address • City • State • ZIP Code • Country (either the United States or Canada) 9. Tap Submit. Your NOOK enters this information and creates your account. Getting Started 8 Set Up Your NOOK
-
 1
1 -
2
-
3
-
4
-
5
-
6
-
7
-
8
-
 9
9 -
 10
10 -
 11
11 -
 12
12 -
 13
13 -
 14
14 -
 15
15 -
 16
16 -
 17
17 -
 18
18 -
 19
19 -
20
-
21
-
22
-
23
-
24
-
25
-
26
-
27
-
28
-
29
-
30
-
31
-
32
-
33
-
34
-
35
-
36
-
37
-
38
-
39
-
40
-
41
-
42
-
43
-
44
-
45
-
46
-
47
-
48
-
49
-
50
-
51
-
52
-
53
-
54
-
55
-
56
-
57
-
58
-
59
-
60
-
61
-
62
-
63
-
64
-
65
-
66
-
67
-
68
-
69
-
70
-
71
-
72
-
73
-
74
-
75
-
76
-
77
-
78
-
79
-
80
-
81
-
82
-
83
-
84
-
85
-
86
-
87
-
88
-
89
-
90
-
91
-
92
-
93
-
94
-
95
-
96
-
97
-
98
-
99
-
100
-
101
-
102
-
103
-
104
-
105
-
106
-
107
-
108
-
109
-
110
-
111
-
112
-
113
-
114
-
115
-
116
-
117
-
118
-
119
-
120
-
121
-
122
-
123
 |
 |