Sony HDWS280 Product Manual (Operation Manual 1st Edition (Revised 5)) - Page 15
Tape Transport
 |
View all Sony HDWS280 manuals
Add to My Manuals
Save this manual to your list of manuals |
Page 15 highlights
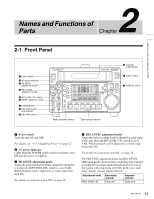
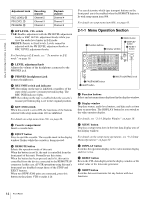
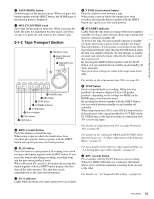
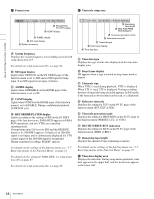
Chapter 2 Names and Functions of Parts g PAGE/HOME button Switches pages of the function menu. When you press this button together with the SHIFT button, the HOME page of the function menu is displayed. h MULTI CONTROL knob Sets value for the menu or timecode. When you press the knob, the units for adjustment become larger, and when you press it again, the unit return to the original value. 2-1-2 Tape Transport Section 9 PREROLL button 0 Search dial and indicator PREROLL qa JOG/SHUTTLE button JOG/SHUTTLE REW PLAY F FWD STOP REC PAUSE STANDBY 8 PAUSE button 7 REC button 6 STOP button 5 STANDBY indicator 4 F FWD button 3 Servo indicator 2 PLAY button 1 REW button a REW (rewind) button Press this button to rewind the tape. When using a tape on which shot marks have been recorded, pressing this button together with the SHIFT button cues up the previous shot mark position. b PLAY button Press this button to start playback. Recording starts when you press this button together with the REC button. If you press this button only during recording, recording stops, and the unit enters playback mode. When a Betacam SX cassette is being played, pressing this button together with the SHIFT button displays the shot data on the video monitor. The shot data can be superimposed on the character information. c Servo indicator Lights while the drum servo and capstan servo are locked. d F FWD (fast forward) button Press this button to fast-forward a tape. When using a tape on which shot marks have been recorded, pressing this button together with the SHIFT button cues up the next shot mark position. e STANDBY indicator Lights while the tape drum is rotating with tension applied (standby on). It goes dark when the drum stops rotating and tension is released (standby off). To protect the tape, the unit normally changes to standby off mode when stop or pause mode continues for longer than eight minutes. If you operate a search dial or any of the tape transport buttons other than the PAUSE button while the unit is in standby off mode, the unit changes to standby on mode and enters the mode called by the button or dial that you pressed. By pressing the SHIFT button together with the STOP button, you can switch between standby on and standby off mode manually. Tape protection settings are made with setup menu items 500s. For details on the setup menu items 500s, see page 69. f STOP button Press to stop playback or recording. When you stop playback, the monitor displays E-E or still picture playback, depending on the settings for PB/EE on the HOME page of the function menu. By pressing this button together with the SHIFT button, you can switch between standby on and standby off manually. When setup menu item 105 is set to ON, this button flashes if the reference video signal specified by OUT REF on the P2 VIDEO page of the function menu or setup menu item 309 is not being input. For details on setup menu item 105, see page 66 and for 309, see page 68. For details on the settings for PB/EE and OUT REF of the function menu, see "3-7 Basic Operations of the Function Menu" on page 31. For more details on the reference video signal settings, see "3-5 Setting Reference Video Signals" on page 27. g REC (record) button Press together with the PLAY button to start recording. When two HDW-S280 units are connected, this button allows you to perform sequential recording from one unit to the other. For details, see "4-3 Sequential Recording" on page 41. 15 Front Panel
-
 1
1 -
2
-
3
-
4
-
5
-
6
-
7
-
8
-
9
-
 10
10 -
 11
11 -
 12
12 -
 13
13 -
 14
14 -
 15
15 -
 16
16 -
 17
17 -
 18
18 -
 19
19 -
 20
20 -
21
-
22
-
23
-
24
-
25
-
26
-
27
-
28
-
29
-
30
-
31
-
32
-
33
-
34
-
35
-
36
-
37
-
38
-
39
-
40
-
41
-
42
-
43
-
44
-
45
-
46
-
47
-
48
-
49
-
50
-
51
-
52
-
53
-
54
-
55
-
56
-
57
-
58
-
59
-
60
-
61
-
62
-
63
-
64
-
65
-
66
-
67
-
68
-
69
-
70
-
71
-
72
-
73
-
74
-
75
-
76
-
77
-
78
-
79
-
80
-
81
-
82
-
83
-
84
-
85
-
86
-
87
-
88
-
89
-
90
-
91
-
92
-
93
-
94
 |
 |
