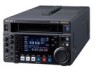
Sony HDWS280 Product Manual (Operation Manual 1st Edition (Revised 5)) - Page 92
R/P LEVEL CTL switch
 |
View all Sony HDWS280 manuals
Add to My Manuals
Save this manual to your list of manuals |
Page 92 highlights
Appendixes Battery power 22 DC powe 22 Supplying power 22 POWER switch 20 Power switch 13 Preroll 47 Changing the preroll time 47 PREROLL button 16 Preview 48 R R/P LEVEL CTL switch 14 Rear panel 20 REC button 15 REC INHI indicator 14 REC INHI switch 14 REC LEVEL adjustment knob 13 REC RUN/FREE RUN indication 18 RECORDER/PLAYER display 18 Recording 40 Preparations 40 REF. INPUT connector 20 Reference timecode 18 Reference video signal 27 Remaining battery power display 17 REMOTE 9P connector 20 REMOTE button 14 REMOTE connector 20 RESET button 14 REW button 15 S SDI input display 18 SDI OUT connector 21 Search dial 16 Search indicator 16 Sequential recording 41 Servo indicator 15 Setup menu 60 Setup menus Basic detup menu 63 Configuration 60 Displaying 60 Extended setup menu 66 Menu bank 62 Operations 60 Setting 61 SHIFT button 14 Shot data 51 Displaying 51 Shot mark 51 Cueing up 51 Recording 51 Shuttle mode 44 Stand 24 Replacing 24 Using 24 STANDBY indicator 15 STOP button 15 Stop code 52 Checking the recorded stop code 53 Detecting 52 Erasing 54 Recording 53 Stop code display 17 Superimposed data 19 System configurations 11 System frequency 18 Switching 62 T Tape slack 79 Tape transport section 15 TIME CODE connector 20 Time data display area 18 Time data type 18 Timecode 28 Recording 28 Setting an initial timecode value 29 Setting to the current time 29 User bits 29 Timecode generation mode 18 Timecode setup area 18 Timecode type 18 U UMID 55 Display 58 Output settings 58 Recording 55 V Video monitor display 19 W Warning message 82 Setting the warning message to be detected 82 92 Index
-
 1
1 -
2
-
3
-
4
-
5
-
6
-
7
-
8
-
9
-
10
-
11
-
12
-
13
-
14
-
15
-
16
-
17
-
18
-
19
-
20
-
21
-
22
-
23
-
24
-
25
-
26
-
27
-
28
-
29
-
30
-
31
-
32
-
33
-
34
-
35
-
36
-
37
-
38
-
39
-
40
-
41
-
42
-
43
-
44
-
45
-
46
-
47
-
48
-
49
-
50
-
51
-
52
-
53
-
54
-
55
-
56
-
57
-
58
-
59
-
60
-
61
-
62
-
63
-
64
-
65
-
66
-
67
-
68
-
69
-
70
-
71
-
72
-
73
-
74
-
75
-
76
-
77
-
78
-
79
-
80
-
81
-
82
-
83
-
84
-
85
-
86
-
 87
87 -
 88
88 -
 89
89 -
 90
90 -
 91
91 -
 92
92 -
 93
93 -
 94
94
 |
 |
