Sony HDWS280 Product Manual (Operation Manual 1st Edition (Revised 5)) - Page 46
Modifying and Deleting Edit, Points
 |
View all Sony HDWS280 manuals
Add to My Manuals
Save this manual to your list of manuals |
Page 46 highlights
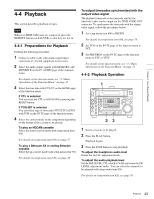
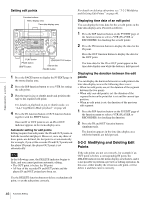
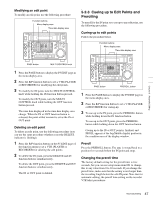
Chapter 5 Assemble Editing Setting edit points Function buttons Menu display area Time data display area HDW-S280 EJECT PB LEVEL 13 REC LEVEL 13 24 24 R/P LEVEL CTL VAR LEVEL PRESET PHONES REC INHI ON OFF KEY INHI ON OFF SHIFT PAGE HOME CHARACTR ON PB/EE PB CONFI ENABLE CTL/TC TC EMPH EMPH EMPH EMPH 0 0 -10 -10 -20 -20 -30 -30 -40 -40 1 23 4 HD INPUT : ANA CH1 IN : -60 CH2 IN : -4 COND OUT : +4 MONI L : 1 BANK 2 MONI R : 2 D-STOP DOLBY NR P ROLL ASSEMBLE 59.94i SDI ASMBL CONFI ON RECORDER OFF LTC DF VITC LTC EXT-LTC R-RUN REM:00M TCG SET HOME 00:00:00:00. DISPLAY MULTI CONTROL REMOTE MENU RESET PREROLL PUSH PITCH CTL JOG/SHUTTLE REW PLAY F FWD STOP REC PAUSE STANDBY PLAY button PAGE button SHIFT button JOG/SHUTTLE button Search dial PAUSE button 1 Press the PAGE button to display the P5 EDIT page in the menu display area. 2 Press the R/P function button to set a VTR for setting the edit points. 3 Play the tape in jog or shuttle mode and position the tape to the required edit point. For details on playback in jog or shuttle mode, see "4-4-3 Jog/Shuttle Mode playback" on page 44. 4 Press the IN function button or OUT function button together with the SHIFT button. Once an IN or OUT point is set, an IN or OUT indicator appears in the menu display area. Automatic setting for edit points Editing requires four edit points: the IN and OUT points on both the recorder and player. However, once any three of these points are defined, the last point is set automatically. For example, if you set the recorder IN and OUT points and the player IN point, the player OUT point is set automatically. Note In the following cases, the DELETE indicator begins to flash, and you cannot perform automatic editing. • The OUT point is before the IN point. • All four of the recorder IN and OUT points and the player IN and OUT points have been set. Use the DELETE function button to delete a redundant edit point, or set the edit points correctly. For details on deleting edit points, see "5-2-2 Modifying and Deleting Edit Points" on page 46. Displaying time data of an edit point You can display the time data for the set edit points in the time data display area. Proceed as follows: 1 Press the R/P function button on the P5 EDIT page of the function menu to select a VTR (PLAYER or RECORDER) for checking the set edit points. 2 Press the IN function button to display the data for the IN point. Press the OUT function button to display the data for the OUT point. The time data for the IN or OUT point appear in the time data display area while the button is held pressed. Displaying the duration between the edit points You can display the duration between two edit points in the time data display area in the following three cases: • When two edit points are set: the duration of the segment between the two points • When only one edit point is set: the duration of the segment between the point that is set and the current tape position. • When no edit point is set: the duration of the previous edit segment 1 Press the R/P function button on the P5 EDIT page of the function menu to select a VTR (PLAYER or RECORDER) for checking the duration. 2 Press the IN and OUT function buttons simultaneously. The duration appears in the time data display area while the buttons are held pressed. 5-2-2 Modifying and Deleting Edit Points If the edit points are not set correctly, for example if an OUT point is before a corresponding IN point, the DELETE indicator in the menu display area flashes, and it is not possible to perform a preview or editing operation. In this case, either modify the erroneous edit point, or first delete it and then enter it correctly. 46 Automatic Editing
-
 1
1 -
2
-
3
-
4
-
5
-
6
-
7
-
8
-
9
-
10
-
11
-
12
-
13
-
14
-
15
-
16
-
17
-
18
-
19
-
20
-
21
-
22
-
23
-
24
-
25
-
26
-
27
-
28
-
29
-
30
-
31
-
32
-
33
-
34
-
35
-
36
-
37
-
38
-
39
-
40
-
 41
41 -
 42
42 -
 43
43 -
 44
44 -
 45
45 -
 46
46 -
 47
47 -
 48
48 -
 49
49 -
 50
50 -
 51
51 -
52
-
53
-
54
-
55
-
56
-
57
-
58
-
59
-
60
-
61
-
62
-
63
-
64
-
65
-
66
-
67
-
68
-
69
-
70
-
71
-
72
-
73
-
74
-
75
-
76
-
77
-
78
-
79
-
80
-
81
-
82
-
83
-
84
-
85
-
86
-
87
-
88
-
89
-
90
-
91
-
92
-
93
-
94
 |
 |
