Sony HDWS280 Product Manual (Operation Manual 1st Edition (Revised 5)) - Page 47
Cueing up to Edit Points and, Prerolling
 |
View all Sony HDWS280 manuals
Add to My Manuals
Save this manual to your list of manuals |
Page 47 highlights
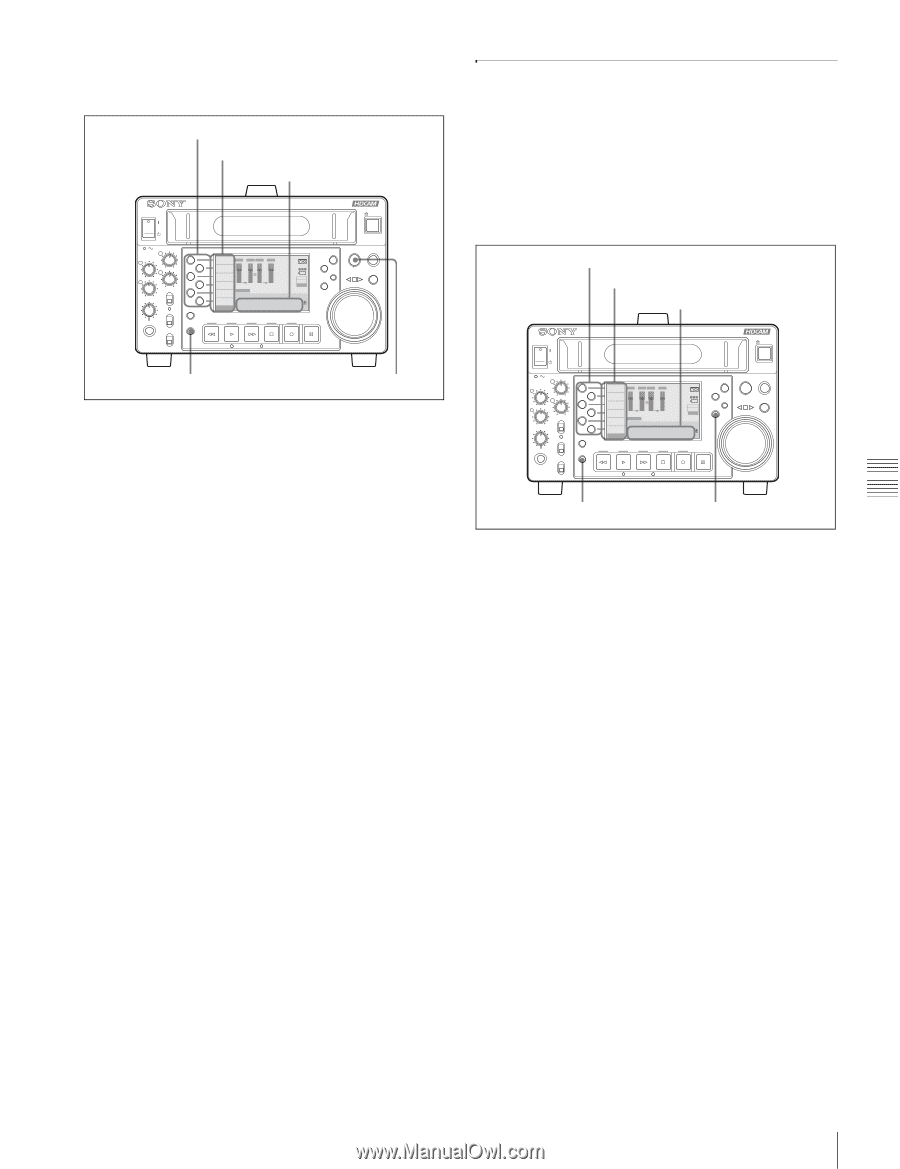
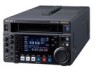
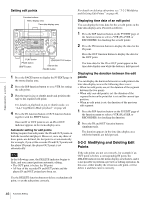
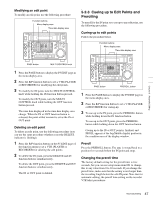
Chapter 5 Assemble Editing Modifying an edit point To modify an edit point, use the following procedure: Function buttons Menu display area Time data display area HDW-S280 EJECT PB LEVEL 13 REC LEVEL 13 24 24 R/P LEVEL CTL VAR LEVEL PRESET PHONES REC INHI ON OFF KEY INHI ON OFF SHIFT PAGE HOME CHARACTR ON PB/EE PB CONFI ENABLE CTL/TC TC EMPH EMPH EMPH EMPH 0 0 -10 -10 -20 -20 -30 -30 -40 -40 1 23 4 HD INPUT : ANA CH1 IN : -60 CH2 IN : -4 COND OUT : +4 MONI L : 1 BANK 2 MONI R : 2 D-STOP DOLBY NR P ROLL ASSEMBLE 59.94i SDI ASMBL CONFI ON RECORDER OFF LTC DF VITC LTC EXT-LTC R-RUN REM:00M TCG SET HOME 00:00:00:00. DISPLAY MULTI CONTROL REMOTE MENU RESET PREROLL PUSH PITCH CTL JOG/SHUTTLE REW PLAY F FWD STOP REC PAUSE STANDBY PAGE button MULTI CONTROL knob 1 Press the PAGE button to display the P5 EDIT page in the menu display area. 2 Press the R/P function button to set a VTR (PLAYER or RECORDER) for modifying the edit points. 3 To modify the IN point, turn the MULTI CONTROL knob while holding the IN function button pressed. To modify the OUT point, turn the MULTI CONTROL knob while holding the OUT function button pressed. The time data displayed in the time data display area change. When the IN or OUT function button is released, the point at that moment is set as the IN or OUT point. Deleting an edit point To delete an edit point, use the following procedure (you can use the same procedure whether or not the DELETE indicator is flashing); 1 Press the R/P function button on the P5 EDIT page of the function menu to set a VTR (PLAYER or RECORDER) for deleting the edit points. 2 To delete the IN point, press the DELETE and IN function buttons simultaneously. To delete the OUT point, press the DELETE and OUT function buttons simultaneously. The IN or OUT point is deleted. 5-2-3 Cueing up to Edit Points and Prerolling To preroll for the IN point or to cue up to any edit point, use the following procedure. Cueing-up to edit points Follow the procedure below. Function buttons Menu display area Time data display area HDW-S280 EJECT PB LEVEL 13 REC LEVEL 13 24 24 R/P LEVEL CTL VAR LEVEL PRESET PHONES REC INHI ON OFF KEY INHI ON OFF SHIFT PAGE HOME CHARACTR ON PB/EE PB CONFI ENABLE CTL/TC TC EMPH EMPH EMPH EMPH 0 0 -10 -10 -20 -20 -30 -30 -40 -40 1 23 4 HD INPUT : ANA CH1 IN : -60 CH2 IN : -4 COND OUT : +4 MONI L : 1 BANK 2 MONI R : 2 D-STOP DOLBY NR P ROLL ASSEMBLE 59.94i SDI ASMBL CONFI ON RECORDER OFF LTC DF VITC LTC EXT-LTC R-RUN REM:00M TCG SET HOME 00:00:00:00. DISPLAY MULTI CONTROL REMOTE MENU RESET PREROLL PUSH PITCH CTL JOG/SHUTTLE REW PLAY F FWD STOP REC PAUSE STANDBY PAGE button PREROLL button 1 Press the PAGE button to display the P5 EDIT page in the menu display area. 2 Press the R/P function button to set a VTR (PLAYER or RECORDER) for cueing-up. 3 To cue up to the IN point, press the PREROLL button while holding down the IN function button. To cue up to the OUT point, press the PREROLL button while holding down the OUT function button. Cueing up to the IN or OUT point is finished, and PROLL appears at the Jog/Shuttle display positon in the condition area of the display window. Preroll Press the PREROLL button. The tape is wound back to a position five seconds before the IN point and stops. Changing the preroll time The factory default setting for the preroll time is five seconds, but you can use setup menu item 001 to change this to any value from 0 to 30 seconds. If you change the preroll time, make sure that the setting is not longer than the recording length before the edit IN point. Note that for automatic editing, the preroll time setting on the recorder VTR takes precedence. 47 Automatic Editing
-
 1
1 -
2
-
3
-
4
-
5
-
6
-
7
-
8
-
9
-
10
-
11
-
12
-
13
-
14
-
15
-
16
-
17
-
18
-
19
-
20
-
21
-
22
-
23
-
24
-
25
-
26
-
27
-
28
-
29
-
30
-
31
-
32
-
33
-
34
-
35
-
36
-
37
-
38
-
39
-
40
-
41
-
 42
42 -
 43
43 -
 44
44 -
 45
45 -
 46
46 -
 47
47 -
 48
48 -
 49
49 -
 50
50 -
 51
51 -
 52
52 -
53
-
54
-
55
-
56
-
57
-
58
-
59
-
60
-
61
-
62
-
63
-
64
-
65
-
66
-
67
-
68
-
69
-
70
-
71
-
72
-
73
-
74
-
75
-
76
-
77
-
78
-
79
-
80
-
81
-
82
-
83
-
84
-
85
-
86
-
87
-
88
-
89
-
90
-
91
-
92
-
93
-
94
 |
 |