Sony HDWS280 Product Manual (Operation Manual 1st Edition (Revised 5)) - Page 16
Sony HDWS280 Manual
 |
View all Sony HDWS280 manuals
Add to My Manuals
Save this manual to your list of manuals |
Page 16 highlights
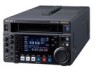
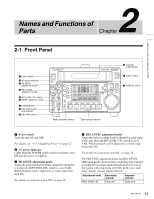
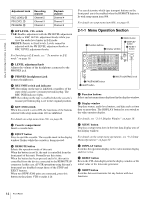
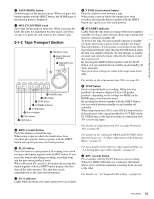
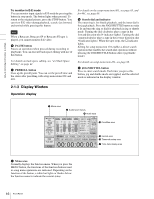
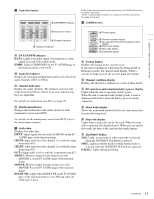
Chapter 2 Names and Functions of Parts To monitor in E-E mode You can monitor input signals in E-E mode by pressing this button in stop mode. The button lights when pressed. To return to the original picture, press the STOP button. You can view E-E video during playback, search, fast forward, and rewind while pressing this button. Note When a Betacam, Betacam SP or Betacam SX tape is played, you cannot monitor E-E video. h PAUSE button Pauses an operation (when pressed during recording or playback). You can execute back space editing with use of this button. For details on back space editing, see "4-2 Back Space Editing" on page 41. i PREROLL button Cues up the preroll point. You can set the preroll time and the status after prerolling with setup menu items 001 and 401. For details on the setup menu item 001, see page 63, and for 401, see page 69. j Search dial and indicator The outer ring is for shuttle playback, and the inner dial is for jog playback. Press the JOG/SHUTTLE button to make it lit and turn the ring or dial for playback in jog or shuttle mode. Turning the dial clockwise plays a tape in the forward direction (the G indicator lights). Turning the dial counterclockwise plays a tape in the reverse direction (the g indicator lights). When the tape stops, the s indicator lights. Setting for setup menu item 101 enables a direct search operation that enables the search dial operation without pressing the JOG/SHUTTLE button (direct jog/shuttle mode). For details on setup menu item 101, see page 66. k JOG/SHUTTEL button Press to enter search mode. Each time you press this button, jog and shuttle mode are toggled, and the selected mode is indicated in the display window. 2-1-3 Display Window Operation display 1 Menu area 2 Audio level meters 3 Audio data CHARACTR ON PB/EE PB CONFI ENABLE CTL/TC TC ASSEMBLE EMPH EMPH EMPH EMPH 0 0 -10 -10 -20 -20 -30 -30 -40 -40 1 23 4 HD INPUT : ANA CH1 IN : -60 CH2 IN : -4 COND OUT : +4 MONI L : 1 BANK 2 MONI R : 2 D-STOP DOLBY NR P ROLL 59.94i SDI ASMBL CONFI ON RECORDER OFF LTC DF VITC LTC EXT-LTC R-RUN REM:00M TCG SET HOME 00:00:00:00. 4 Condition area 5 Format area 6 Timecode setup area 7 Time data display area a Menu area Normally displays the function menu. When you press the MENU button, the functions of the function buttons used in setup menu operations are indicated. Depending on the function of the button, a white bar lights or flashes below the function name to indicate the current status. 16 Front Panel
-
 1
1 -
2
-
3
-
4
-
5
-
6
-
7
-
8
-
9
-
10
-
 11
11 -
 12
12 -
 13
13 -
 14
14 -
 15
15 -
 16
16 -
 17
17 -
 18
18 -
 19
19 -
 20
20 -
 21
21 -
22
-
23
-
24
-
25
-
26
-
27
-
28
-
29
-
30
-
31
-
32
-
33
-
34
-
35
-
36
-
37
-
38
-
39
-
40
-
41
-
42
-
43
-
44
-
45
-
46
-
47
-
48
-
49
-
50
-
51
-
52
-
53
-
54
-
55
-
56
-
57
-
58
-
59
-
60
-
61
-
62
-
63
-
64
-
65
-
66
-
67
-
68
-
69
-
70
-
71
-
72
-
73
-
74
-
75
-
76
-
77
-
78
-
79
-
80
-
81
-
82
-
83
-
84
-
85
-
86
-
87
-
88
-
89
-
90
-
91
-
92
-
93
-
94
 |
 |