Sony HDWS280 Product Manual (Operation Manual 1st Edition (Revised 5)) - Page 34
P5 Edit
 |
View all Sony HDWS280 manuals
Add to My Manuals
Save this manual to your list of manuals |
Page 34 highlights
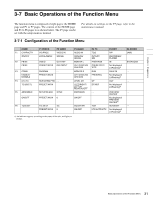
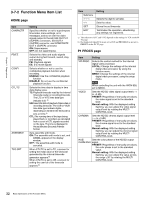
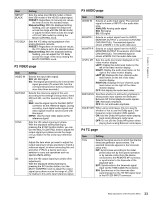
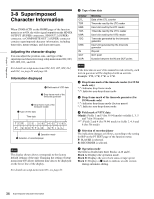
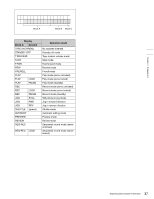
Chapter 3 Preparations Item Setting PRST/RGN Selects one of the following for timecodes generated by the internal timecode generator. PRESET: Presets the initial value for the timecode generated by the internal timecode generator, as specified by front panel operation or by remote control from the device connected to the REMOTE 9P connector. This operation is enabled when TCG is set to INT. At other times, the operation is the same as when LTC is selected. LTC: Regenerate timecodes by synchronizing with the LTC timecode value read by the internal timecode reader. VITC: Regenerate timecodes by synchronizing with the VITC timecode value read by the internal timecode reader. If TCG is set to EXT, the operation is the same as SDI. RUN Selects one of the following running modes for the internal timecode generator. FREE: The timecode continues to increase as long as the unit is powered on, regardless of the operating mode of this unit. REC: The timecode increases during recording only. If you select this mode, you should also set TCG to INT, and set PRST/RGN to PRESET. DF In 59.94i mode, this is to select either drop- frame mode or non drop frame mode for the timecode generator and the CTL counter. DF: Drop frame mode NDF: Non-drop frame mode TCR Selects the type of timecode to display in the time data display area. LTC: Display LTC. AUTO: Display VITC when the tape speed is 0.5 or less normal speed, and LTC otherwise. VITC: Display VITC. P5 EDIT page Item R/P IN Setting Selects which VTR to be controlled (player or recorder) when two VTRs are connected, the VTR connected to the REMOTE 9P connector is used as a player and this unit is used as a recorder. (For a single VTR operation, press the button for more than two seconds.) RECORDER: Controls this unit (the recorder VTR). PLAYER: Controls the connected player VTR. Sets the current tape point as the IN point when pressed together with the SHIFT button. An indicator (white bar) appears below the IN display. If only the IN function button is pressed, the time data for the IN point appears in the time data display area. Item Setting DELETE Deletes the set edit point. If the button is pressed together with the IN function button, the IN point is deleted, and if it is pressed together with the OUT function button, the OUT point is deleted. If the set edit points are not correct, the indicator below the DELETE display flashes. OUT Sets the current tape point as the OUT point when pressed together with the SHIFT button. An indicator (white bar) appears below the OUT display. If only the OUT function button is pressed, the time data for the OUT point appears in the time data display area. PREVIEW/ REVIEW Either PREVIEW or REVIEW appears according to the editing status. When the corresponding function is executable, the indicator flashes. If you press this button together with the SHIFT button, the corresponding function will be performed. During preview or review the indicator is lit, and when finished the indicator returns to flashing. AUTOEDIT If you press this button together with the SHIFT button while the indicator is flashing, automatic editing will be performed. During automatic editing the indicator is lit, and when it is finished, the indicator starts flashing again. 34 Basic Operations of the Function Menu
-
 1
1 -
2
-
3
-
4
-
5
-
6
-
7
-
8
-
9
-
10
-
11
-
12
-
13
-
14
-
15
-
16
-
17
-
18
-
19
-
20
-
21
-
22
-
23
-
24
-
25
-
26
-
27
-
28
-
 29
29 -
 30
30 -
 31
31 -
 32
32 -
 33
33 -
 34
34 -
 35
35 -
 36
36 -
 37
37 -
 38
38 -
 39
39 -
40
-
41
-
42
-
43
-
44
-
45
-
46
-
47
-
48
-
49
-
50
-
51
-
52
-
53
-
54
-
55
-
56
-
57
-
58
-
59
-
60
-
61
-
62
-
63
-
64
-
65
-
66
-
67
-
68
-
69
-
70
-
71
-
72
-
73
-
74
-
75
-
76
-
77
-
78
-
79
-
80
-
81
-
82
-
83
-
84
-
85
-
86
-
87
-
88
-
89
-
90
-
91
-
92
-
93
-
94
 |
 |
