Sony HDWS280 Product Manual (Operation Manual 1st Edition (Revised 5)) - Page 41
Back Space Editing, Sequential Recording
 |
View all Sony HDWS280 manuals
Add to My Manuals
Save this manual to your list of manuals |
Page 41 highlights
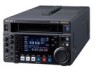
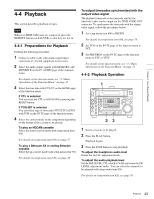
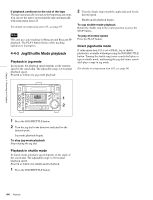
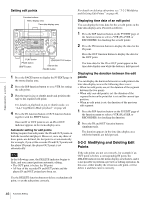
Chapter 4 Recording and Playback 4-2 Back Space Editing 4-3 Sequential Recording You can record multiple scenes as a single sequence with no noise or breakup between scenes (back space editing). Proceed as follows. When you connect two HDW-S280 units as shown below, you can perform sequential recording from one unit to another. HDW-S280 EJECT PB LEVEL 13 REC LEVEL 13 24 24 R/P LEVEL CTL VAR LEVEL PRESET PHONES REC INHI ON OFF KEY INHI ON OFF SHIFT PAGE HOME CHARACTR ON PB/EE PB CONFI ENABLE CTL/TC TC EMPH EMPH EMPH EMPH 0 0 -10 -10 -20 -20 -30 -30 -40 -40 1 23 4 HD INPUT : ANA CH1 IN : -60 CH2 IN : -4 COND OUT : +4 MONI L : 1 BANK 2 MONI R : 2 D-STOP DOLBY NR P ROLL ASSEMBLE 59.94i SDI ASMBL CONFI ON RECORDER OFF LTC DF VITC LTC EXT-LTC R-RUN REM:00M TCG SET HOME 00:00:00:00. DISPLAY MULTI CONTROL REMOTE MENU RESET PREROLL PUSH PITCH CTL JOG/SHUTTLE REW PLAY F FWD STOP REC PAUSE STANDBY 1 5 2,3 PUSH 2 PUSH 2 1 HD SDI video/audio signal Reference video signal HD SDI INPUT IN 1 3 1 3 2 3 2 3 Starting VTR 75Ω coaxial cable with BNC connectors (not supplied) -AC IN POWER ON REF INPUT - AC IN REMOTE DC IN 12V OFF SDI OUT 1 2 COMPOSITE OUT 1 2 (SUPER) (SUPER) INPUT HD SDI OUTPUT IN MONI 1 2 VIDEO CONTROL TIME CODE IN IOUT REF. INPUT REMOTE 9P (SUPER) AUDIO INPUT AUDIO OUTPUT 1 2 1 2 AUDIO MONITOR OUTPUT R L REMOTE 9P 2 3 2 3 1 1 1 1 Press the REC button and PLAY button simultaneously. Recording beigns. 2 When recording finishes, press the PAUSE button. The tape is rewound a little to a point just before where it was when you pressed the PAUSE button, and the unit enters recording pause mode. Note When recording is paused, do not do any of the following (if you do, back space editing will be interrupted): • Eject a cassette. • Play back, rewind, or fast forward the tape. • Press the STOP button. 3 At the next scene, press the PAUSE button. The tape moves to the recording start position, and recording starts. 4 Repeat steps 2 and 3 to record more scenes. 5 When you are finished recording scenes, press the STOP button. Recording continuous timecode Set setup menu item 610 to a setting other than MANU. For details on setup menu item 610, see page 71. HD SDI INPUT MONI REF INPUT 75Ω coaxial cable with BNC connectors (not supplied) 75Ω coaxial cable with BNC connectors (not supplied) Second VTR 9-pin remote control cable (not supplied) HD SDI INPUT IN 1 1 2 -AC IN POWER ON REF INPUT - AC IN REMOTE DC IN 12V OFF SDI OUT 1 2 COMPOSITE OUT 1 2 (SUPER) (SUPER) INPUT HD SDI OUTPUT IN MONI 1 2 VIDEO CONTROL TIME CODE IN IOUT REF. INPUT REMOTE 9P (SUPER) AUDIO INPUT AUDIO OUTPUT 1 2 1 2 AUDIO MONITOR OUTPUT R L 2 2 2 REMOTE 9P 3 3 3 3 3 PUSH 3 PUSH 1 1 1 1 2 2 If you use only two cassettes, the last 78 minutes recorded can be obtained at any time. If you change cassettes about every 38 minutes, endless recording is possible. Follow the procedures below. You can perform the front panel operations on the both units during sequential recording. 41 Back Space Editing / Sequential Recording
-
 1
1 -
2
-
3
-
4
-
5
-
6
-
7
-
8
-
9
-
10
-
11
-
12
-
13
-
14
-
15
-
16
-
17
-
18
-
19
-
20
-
21
-
22
-
23
-
24
-
25
-
26
-
27
-
28
-
29
-
30
-
31
-
32
-
33
-
34
-
35
-
 36
36 -
 37
37 -
 38
38 -
 39
39 -
 40
40 -
 41
41 -
 42
42 -
 43
43 -
 44
44 -
 45
45 -
 46
46 -
47
-
48
-
49
-
50
-
51
-
52
-
53
-
54
-
55
-
56
-
57
-
58
-
59
-
60
-
61
-
62
-
63
-
64
-
65
-
66
-
67
-
68
-
69
-
70
-
71
-
72
-
73
-
74
-
75
-
76
-
77
-
78
-
79
-
80
-
81
-
82
-
83
-
84
-
85
-
86
-
87
-
88
-
89
-
90
-
91
-
92
-
93
-
94
 |
 |
