Sony HDWS280 Product Manual (Operation Manual 1st Edition (Revised 5)) - Page 53
Recording the Stop Code
 |
View all Sony HDWS280 manuals
Add to My Manuals
Save this manual to your list of manuals |
Page 53 highlights
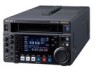
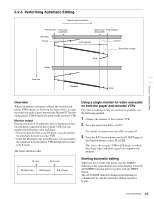
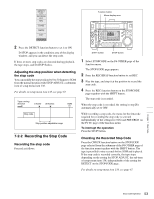
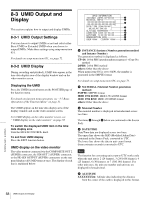
DETECT OFF REC/ERAS REC REC ERASE CHECK EXIT STOPCODE 2 Press the DETECT function button to set it to ON. D-STOP appears in the condition area of the display window, and you can detect the stop code. If three or more stop codes are detected during playback, the tape stops, and D-STOP flashes. Adjusting the stop position when detecting the stop code You can modify the stop position by 0 to 30 frames to SOM from the normal position with STOP ADJUST, a submenu item of setup menu item 138. For details on setup menu item 138, see page 67. Tape running direction 0 frame 30 frames SOM Stop code Stop position adjustable range 7-2-2 Recording the Stop Code Recording the stop code Proceed as follows. Function button Menu display area HDW-S280 EJECT PB LEVEL 13 REC LEVEL 13 24 24 R/P LEVEL CTL VAR LEVEL PRESET PHONES REC INHI ON OFF KEY INHI ON OFF SHIFT PAGE HOME CHARACTR ON PB/EE PB CONFI ENABLE CTL/TC TC EMPH EMPH EMPH EMPH 0 0 -10 -10 -20 -20 -30 -30 -40 -40 1 23 4 HD INPUT : ANA CH1 IN : -60 CH2 IN : -4 COND OUT : +4 MONI L : 1 BANK 2 MONI R : 2 D-STOP DOLBY NR P ROLL ASSEMBLE 59.94i SDI ASMBL CONFI ON RECORDER OFF LTC DF VITC LTC EXT-LTC R-RUN REM:00M TCG SET HOME 00:00:00:00. DISPLAY MULTI CONTROL REMOTE MENU RESET PREROLL PUSH PITCH CTL JOG/SHUTTLE REW PLAY F FWD STOP REC PAUSE STANDBY SHIFT button STOP button 1 Select STOPCODE on the P6 OTHER page of the function menu. The STOPCODE page appears. 2 Press the REC/ERAS function button to set REC. 3 Play the tape, and stop it at the position to record the stop code. 4 Press the REC function button on the STOPCODE page together with the SHIFT button. The stop code is recorded. When the stop code is recorded, the setting in step 2 is automatically set to OFF. While recording a stop code, the menu for the timecode required for recording the stop code is selected independently of the settings for TCG and PRST/RGN on the P4 TC page of the function menu. To interrupt the operation Press the STOP button. Checking the Recorded Stop Code Press the CHECK function button on the STOPCODE page selected from the submenu of the P6 OTHER page of the function menu together with the SHIFT button. The tape is prerolled to nine seconds before SOM and is played. If the stop code is recorded correctly, the tape stops depending on the setting for STOP ADJUST, the sub item of setup menu item 138, independently of the setting for DETECT on the STOPCODE page. For details on setup menu item 138, see page 67. Chapter 7 Stop Code 53 Stop Code Operation
-
 1
1 -
2
-
3
-
4
-
5
-
6
-
7
-
8
-
9
-
10
-
11
-
12
-
13
-
14
-
15
-
16
-
17
-
18
-
19
-
20
-
21
-
22
-
23
-
24
-
25
-
26
-
27
-
28
-
29
-
30
-
31
-
32
-
33
-
34
-
35
-
36
-
37
-
38
-
39
-
40
-
41
-
42
-
43
-
44
-
45
-
46
-
47
-
 48
48 -
 49
49 -
 50
50 -
 51
51 -
 52
52 -
 53
53 -
 54
54 -
 55
55 -
 56
56 -
 57
57 -
 58
58 -
59
-
60
-
61
-
62
-
63
-
64
-
65
-
66
-
67
-
68
-
69
-
70
-
71
-
72
-
73
-
74
-
75
-
76
-
77
-
78
-
79
-
80
-
81
-
82
-
83
-
84
-
85
-
86
-
87
-
88
-
89
-
90
-
91
-
92
-
93
-
94
 |
 |