Toshiba Satellite E305 PSE30C-00E00C Users Manual Canada; English - Page 114
Power-up modes, Windows utilities
 |
View all Toshiba Satellite E305 PSE30C-00E00C manuals
Add to My Manuals
Save this manual to your list of manuals |
Page 114 highlights
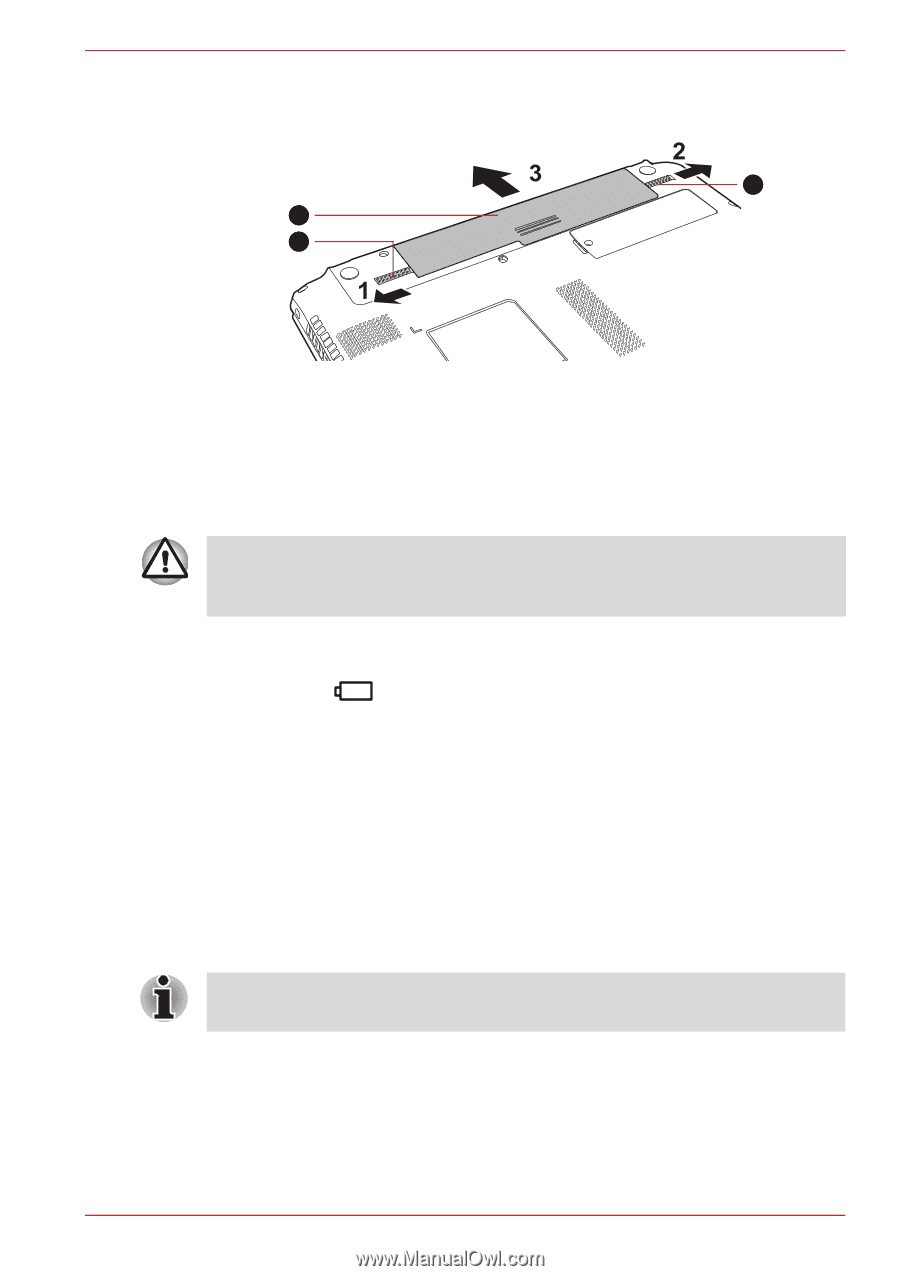
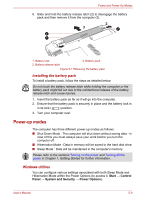
Power and Power-Up Modes 6. Slide and hold the battery release latch (2) to disengage the battery pack and then remove it from the computer (3). 2 3 1 1. Battery lock 2. Battery release latch 3. Battery pack Figure 5-1 Releasing the battery pack Installing the battery pack To install a battery pack, follow the steps as detailed below: Do not touch the battery release latch while holding the computer or the battery pack might fall out due to the unintentional release of the battery release latch and cause injuries. 1. Insert the battery pack as far as it will go into the computer. 2. Ensure that the battery pack is securely in place and the battery lock is in its lock ( ) position. 3. Turn your computer over. Power-up modes The computer has three different power-up modes as follows: ■ Shut Down Mode : The computer will shut down without saving data - in view of this you must always save your work before you turn the computer off. ■ Hibernation Mode : Data in memory will be saved to the hard disk drive. ■ Sleep Mode : Data will be maintained in the computer's memory. Please refer to the sections Turning on the power and Turning off the power in Chapter 1, Getting Started for further information. Windows utilities You can configure various settings associated with both Sleep Mode and Hibernation Mode within the Power Options (to access it, Start → Control Panel → System and Security → Power Options). User's Manual 5-9
-
 1
1 -
2
-
3
-
4
-
5
-
6
-
7
-
8
-
9
-
10
-
11
-
12
-
13
-
14
-
15
-
16
-
17
-
18
-
19
-
20
-
21
-
22
-
23
-
24
-
25
-
26
-
27
-
28
-
29
-
30
-
31
-
32
-
33
-
34
-
35
-
36
-
37
-
38
-
39
-
40
-
41
-
42
-
43
-
44
-
45
-
46
-
47
-
48
-
49
-
50
-
51
-
52
-
53
-
54
-
55
-
56
-
57
-
58
-
59
-
60
-
61
-
62
-
63
-
64
-
65
-
66
-
67
-
68
-
69
-
70
-
71
-
72
-
73
-
74
-
75
-
76
-
77
-
78
-
79
-
80
-
81
-
82
-
83
-
84
-
85
-
86
-
87
-
88
-
89
-
90
-
91
-
92
-
93
-
94
-
95
-
96
-
97
-
98
-
99
-
100
-
101
-
102
-
103
-
104
-
105
-
106
-
107
-
108
-
 109
109 -
 110
110 -
 111
111 -
 112
112 -
 113
113 -
 114
114 -
 115
115 -
 116
116 -
 117
117 -
 118
118 -
 119
119 -
120
-
121
-
122
-
123
-
124
-
125
-
126
-
127
-
128
-
129
-
130
-
131
-
132
-
133
-
134
-
135
-
136
-
137
-
138
-
139
-
140
-
141
-
142
-
143
-
144
-
145
-
146
-
147
-
148
-
149
-
150
-
151
-
152
-
153
-
154
-
155
-
156
 |
 |