Yamaha RXV1800 Owner's Manual - Page 103
Example 3: Saving the sound, configurations for specific sources
 |
UPC - 027108928463
View all Yamaha RXV1800 manuals
Add to My Manuals
Save this manual to your list of manuals |
Page 103 highlights
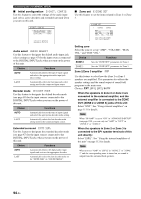
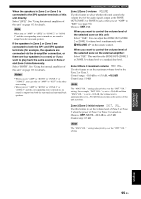
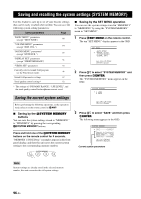
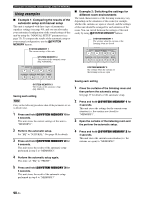
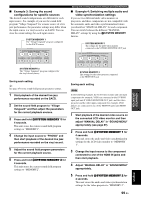
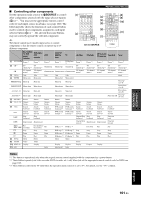
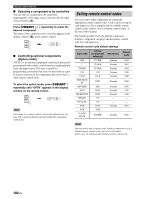
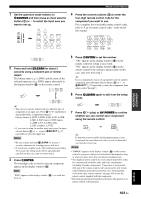
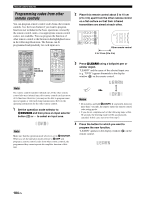
ADVANCED OPERATION ■ Example 3: Saving the sound configurations for specific sources The desired sound configurations are different for each input source. For example, if you use the sound field program "Village Vanguard" for a music source of a live jazz performance, the parameter settings may differ when the input source is a vinyl record or an SACD. You can store the sound settings for each input source. SYSTEM MEMORY 1 The "Village Vanguard" program configured for the SACD sources SYSTEM MEMORY 1 2 3 4 CLASSICAL LIVE/CLUB ENTERTAIN 5 6 7 MOVIE 8 SYSTEM MEMORY 2 The "Village Vanguard" program configured for the vinyl record sources Saving each setting y See page 67 for the sound field program parameter settings. 1 Start playback of the desired live jazz performance recorded on the SACD. 2 Set the sound field program to "Village Vanguard" and then adjust the parameters for the current playback sources. 3 Press and hold MSYSTEM MEMORY 1 for 4 seconds. This unit stores the current sound field program settings to "MEMORY1". 4 Change the input source to "PHONO" and then start playback of the desired live jazz performance recorded on the vinyl record. 5 Adjust the sound field program parameters for the current playback source. 6 Press and hold MSYSTEM MEMORY 2 for 4 seconds. This unit stores the current sound field program settings to "MEMORY2". Saving and recalling the system settings (SYSTEM MEMORY) ■ Example 4: Switching multiple audio and video synchronization settings If you use two different kinds video monitors or projectors, and these components are not compatible with the automatic audio and video synchronization feature, you should set "MANUAL DELAY" for each component. You can switch between the different "MANUAL DELAY" settings by using the MSYSTEM MEMORY buttons. SYSTEM MEMORY 1 The settings for the LCD video monitor connected to the S VIDEO MONITOR OUT jack SYSTEM MEMORY 1 2 3 4 CLASSICAL LIVE/CLUB ENTERTAIN 5 6 7 MOVIE 8 SYSTEM MEMORY 2 The settings for the video projector connected to the HDMI OUT jack Saving each setting Note In the following example, the LCD video monitor and one input component (for example, VCR) are connected to the S VIDEO input jack and S VIDEO MONITOR OUT jack, and the video projector and the other input component (for example, DVD player) are connected to one of the HDMI IN jacks and HDMI OUT jack. 1 Start playback of the desired video source on the connected LCD video monitor and then adjust "MANUAL DELAY" in "SOUND MENU" appropriately (see page 87). 2 Press and hold MSYSTEM MEMORY 1 for 4 seconds. This unit stores the audio and video synchronization settings for the LCD video monitor to "MEMORY 1". 3 Change the input source to the component connected to one of the HDMI IN jacks and then start playback. 4 Adjust "MANUAL DELAY" in "SOUND MENU" appropriately. 5 Press and hold MSYSTEM MEMORY 2 for 4 seconds. This unit stores the audio and video synchronization settings for the video projector to "MEMORY 2". English 99 En
-
 1
1 -
2
-
3
-
4
-
5
-
6
-
7
-
8
-
9
-
10
-
11
-
12
-
13
-
14
-
15
-
16
-
17
-
18
-
19
-
20
-
21
-
22
-
23
-
24
-
25
-
26
-
27
-
28
-
29
-
30
-
31
-
32
-
33
-
34
-
35
-
36
-
37
-
38
-
39
-
40
-
41
-
42
-
43
-
44
-
45
-
46
-
47
-
48
-
49
-
50
-
51
-
52
-
53
-
54
-
55
-
56
-
57
-
58
-
59
-
60
-
61
-
62
-
63
-
64
-
65
-
66
-
67
-
68
-
69
-
70
-
71
-
72
-
73
-
74
-
75
-
76
-
77
-
78
-
79
-
80
-
81
-
82
-
83
-
84
-
85
-
86
-
87
-
88
-
89
-
90
-
91
-
92
-
93
-
94
-
95
-
96
-
97
-
 98
98 -
 99
99 -
 100
100 -
 101
101 -
 102
102 -
 103
103 -
 104
104 -
 105
105 -
 106
106 -
 107
107 -
 108
108 -
109
-
110
-
111
-
112
-
113
-
114
-
115
-
116
-
117
-
118
-
119
-
120
-
121
-
122
-
123
-
124
-
125
-
126
-
127
-
128
-
129
-
130
-
131
-
132
-
133
-
134
-
135
-
136
-
137
-
138
-
139
-
140
-
141
-
142
-
143
-
144
-
145
-
146
-
147
-
148
-
149
-
150
-
151
-
152
-
153
-
154
-
155
-
156
-
157
 |
 |
