Yamaha RXV1800 Owner's Manual - Page 122
RS-232C access on the standby mode, Remote control AMP ID, on the remote control. - rs 232c setup
 |
UPC - 027108928463
View all Yamaha RXV1800 manuals
Add to My Manuals
Save this manual to your list of manuals |
Page 122 highlights
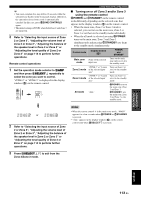
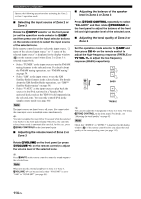
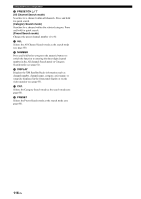
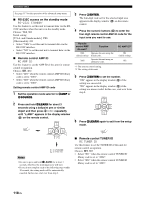
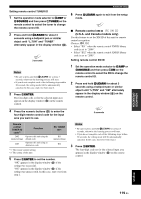
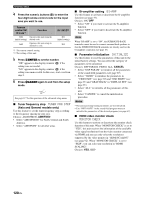
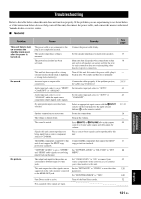
Advanced setup See page 117 for the operation of the advanced setup menu. ■ RS-232C access on the standby mode RS-232C STANDBY Use this feature to set this unit to transmit data via the RS232C interface when this unit is in the standby mode. Choices: YES, NO Initial setting: [U.S.A. and Canada models]: YES [Other models]: NO • Select "YES" to set this unit to transmit data via the RS-232C interface. • Select "NO" to set this unit not to transmit data via the RS-232C interface. ■ Remote control AMP ID RC AMP ID Use this feature to set the AMP ID of this unit for remote control recognition. Choices: ID1, ID2 • Select "ID1" when the remote control AMP ID library code is set to "2001". • Select "ID2" when the remote control AMP ID library code is set to "2002". Setting remote control AMP ID code 1 Set the operation mode selector to CAMP or C SOURCE. 3 Press 3ENTER. The four-digit code set for the selected input area appears in the display window (A) on the remote control. 4 Press the numeric buttons (5) to enter the four-digit remote control AMP ID code for the input area you want to use. Remote control AMP ID code*1 Function 2001 Operates this unit using the (initial setting) default code. 2002 Operates this unit using an alternative code. *1 The remote control setting. *2 The setting of this unit. RC AMP ID*2 ID1 (initial setting) ID2 5 Press 3ENTER to set the number. "OK" appears in the display window (A) if the setting was successful. "NG" appears in the display window (A) if the setting was unsuccessful. In this case, start over from step 2. PRESET/CH 2 Press and hold LLEARN for about 3 seconds using a ballpoint pen or similar object and then press 3l / h repeatedly until "L;AMP" appears in the display window (A) on the remote control. PRESET/CH LEARN A-E/CAT. ENTER Notes • Be sure to press and hold LLEARN for at least 3 seconds, otherwise the learning process will start. • If you do not complete each of the following steps within 30 seconds, the setting mode will be automatically canceled. In this case, start over from step 2. A-E/CAT. ENTER 6 Press LLEARN again to exit from the setup mode. LEARN ■ Remote control TUNER ID RC TUNER ID Use this feature to set the TUNER ID of this unit for remote control recognition. Choices: ID1, ID2 • Select "ID1" when the remote control TUNER ID library code is set to "2602". • Select "ID2" when the remote control TUNER ID library code is set to "2603". 118 En
-
 1
1 -
2
-
3
-
4
-
5
-
6
-
7
-
8
-
9
-
10
-
11
-
12
-
13
-
14
-
15
-
16
-
17
-
18
-
19
-
20
-
21
-
22
-
23
-
24
-
25
-
26
-
27
-
28
-
29
-
30
-
31
-
32
-
33
-
34
-
35
-
36
-
37
-
38
-
39
-
40
-
41
-
42
-
43
-
44
-
45
-
46
-
47
-
48
-
49
-
50
-
51
-
52
-
53
-
54
-
55
-
56
-
57
-
58
-
59
-
60
-
61
-
62
-
63
-
64
-
65
-
66
-
67
-
68
-
69
-
70
-
71
-
72
-
73
-
74
-
75
-
76
-
77
-
78
-
79
-
80
-
81
-
82
-
83
-
84
-
85
-
86
-
87
-
88
-
89
-
90
-
91
-
92
-
93
-
94
-
95
-
96
-
97
-
98
-
99
-
100
-
101
-
102
-
103
-
104
-
105
-
106
-
107
-
108
-
109
-
110
-
111
-
112
-
113
-
114
-
115
-
116
-
 117
117 -
 118
118 -
 119
119 -
 120
120 -
 121
121 -
 122
122 -
 123
123 -
 124
124 -
 125
125 -
 126
126 -
 127
127 -
128
-
129
-
130
-
131
-
132
-
133
-
134
-
135
-
136
-
137
-
138
-
139
-
140
-
141
-
142
-
143
-
144
-
145
-
146
-
147
-
148
-
149
-
150
-
151
-
152
-
153
-
154
-
155
-
156
-
157
 |
 |
