Yamaha RXV1800 Owner's Manual - Page 37
Setting the speaker impedance, Turning this unit on and off, Turning on this unit - remote control
 |
UPC - 027108928463
View all Yamaha RXV1800 manuals
Add to My Manuals
Save this manual to your list of manuals |
Page 37 highlights
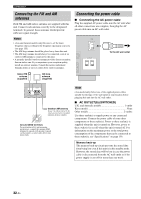
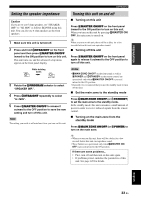
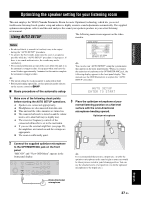
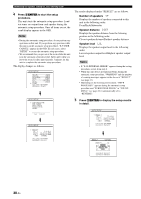
PREPARATION Connections Setting the speaker impedance Turning this unit on and off Caution If you are to use 6 ohm speakers, set "SPEAKER IMP." to "6Ω MIN" as follows BEFORE using this unit. You can also use 4 ohm speakers as the front speakers. 1 Make sure this unit is turned off. 2 Press and hold OSTRAIGHT on the front panel and then press AMASTER ON/OFF inward to the ON position to turn on this unit. This unit turns on, and the advanced setup menu appears in the front panel display. ■ Turning on this unit Press AMASTER ON/OFF on the front panel inward to the ON position to turn on this unit. When you turn on this unit by pressing AMASTER ON/ OFF, the main zone is turned on. y When you turn on this unit, there will be a delay for a few seconds before this unit can reproduce sound. ■ Turning off this unit Press AMASTER ON/OFF on the front panel again to release it outward to the OFF position to turn off this unit. STRAIGHT EFFECT While holding down MASTER 3 Rotate the NPROGRAM selector to select "SPEAKER IMP.". 4 Press OSTRAIGHT repeatedly to select "6Ω MIN". 5 Press AMASTER ON/OFF to release it outward to the OFF position to save the new setting and turn off this unit. Note The setting you made is reflected next time you turn on this unit. Notes • BMAIN ZONE ON/OFF on the front panel as well as 8POWER and 7STANDBY on the remote control are operational only when AMASTER ON/OFF is pressed inward to the ON position. • Basically, we recommend that you use the standby mode to turn off this unit. ■ Set the main zone to the standby mode Press BMAIN ZONE ON/OFF (or 7STANDBY) to set the main zone to the standby mode. In the standby mode, this unit consumes a small amount of power in order to receive infrared signals from the remote control. ■ Turning on the main zone from the standby mode Press BMAIN ZONE ON/OFF (or 8POWER) to turn on the main zone. y • When you turn on this unit, there will be a delay for a few seconds before this unit can reproduce sound. • These buttons are operational only when AMASTER ON/ OFF is pressed inward to the ON position. If there are some problems... • First, turn off and then turn on this unit again. • If problems persist, initialize the parameters of this unit. See page 129 for details. English 33 En
-
 1
1 -
2
-
3
-
4
-
5
-
6
-
7
-
8
-
9
-
10
-
11
-
12
-
13
-
14
-
15
-
16
-
17
-
18
-
19
-
20
-
21
-
22
-
23
-
24
-
25
-
26
-
27
-
28
-
29
-
30
-
31
-
 32
32 -
 33
33 -
 34
34 -
 35
35 -
 36
36 -
 37
37 -
 38
38 -
 39
39 -
 40
40 -
 41
41 -
 42
42 -
43
-
44
-
45
-
46
-
47
-
48
-
49
-
50
-
51
-
52
-
53
-
54
-
55
-
56
-
57
-
58
-
59
-
60
-
61
-
62
-
63
-
64
-
65
-
66
-
67
-
68
-
69
-
70
-
71
-
72
-
73
-
74
-
75
-
76
-
77
-
78
-
79
-
80
-
81
-
82
-
83
-
84
-
85
-
86
-
87
-
88
-
89
-
90
-
91
-
92
-
93
-
94
-
95
-
96
-
97
-
98
-
99
-
100
-
101
-
102
-
103
-
104
-
105
-
106
-
107
-
108
-
109
-
110
-
111
-
112
-
113
-
114
-
115
-
116
-
117
-
118
-
119
-
120
-
121
-
122
-
123
-
124
-
125
-
126
-
127
-
128
-
129
-
130
-
131
-
132
-
133
-
134
-
135
-
136
-
137
-
138
-
139
-
140
-
141
-
142
-
143
-
144
-
145
-
146
-
147
-
148
-
149
-
150
-
151
-
152
-
153
-
154
-
155
-
156
-
157
 |
 |
