Yamaha RXV1800 Owner's Manual - Page 29
Connecting other components, Connecting a Blu-ray Disc or HD DVD player
 |
UPC - 027108928463
View all Yamaha RXV1800 manuals
Add to My Manuals
Save this manual to your list of manuals |
Page 29 highlights
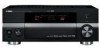
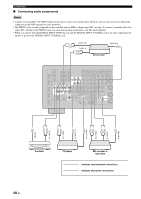
PREPARATION Connections Connecting other components Make sure that this unit and other components are unplugged from the AC wall outlets. Notes • When "VIDEO CONV." is set to "OFF" (see page 92), be sure to make the same type of video connections as those made for your TV (see page 24). For example, if you connected your TV to the VIDEO MONITOR OUT jack of this unit, connect your other components to the VIDEO jacks. • When "VIDEO CONV." is set to "ON" (see page 92), the converted video signals are output only at the MONITOR OUT jacks. When recording a source, you must make the same type of video connections between each component. • To make a digital connection to a component other than the default component assigned to each DIGITAL INPUT or DIGITAL OUTPUT jack, select the corresponding setting for "OPTICAL OUT", "OPTICAL IN", or "COAXIAL IN" in "I/O ASSIGNMENT" (see page 89). • If you connect your DVD player to both the DIGITAL INPUT OPTICAL and the DIGITAL INPUT COAXIAL jacks, priority is given to the signals input at the DIGITAL INPUT COAXIAL jack. • The short message displays do not appear when the component video signals with 480p/576p, 720p, 1080i or 1080p resolutions are input. ■ Connecting a Blu-ray Disc or HD DVD player Connect your Blu-ray Disc or HD DVD player to the HDMI IN 1 jack of this unit to perform the features of the Blu-ray Disc or HD DVD completely. HDMI out Component out Blu-ray Disc or HD DVD player Optical out Audio out S-video out Video out Y PB PR S V LR O HDMI COMPONENT VIDEO A BD/HD DVD Y PB PR BD/HD DVD VIDEO L R S VIDEO VIDEO IN1 BD/ HD DVD DIGITAL INPUT 5 BD/ HD DVD OPTICAL English indicates recommended connections indicates alternative connections 25 En
-
 1
1 -
2
-
3
-
4
-
5
-
6
-
7
-
8
-
9
-
10
-
11
-
12
-
13
-
14
-
15
-
16
-
17
-
18
-
19
-
20
-
21
-
22
-
23
-
 24
24 -
 25
25 -
 26
26 -
 27
27 -
 28
28 -
 29
29 -
 30
30 -
 31
31 -
 32
32 -
 33
33 -
 34
34 -
35
-
36
-
37
-
38
-
39
-
40
-
41
-
42
-
43
-
44
-
45
-
46
-
47
-
48
-
49
-
50
-
51
-
52
-
53
-
54
-
55
-
56
-
57
-
58
-
59
-
60
-
61
-
62
-
63
-
64
-
65
-
66
-
67
-
68
-
69
-
70
-
71
-
72
-
73
-
74
-
75
-
76
-
77
-
78
-
79
-
80
-
81
-
82
-
83
-
84
-
85
-
86
-
87
-
88
-
89
-
90
-
91
-
92
-
93
-
94
-
95
-
96
-
97
-
98
-
99
-
100
-
101
-
102
-
103
-
104
-
105
-
106
-
107
-
108
-
109
-
110
-
111
-
112
-
113
-
114
-
115
-
116
-
117
-
118
-
119
-
120
-
121
-
122
-
123
-
124
-
125
-
126
-
127
-
128
-
129
-
130
-
131
-
132
-
133
-
134
-
135
-
136
-
137
-
138
-
139
-
140
-
141
-
142
-
143
-
144
-
145
-
146
-
147
-
148
-
149
-
150
-
151
-
152
-
153
-
154
-
155
-
156
-
157
 |
 |
