Yamaha RXV1800 Owner's Manual - Page 47
Selecting audio input jacks (AUDIO SELECT), Selecting the MULTI CH INPUT component
 |
UPC - 027108928463
View all Yamaha RXV1800 manuals
Add to My Manuals
Save this manual to your list of manuals |
Page 47 highlights
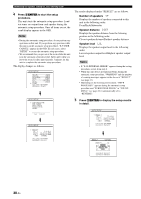
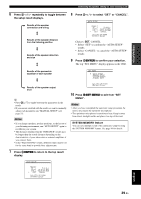
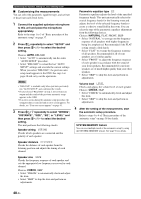
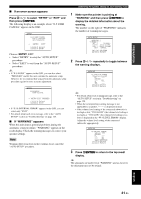
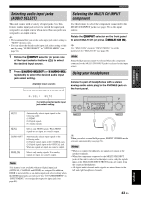
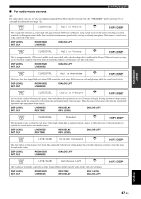
BASIC OPERATION Playback Selecting audio input jacks (AUDIO SELECT) This unit comes with a variety of input jacks. Use this feature (audio input jack select) to switch the input jack assigned to an input source when more than one jacks are assigned to an input source. y • We recommend that you set the audio input jack select setting to "AUTO" in most cases. • You can adjust the default audio input jack select setting of this unit by using "AUDIO SELECT" in "OPTION MENU" (see page 94). 1 Rotate the CINPUT selector (or press one of the input selector buttons (1)) to select the desired input source. 2 Press DAUDIO SELECT (or 9AUDIO SEL) repeatedly to select the desired audio input jack select setting. Available input sources V-AUX VCR DVR DTV/CBL DVD BD/HD DVD MD/TAPE CD-R CD PHONO MULTI CH TUNER XM Selecting the MULTI CH INPUT component Use this feature to select the component connected to the MULTI CH INPUT jacks (see page 30) as the input source. Rotate the CINPUT selector on the front panel to select MULTI CH (or press 1MULTI CH IN). y Use "MULTI CH" menu in "INPUT MENU" to set the parameters for "MULTI CH" (see page 88). Note Sound field programs cannot be selected when the component connected to the MULTI CH INPUT jacks is selected as the input source. Using your headphones Connect a pair of headphones with a stereo analog audio cable plug to the PHONES jack on the front panel. A.SEL: AUTO Currently selected audio input jack select setting AUTO Automatically selects input signals in the following order: (1) HDMI (2) Digital signals (3) Analog signals HDMI Selects only HDMI signals. When HDMI signals are not input, no sound is output. COAX/OPT Automatically selects input signals in the following order: (1) Digital signals input at the COAXIAL jack. (2) Digital signals input at the OPTICAL jack. When no signals are input, no sound is output. ANALOG Selects only analog signals. If no analog signals are input, no sound is output. Note This feature is not available when no digital input jack (OPTICAL, COAXIAL and HDMI) are assigned. In addition, HDMI is not available as an Audio input jack select setting when the HDMI input jacks are not used. Use "I/O ASSIGNMENT" in "INPUT MENU" to reassign the respective input jack (see page 89). MAIN ZONE ON/OFF ON OFF MASTER INPUT AUDIO TONE SELECT CONTROL A/B/C/D/E CATEGORY STRAIGHT EFFECT YPAO PRESET/TUNING/CH PRESET/ TUNING EDIT SEARCH MODE MULTI ZONE MEMORY TUNING FM/AM MAN'L/AUTO FM MODE DISPLAY ZONE ON/OFF ZONE CONTROLS ZONE 2 ZONE 3 SILENT CINEMA S VIDEO VIDEO L AUDIO R OPTICAL PROGRAM OPTIMIZER MIC PHONES VIDEO AUX SLEEP PURE DIRECT VOLUME y When you select a sound field program, SILENT CINEMA mode activates automatically (see page 51). Notes • When you connect headphones, no signals are output at the speaker terminals. • When the component connected to the MULTI CH INPUT jacks of this unit is selected as the input source, only the signals input at the MULTI CH INPUT FRONT jacks are output from the connected headphones. • All digital multi-channel audio signals are mixed down to the left and right headphone channels. English 43 En
-
 1
1 -
2
-
3
-
4
-
5
-
6
-
7
-
8
-
9
-
10
-
11
-
12
-
13
-
14
-
15
-
16
-
17
-
18
-
19
-
20
-
21
-
22
-
23
-
24
-
25
-
26
-
27
-
28
-
29
-
30
-
31
-
32
-
33
-
34
-
35
-
36
-
37
-
38
-
39
-
40
-
41
-
 42
42 -
 43
43 -
 44
44 -
 45
45 -
 46
46 -
 47
47 -
 48
48 -
 49
49 -
 50
50 -
 51
51 -
 52
52 -
53
-
54
-
55
-
56
-
57
-
58
-
59
-
60
-
61
-
62
-
63
-
64
-
65
-
66
-
67
-
68
-
69
-
70
-
71
-
72
-
73
-
74
-
75
-
76
-
77
-
78
-
79
-
80
-
81
-
82
-
83
-
84
-
85
-
86
-
87
-
88
-
89
-
90
-
91
-
92
-
93
-
94
-
95
-
96
-
97
-
98
-
99
-
100
-
101
-
102
-
103
-
104
-
105
-
106
-
107
-
108
-
109
-
110
-
111
-
112
-
113
-
114
-
115
-
116
-
117
-
118
-
119
-
120
-
121
-
122
-
123
-
124
-
125
-
126
-
127
-
128
-
129
-
130
-
131
-
132
-
133
-
134
-
135
-
136
-
137
-
138
-
139
-
140
-
141
-
142
-
143
-
144
-
145
-
146
-
147
-
148
-
149
-
150
-
151
-
152
-
153
-
154
-
155
-
156
-
157
 |
 |
