Yamaha RXV1800 Owner's Manual - Page 25
Information on HDMI™, HDMI jack and cable plug, Default input assignment of HDMI input, jacks - specifications
 |
UPC - 027108928463
View all Yamaha RXV1800 manuals
Add to My Manuals
Save this manual to your list of manuals |
Page 25 highlights
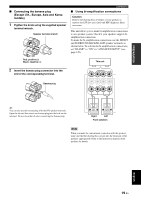
PREPARATION Connections Information on HDMI™ This unit has four HDMI input jacks and one HDMI output jack for digital audio and video signal input/output. Connect the HDMI IN 1, HDMI IN 2, HDMI IN 3 or HDMI IN 4 jack of this unit to the HDMI output jack of other HDMI components (such as a DVD player). Connect the HDMI OUT jack of this unit to the HDMI input jack of other HDMI components (such as a TV and a projector). The video or audio signals input at the HDMI IN jacks of the selected input source are output at the HDMI OUT jack of this unit. This HDMI interface of this unit is based on the following standards: • HDMI Version 1.3a (High-Definition Multimedia Interface Specification Version 1.3a) licensed by HDMI Licensing, LLC. • HDCP (High-bandwidth Digital Content Protection System) licensed by Digital Content Protection, LLC. Note You can check the potential problem about the HDMI connection (see page 44). ■ HDMI jack and cable plug HDMI HDMI cable plug ■ Default input assignment of HDMI input jacks HDMI input jack Assigned input source IN1 BD/HD DVD IN2 DVD y • We recommend that you use a commercially available HDMI cable shorter than 5 meters (16 feet) with the HDMI logo printed on it. • Use a conversion cable (HDMI jack ↔ DVI-D jack) to connect this unit to other DVI components. IN3 DTV/CBL IN4 DVR Notes • Do not disconnect or connect the cable or turn off the power of the HDMI components connected to the HDMI OUT jack of this unit while data is being transferred. Doing so may disrupt playback or cause noise. • The HDMI OUT jack outputs the audio signals input at the HDMI input jacks only even if "SUPPORT AUDIO" is set to "OTHER" (see page 88). • If you turn off the power of the video monitor connected to the HDMI OUT jack via a DVI connection, this unit may fail to establish the connection to the component. • The analog video signals input at the composite video, S-video and component video jacks can be digitally up-converted to be output at the HDMI OUT jack. Set "VIDEO CONV." to "ON" in "MANUAL SETUP" (see page 92) to activate this feature. English 21 En
-
 1
1 -
2
-
3
-
4
-
5
-
6
-
7
-
8
-
9
-
10
-
11
-
12
-
13
-
14
-
15
-
16
-
17
-
18
-
19
-
 20
20 -
 21
21 -
 22
22 -
 23
23 -
 24
24 -
 25
25 -
 26
26 -
 27
27 -
 28
28 -
 29
29 -
 30
30 -
31
-
32
-
33
-
34
-
35
-
36
-
37
-
38
-
39
-
40
-
41
-
42
-
43
-
44
-
45
-
46
-
47
-
48
-
49
-
50
-
51
-
52
-
53
-
54
-
55
-
56
-
57
-
58
-
59
-
60
-
61
-
62
-
63
-
64
-
65
-
66
-
67
-
68
-
69
-
70
-
71
-
72
-
73
-
74
-
75
-
76
-
77
-
78
-
79
-
80
-
81
-
82
-
83
-
84
-
85
-
86
-
87
-
88
-
89
-
90
-
91
-
92
-
93
-
94
-
95
-
96
-
97
-
98
-
99
-
100
-
101
-
102
-
103
-
104
-
105
-
106
-
107
-
108
-
109
-
110
-
111
-
112
-
113
-
114
-
115
-
116
-
117
-
118
-
119
-
120
-
121
-
122
-
123
-
124
-
125
-
126
-
127
-
128
-
129
-
130
-
131
-
132
-
133
-
134
-
135
-
136
-
137
-
138
-
139
-
140
-
141
-
142
-
143
-
144
-
145
-
146
-
147
-
148
-
149
-
150
-
151
-
152
-
153
-
154
-
155
-
156
-
157
 |
 |
