Yamaha RXV1800 Owner's Manual - Page 44
Customizing the measurements, DISTANCE, SIZE, EQ, or LEVEL
 |
UPC - 027108928463
View all Yamaha RXV1800 manuals
Add to My Manuals
Save this manual to your list of manuals |
Page 44 highlights
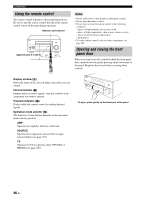
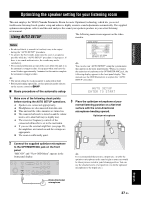
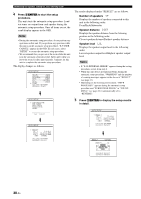
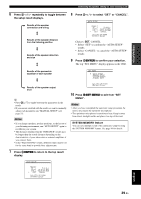
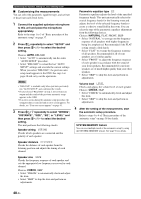
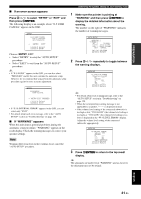
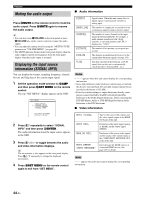
Optimizing the speaker setting for your listening room ■ Customizing the measurements You can select the parametric equalizer type, and activate or deactivate each check items. 1 Connect the supplied optimizer microphone to this unit and place the microphone appropriately. Refer to the steps 1 to 3 of "Basic procedure of the automatic setup" on page 37. 2 Press 3k repeatedly to select "SETUP" and then press 3l / h to select the desired setting. Choices: AUTO, RELOAD • Select "AUTO" to automatically run the entire "AUTO SETUP" procedure. • Select "RELOAD" to reload the last "AUTO SETUP" settings and override the current settings. When you select "RELOAD", the previous auto setup result appears in the OSD. See step 4 on page 38 and carry out the operations. Notes • "RELOAD" is available only when you have previously run "AUTO SETUP" and confirmed the results. • If you selected "RELOAD" in step 2, no test tones are output and the result of the previous automatic setup appears in the OSD. • If an error occurs during the automatic setup procedure, the setup procedure is canceled and an error screen appears. For details, see "If an error screen appears" on page 41. 3 Press 3k / n repeatedly to select "WIRING", "DISTANCE", "SIZE", "EQ", or "LEVEL" and then press 3l / h to select the desired setting. This unit performs the following checks: Speaker wiring WIRING Checks which speakers are connected and the polarity of each speaker. Parametric equalizer type EQ Parametric equalizer adjusts the level of the specified frequency bands. This unit automatically selects the crucial frequency bands for the listening room and adjusts the level of the selected frequency bands to create a cohesive sound field in the room. You can select the type of the parametric equalizer adjustment from the following choices. Choices: NATURAL, FLAT, FRONT, SKIP • Select "NATURAL" to average out the frequency response of all speakers with higher frequencies being less emphasized. Recommended if the FLAT setting sounds a little harsh. • Select "FLAT" to average the frequency response of all speakers. Recommended if all of your speakers are of similar quality. • Select "FRONT" to adjust the frequency response of each speaker in accordance with the sound of your front speakers. Recommended if your front speakers are of much higher quality than your other speakers. • Select "SKIP" to skip this item and perform no adjustments. Volume level LEVEL Checks and adjusts the volume level of each speaker. Choices: CHECK, SKIP • Select "CHECK" to automatically check and adjust this item. • Select "SKIP" to skip this item and perform no adjustments. 4 After the setting of the measurement, start the automatic setup procedure. Refer to steps 4 to 6 of "Basic procedure of the automatic setup" on page 38 for details. SYSTEM MEMORY feature You can save multiple result of the automatic setup by using the SYSTEM MEMORY feature. See page 96 for details. Speaker distance DISTANCE Checks the distance of each speaker from the listening position and adjusts the timing of each channel. Speaker size SIZE Checks the frequency response of each speaker and sets the appropriate low-frequency crossover for each channel. Choices: CHECK, SKIP • Select "CHECK" to automatically check and adjust the item. • Select "SKIP" to skip the item and perform no adjustments. 40 En
-
 1
1 -
2
-
3
-
4
-
5
-
6
-
7
-
8
-
9
-
10
-
11
-
12
-
13
-
14
-
15
-
16
-
17
-
18
-
19
-
20
-
21
-
22
-
23
-
24
-
25
-
26
-
27
-
28
-
29
-
30
-
31
-
32
-
33
-
34
-
35
-
36
-
37
-
38
-
 39
39 -
 40
40 -
 41
41 -
 42
42 -
 43
43 -
 44
44 -
 45
45 -
 46
46 -
 47
47 -
 48
48 -
 49
49 -
50
-
51
-
52
-
53
-
54
-
55
-
56
-
57
-
58
-
59
-
60
-
61
-
62
-
63
-
64
-
65
-
66
-
67
-
68
-
69
-
70
-
71
-
72
-
73
-
74
-
75
-
76
-
77
-
78
-
79
-
80
-
81
-
82
-
83
-
84
-
85
-
86
-
87
-
88
-
89
-
90
-
91
-
92
-
93
-
94
-
95
-
96
-
97
-
98
-
99
-
100
-
101
-
102
-
103
-
104
-
105
-
106
-
107
-
108
-
109
-
110
-
111
-
112
-
113
-
114
-
115
-
116
-
117
-
118
-
119
-
120
-
121
-
122
-
123
-
124
-
125
-
126
-
127
-
128
-
129
-
130
-
131
-
132
-
133
-
134
-
135
-
136
-
137
-
138
-
139
-
140
-
141
-
142
-
143
-
144
-
145
-
146
-
147
-
148
-
149
-
150
-
151
-
152
-
153
-
154
-
155
-
156
-
157
 |
 |
