Yamaha RXV1800 Owner's Manual - Page 119
Using Zone 2/Zone 3 remote control, except Europe model, All Channel Search or Category Search mode
 |
UPC - 027108928463
View all Yamaha RXV1800 manuals
Add to My Manuals
Save this manual to your list of manuals |
Page 119 highlights
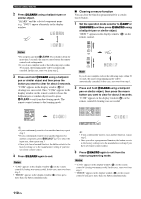
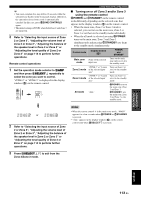
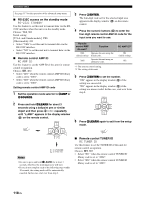
ADVANCED OPERATION Using multi-zone configuration ■ Using Zone 2/Zone 3 remote control (except Europe model) You can control Zone 2 or Zone 3 features by using the supplied Zone 2/Zone 3 remote control. First, set the ID1/ID2 switch and ZONE 2/ZONE 3 switch appropriately. 1 2 XM POWER TUNER CD 1 2 CD-R 3 STANDBY MD/TAPE 4 DVD BD/HD DVD PHONO 5 6 ENT DTV/CBL 7 DVR 8 VCR V-AUX/DOCK 9 0 0 A 3 PRESET VOLUME B A/B/C/D/E 4 MUTE C 5 6 A-E/CAT. PRESET/CH DISPLAY D 7 ALL PRESET CAT. E 8 ID1 ID2 NUMBER ZONE 2 ZONE 3 F G 9 Controlling the amplifier function 1 XM Selects XM as the input source of the controlling zone. 2 Input selector buttons Selects the desired input source for the controlling zone. 8 ID1/ID2 switch Switches the remote control ID between ID1 and ID2 (see page 118). 0 POWER Turns on Zone 2 or Zone 3. Note This button is operational only when AMASTER ON/OFF on the front panel is pressed inward to the ON position. A STANDBY Sets Zone 2 or Zone 3 to the standby mode. Note This button is operational only when AMASTER ON/OFF on the front panel is pressed inward to the ON position. B VOLUME +/- Increases or decreases the volume level of Zone 2 or Zone 3. C MUTE Mutes the sound of Zone 2 or Zone 3. Press again to restore the audio output to the previous volume level. G ZONE 2/ZONE 3 switch Switches between the operation mode of Zone 2 and that of Zone 3. Controlling the tuner function (see page 54) Select "TUNER" as the input source of the controlling zone to use the following functions 3 PRESET k / n Selects one of the 8 preset station numbers (1 to 8) when the colon (:) is displayed in the front panel display (see page 56). 4 A/B/C/D/E Selects one of the preset station groups (A to E) (see page 55). Controlling the XM Satellite Radio tuning function (see page 58) Select "XM" as the input source of the controlling zone to use the following functions. 2 Numeric buttons (All Channel Search or Category Search mode) Use 1 to 9 and 0 to enter a channel number directly. (Preset Search mode) Use 1 to 8 to enter a preset channel number directly. y While holding down 9NUMBER (see page 116), press the numeric buttons to enter the desired channel numbers directly when this unit is in the All Channel Search or Category Search mode. 5 A-E/CAT. l / h (All Channel Search mode) Changes the channel category. (Category Search mode) Changes the channel category. (Preset Search mode) Changes the preset channel group (A to E). Continued English 115 En
-
 1
1 -
2
-
3
-
4
-
5
-
6
-
7
-
8
-
9
-
10
-
11
-
12
-
13
-
14
-
15
-
16
-
17
-
18
-
19
-
20
-
21
-
22
-
23
-
24
-
25
-
26
-
27
-
28
-
29
-
30
-
31
-
32
-
33
-
34
-
35
-
36
-
37
-
38
-
39
-
40
-
41
-
42
-
43
-
44
-
45
-
46
-
47
-
48
-
49
-
50
-
51
-
52
-
53
-
54
-
55
-
56
-
57
-
58
-
59
-
60
-
61
-
62
-
63
-
64
-
65
-
66
-
67
-
68
-
69
-
70
-
71
-
72
-
73
-
74
-
75
-
76
-
77
-
78
-
79
-
80
-
81
-
82
-
83
-
84
-
85
-
86
-
87
-
88
-
89
-
90
-
91
-
92
-
93
-
94
-
95
-
96
-
97
-
98
-
99
-
100
-
101
-
102
-
103
-
104
-
105
-
106
-
107
-
108
-
109
-
110
-
111
-
112
-
113
-
 114
114 -
 115
115 -
 116
116 -
 117
117 -
 118
118 -
 119
119 -
 120
120 -
 121
121 -
 122
122 -
 123
123 -
 124
124 -
125
-
126
-
127
-
128
-
129
-
130
-
131
-
132
-
133
-
134
-
135
-
136
-
137
-
138
-
139
-
140
-
141
-
142
-
143
-
144
-
145
-
146
-
147
-
148
-
149
-
150
-
151
-
152
-
153
-
154
-
155
-
156
-
157
 |
 |
