Yamaha RXV1800 Owner's Manual - Page 42
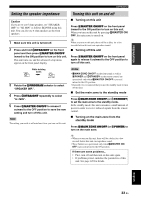
Press, to start the setup, procedure., Number of speakers, Speaker distance, Speaker level, - problems
 |
UPC - 027108928463
View all Yamaha RXV1800 manuals
Add to My Manuals
Save this manual to your list of manuals |
Page 42 highlights
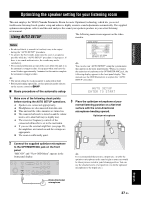
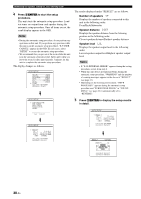
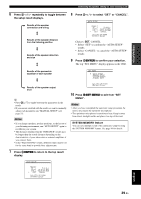
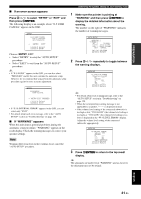
[ p Optimizing the speaker setting for your listening room 4 Press 3ENTER to start the setup procedure. This unit starts the automatic setup procedure. Loud test tones are output from each speaker during the automatic setup procedure. Once all items are set, the result display appears in the OSD. Notes • During the automatic setup procedure, do not perform any operation on this unit. If you perform any operation while this unit is in the automatic setup procedure, "E-9:USER CANCEL" appears in the OSD. In such cases, select "RETRY" to restart the automatic setup procedure. • We recommend that you get out of the room while this unit is in the automatic setup procedure. Keep quiet when you leave the room. It takes approximately 3 minutes for this unit to complete the automatic setup procedure. The display changes as follows. AUTO SETUP SETUP;;;;;;;;;AUTO WIRING;;;;;;;CHECK DISTANCE;;;;;CHECK SIZE;;;;;;;;;CHECK EQ;;;;;;;;;NATURAL LEVEL;;;;;;;;CHECK . START [ ]/[ ]: UP/DOWN [ENTER]: Start The results displayed under "RESULT" are as follows. Number of speakers SP Displays the number of speakers connected to this unit in the following order: Front/Back/Subwoofer Speaker distance DIST Displays the speaker distance from the listening position in the following order: Closest speaker distance/Farthest speaker distance Speaker level LVL Displays the speaker output level in the following order: Lowest speaker output level/Highest speaker output level Notes • If "E-10:INTERNAL ERROR" appears during the testing procedure, restart from step 2. • When this unit detects potential problems during the automatic setup procedure, "WARNING" and the number of warning messages appears in the above of "RESULT" (see page 41). • Depending on the listening environment, "SWFR PHASE:REV" appears during the automatic setup procedure and "SUBWOOFER PHASE" in "SOUND MENU" (see page 82) is automatically set to "REVERSE". AUTO SETUP . INITIALIZING PRE CHECK MAIN CHECK EQUALIZING LEVEL EXIT [ AUTO SETUP . RESULT SP : 5/4/0.1 DIST: 14.0/17.0ft LVL : -10.0/+5.0dB >SET CANCEL p [ [ ]/[ ]: UP/DOWN [ENTER]: Detail 5 Press 3ENTER to display the setup results in detail. AUTO SETUP . RESULT SP : 5/4/0.1 DIST: 14.0/17.0ft LVL : -10.0/+5.0dB >SET CANCEL [ p [ ]/[ ]: UP/DOWN [ENTER]: Detail RESULT WIRING FRONT L;;;;;OK [p]/[[]: Select [ENTER]: Return 38 En
-
 1
1 -
2
-
3
-
4
-
5
-
6
-
7
-
8
-
9
-
10
-
11
-
12
-
13
-
14
-
15
-
16
-
17
-
18
-
19
-
20
-
21
-
22
-
23
-
24
-
25
-
26
-
27
-
28
-
29
-
30
-
31
-
32
-
33
-
34
-
35
-
36
-
 37
37 -
 38
38 -
 39
39 -
 40
40 -
 41
41 -
 42
42 -
 43
43 -
 44
44 -
 45
45 -
 46
46 -
 47
47 -
48
-
49
-
50
-
51
-
52
-
53
-
54
-
55
-
56
-
57
-
58
-
59
-
60
-
61
-
62
-
63
-
64
-
65
-
66
-
67
-
68
-
69
-
70
-
71
-
72
-
73
-
74
-
75
-
76
-
77
-
78
-
79
-
80
-
81
-
82
-
83
-
84
-
85
-
86
-
87
-
88
-
89
-
90
-
91
-
92
-
93
-
94
-
95
-
96
-
97
-
98
-
99
-
100
-
101
-
102
-
103
-
104
-
105
-
106
-
107
-
108
-
109
-
110
-
111
-
112
-
113
-
114
-
115
-
116
-
117
-
118
-
119
-
120
-
121
-
122
-
123
-
124
-
125
-
126
-
127
-
128
-
129
-
130
-
131
-
132
-
133
-
134
-
135
-
136
-
137
-
138
-
139
-
140
-
141
-
142
-
143
-
144
-
145
-
146
-
147
-
148
-
149
-
150
-
151
-
152
-
153
-
154
-
155
-
156
-
157
 |
 |
