ZyXEL ARMOR Z1 - Model NBG6816 User Guide - Page 100
Scheduling Screen
 |
View all ZyXEL ARMOR Z1 - Model NBG6816 manuals
Add to My Manuals
Save this manual to your list of manuals |
Page 100 highlights
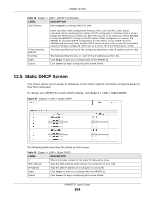
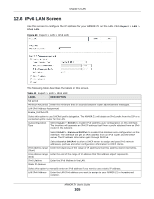
Chapter 11 Wireless LAN Table 36 Expert > Wireless > WPS (continued) LABEL Or input station's PIN number DESCRIPTION Use this button when you use the PIN Configuration method to configure wireless station's wireless settings. WPS Status Status Type the same PIN number generated in the wireless station's utility. Then click Start to associate to each other and perform the wireless security information synchronization. This displays Configured when the ARMOR Z1 has connected to a wireless network using WPS or when WPS Enable is selected and wireless or wireless security settings have been changed. The current wireless and wireless security settings also appear in the screen. Release Configuration 802.11 Mode SSID Security Apply Cancel This displays Unconfigured if WPS is disabled and there are no wireless or wireless security changes on the ARMOR Z1 or you click Release Configuration to remove the configured wireless and wireless security settings. This button is only available when the WPS status displays Configured. Click this button to remove all configured wireless and wireless security settings for WPS connections on the ARMOR Z1. This is the 802.11 mode used. Only compliant WLAN devices can associate with the ARMOR Z1. This is the name of the wireless network (the ARMOR Z1's first SSID). This is the type of wireless security employed by the network. Click Apply to save your changes back to the ARMOR Z1. Click Cancel to reload the previous configuration for this screen. 11.8 Scheduling Screen Use this screen to set the times your wireless LAN is turned on and off. Wireless LAN scheduling is disabled by default. The wireless LAN can be scheduled to turn on or off on certain days and at certain times. To open this screen, click Expert > Wireless > Scheduling. ARMOR Z1 User's Guide 100
-
 1
1 -
2
-
3
-
4
-
5
-
6
-
7
-
8
-
9
-
10
-
11
-
12
-
13
-
14
-
15
-
16
-
17
-
18
-
19
-
20
-
21
-
22
-
23
-
24
-
25
-
26
-
27
-
28
-
29
-
30
-
31
-
32
-
33
-
34
-
35
-
36
-
37
-
38
-
39
-
40
-
41
-
42
-
43
-
44
-
45
-
46
-
47
-
48
-
49
-
50
-
51
-
52
-
53
-
54
-
55
-
56
-
57
-
58
-
59
-
60
-
61
-
62
-
63
-
64
-
65
-
66
-
67
-
68
-
69
-
70
-
71
-
72
-
73
-
74
-
75
-
76
-
77
-
78
-
79
-
80
-
81
-
82
-
83
-
84
-
85
-
86
-
87
-
88
-
89
-
90
-
91
-
92
-
93
-
94
-
 95
95 -
 96
96 -
 97
97 -
 98
98 -
 99
99 -
 100
100 -
 101
101 -
 102
102 -
 103
103 -
 104
104 -
 105
105 -
106
-
107
-
108
-
109
-
110
-
111
-
112
-
113
-
114
-
115
-
116
-
117
-
118
-
119
-
120
-
121
-
122
-
123
-
124
-
125
-
126
-
127
-
128
-
129
-
130
-
131
-
132
-
133
-
134
-
135
-
136
-
137
-
138
-
139
-
140
-
141
-
142
-
143
-
144
-
145
-
146
-
147
-
148
-
149
-
150
-
151
-
152
-
153
-
154
-
155
-
156
-
157
-
158
-
159
-
160
-
161
-
162
-
163
-
164
-
165
-
166
-
167
-
168
-
169
-
170
-
171
-
172
-
173
-
174
-
175
-
176
-
177
-
178
-
179
-
180
-
181
-
182
-
183
-
184
-
185
-
186
-
187
-
188
-
189
-
190
-
191
-
192
-
193
-
194
-
195
-
196
-
197
-
198
-
199
-
200
-
201
-
202
-
203
-
204
-
205
-
206
-
207
-
208
-
209
-
210
-
211
-
212
-
213
-
214
-
215
 |
 |
