ZyXEL ARMOR Z1 - Model NBG6816 User Guide - Page 80
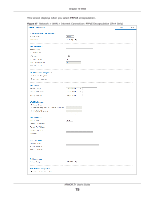
Port Trigger Screen, Expert > WAN > NAT > Port Trigger
 |
View all ZyXEL ARMOR Z1 - Model NBG6816 manuals
Add to My Manuals
Save this manual to your list of manuals |
Page 80 highlights
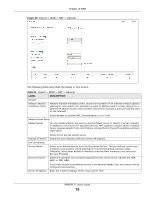
Chapter 10 WAN Table 24 Expert > WAN > NAT > General (continued) LABEL Port DESCRIPTION This shows the port number(s) that identifies the service if you select a pre-defined service. If you select User define in the Service Name field, enter the port number(s) manually. Add Click Add to add the rule in the port forwarding summary table below. # This is the number of an individual port forwarding server entry. Status This icon is turned on when the rule is enabled. Name This field displays a name to identify this rule. Protocol This is the transport layer protocol used for the service. Port This field displays the port number(s). Server IP Address This field displays the inside IP address of the server. Modify Click the Edit icon to open the edit screen where you can modify an existing rule. Click the Delete icon to remove a rule. Apply Click Apply to save your changes back to the ARMOR Z1. Cancel Click Cancel to begin configuring this screen afresh. 10.5.2 Port Trigger Screen To change your ARMOR Z1's trigger port settings, click Expert > WAN > NAT > Port Trigger. The screen appears as shown. Note: Only one LAN computer can use a trigger port (range) at a time. Figure 49 Expert > WAN > NAT > Port Trigger ARMOR Z1 User's Guide 80
-
 1
1 -
2
-
3
-
4
-
5
-
6
-
7
-
8
-
9
-
10
-
11
-
12
-
13
-
14
-
15
-
16
-
17
-
18
-
19
-
20
-
21
-
22
-
23
-
24
-
25
-
26
-
27
-
28
-
29
-
30
-
31
-
32
-
33
-
34
-
35
-
36
-
37
-
38
-
39
-
40
-
41
-
42
-
43
-
44
-
45
-
46
-
47
-
48
-
49
-
50
-
51
-
52
-
53
-
54
-
55
-
56
-
57
-
58
-
59
-
60
-
61
-
62
-
63
-
64
-
65
-
66
-
67
-
68
-
69
-
70
-
71
-
72
-
73
-
74
-
 75
75 -
 76
76 -
 77
77 -
 78
78 -
 79
79 -
 80
80 -
 81
81 -
 82
82 -
 83
83 -
 84
84 -
 85
85 -
86
-
87
-
88
-
89
-
90
-
91
-
92
-
93
-
94
-
95
-
96
-
97
-
98
-
99
-
100
-
101
-
102
-
103
-
104
-
105
-
106
-
107
-
108
-
109
-
110
-
111
-
112
-
113
-
114
-
115
-
116
-
117
-
118
-
119
-
120
-
121
-
122
-
123
-
124
-
125
-
126
-
127
-
128
-
129
-
130
-
131
-
132
-
133
-
134
-
135
-
136
-
137
-
138
-
139
-
140
-
141
-
142
-
143
-
144
-
145
-
146
-
147
-
148
-
149
-
150
-
151
-
152
-
153
-
154
-
155
-
156
-
157
-
158
-
159
-
160
-
161
-
162
-
163
-
164
-
165
-
166
-
167
-
168
-
169
-
170
-
171
-
172
-
173
-
174
-
175
-
176
-
177
-
178
-
179
-
180
-
181
-
182
-
183
-
184
-
185
-
186
-
187
-
188
-
189
-
190
-
191
-
192
-
193
-
194
-
195
-
196
-
197
-
198
-
199
-
200
-
201
-
202
-
203
-
204
-
205
-
206
-
207
-
208
-
209
-
210
-
211
-
212
-
213
-
214
-
215
 |
 |
