ZyXEL ARMOR Z1 - Model NBG6816 User Guide - Page 146
Wake On LAN, Expert, Maintenance, Remote Management, Wake On LAN
 |
View all ZyXEL ARMOR Z1 - Model NBG6816 manuals
Add to My Manuals
Save this manual to your list of manuals |
Page 146 highlights
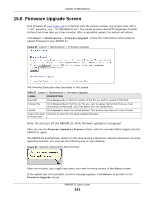
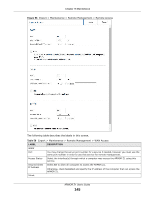
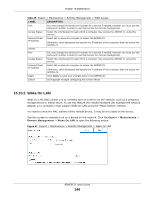
Chapter 15 Maintenance Table 59 Expert > Maintenance > Remote Management > WAN Access LABEL DESCRIPTION Port You may change the server port number for a service if needed, however you must use the same port number in order to use that service for remote management. Access Status Select the interface(s) through which a computer may access the ARMOR Z1 using this service. Secured Client IP Address Select All to allow all computes to access the ARMOR Z1. Otherwise, check Selected and specify the IP address of the computer that can access the ARMOR Z1. HTTPS Port You may change the server port number for a service if needed, however you must use the same port number in order to use that service for remote management. Access Status Select the interface(s) through which a computer may access the ARMOR Z1 using this service. Secured Client IP Address Select All to allow all computes to access the ARMOR Z1. Otherwise, check Selected and specify the IP address of the computer that can access the ARMOR Z1. Apply Click Apply to save your changes back to the ARMOR Z1. Cancel Click Cancel to begin configuring this screen afresh. 15.10.2 Wake On LAN Wake On LAN (WoL) allows you to remotely turn on a device on the network, such as a computer, storage device or media server. To use this feature the remote hardware (for example the network adapter on a computer) must support Wake On LAN using the "Magic Packet" method. You need to know the MAC address of the remote device. It may be on a label on the device. Use this screen to remotely turn on a device on the network. Click the Expert > Maintenance > Remote Management > Wake On LAN to open the following screen. Figure 97 Expert > Maintenance > Remote Management > Wake On LAN ARMOR Z1 User's Guide 146
-
 1
1 -
2
-
3
-
4
-
5
-
6
-
7
-
8
-
9
-
10
-
11
-
12
-
13
-
14
-
15
-
16
-
17
-
18
-
19
-
20
-
21
-
22
-
23
-
24
-
25
-
26
-
27
-
28
-
29
-
30
-
31
-
32
-
33
-
34
-
35
-
36
-
37
-
38
-
39
-
40
-
41
-
42
-
43
-
44
-
45
-
46
-
47
-
48
-
49
-
50
-
51
-
52
-
53
-
54
-
55
-
56
-
57
-
58
-
59
-
60
-
61
-
62
-
63
-
64
-
65
-
66
-
67
-
68
-
69
-
70
-
71
-
72
-
73
-
74
-
75
-
76
-
77
-
78
-
79
-
80
-
81
-
82
-
83
-
84
-
85
-
86
-
87
-
88
-
89
-
90
-
91
-
92
-
93
-
94
-
95
-
96
-
97
-
98
-
99
-
100
-
101
-
102
-
103
-
104
-
105
-
106
-
107
-
108
-
109
-
110
-
111
-
112
-
113
-
114
-
115
-
116
-
117
-
118
-
119
-
120
-
121
-
122
-
123
-
124
-
125
-
126
-
127
-
128
-
129
-
130
-
131
-
132
-
133
-
134
-
135
-
136
-
137
-
138
-
139
-
140
-
 141
141 -
 142
142 -
 143
143 -
 144
144 -
 145
145 -
 146
146 -
 147
147 -
 148
148 -
 149
149 -
 150
150 -
 151
151 -
152
-
153
-
154
-
155
-
156
-
157
-
158
-
159
-
160
-
161
-
162
-
163
-
164
-
165
-
166
-
167
-
168
-
169
-
170
-
171
-
172
-
173
-
174
-
175
-
176
-
177
-
178
-
179
-
180
-
181
-
182
-
183
-
184
-
185
-
186
-
187
-
188
-
189
-
190
-
191
-
192
-
193
-
194
-
195
-
196
-
197
-
198
-
199
-
200
-
201
-
202
-
203
-
204
-
205
-
206
-
207
-
208
-
209
-
210
-
211
-
212
-
213
-
214
-
215
 |
 |
