ZyXEL ARMOR Z1 - Model NBG6816 User Guide - Page 99
Table 36, Label, Description
 |
View all ZyXEL ARMOR Z1 - Model NBG6816 manuals
Add to My Manuals
Save this manual to your list of manuals |
Page 99 highlights
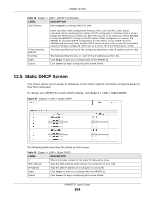
Chapter 11 Wireless LAN Figure 62 Expert > Wireless > WPS The following table describes the labels in this screen. Table 36 Expert > Wireless > WPS LABEL WPS Setup Band WPS PIN Code PIN Number DESCRIPTION Select the frequency band to set whether you want to apply the wireless and security settings to the default 2.4GHz or 5GHz wireless LAN. Select Enable to turn on the WPS feature. Otherwise, select Disable. Select Enable and click Apply to allow the PIN Configuration method. If you select Disable, you cannot create a new PIN number. This is the WPS PIN (Personal Identification Number) of the ARMOR Z1. Enter this PIN in the configuration utility of the device you want to connect to the ARMOR Z1 using WPS. The PIN is not necessary when you use WPS push-button method. Push Button Click Generate to generate a new PIN number. Use this button when you use the PBC (Push Button Configuration) method to configure wireless stations's wireless settings. Click this to start WPS-aware wireless station scanning and the wireless security information synchronization. ARMOR Z1 User's Guide 99
-
 1
1 -
2
-
3
-
4
-
5
-
6
-
7
-
8
-
9
-
10
-
11
-
12
-
13
-
14
-
15
-
16
-
17
-
18
-
19
-
20
-
21
-
22
-
23
-
24
-
25
-
26
-
27
-
28
-
29
-
30
-
31
-
32
-
33
-
34
-
35
-
36
-
37
-
38
-
39
-
40
-
41
-
42
-
43
-
44
-
45
-
46
-
47
-
48
-
49
-
50
-
51
-
52
-
53
-
54
-
55
-
56
-
57
-
58
-
59
-
60
-
61
-
62
-
63
-
64
-
65
-
66
-
67
-
68
-
69
-
70
-
71
-
72
-
73
-
74
-
75
-
76
-
77
-
78
-
79
-
80
-
81
-
82
-
83
-
84
-
85
-
86
-
87
-
88
-
89
-
90
-
91
-
92
-
93
-
 94
94 -
 95
95 -
 96
96 -
 97
97 -
 98
98 -
 99
99 -
 100
100 -
 101
101 -
 102
102 -
 103
103 -
 104
104 -
105
-
106
-
107
-
108
-
109
-
110
-
111
-
112
-
113
-
114
-
115
-
116
-
117
-
118
-
119
-
120
-
121
-
122
-
123
-
124
-
125
-
126
-
127
-
128
-
129
-
130
-
131
-
132
-
133
-
134
-
135
-
136
-
137
-
138
-
139
-
140
-
141
-
142
-
143
-
144
-
145
-
146
-
147
-
148
-
149
-
150
-
151
-
152
-
153
-
154
-
155
-
156
-
157
-
158
-
159
-
160
-
161
-
162
-
163
-
164
-
165
-
166
-
167
-
168
-
169
-
170
-
171
-
172
-
173
-
174
-
175
-
176
-
177
-
178
-
179
-
180
-
181
-
182
-
183
-
184
-
185
-
186
-
187
-
188
-
189
-
190
-
191
-
192
-
193
-
194
-
195
-
196
-
197
-
198
-
199
-
200
-
201
-
202
-
203
-
204
-
205
-
206
-
207
-
208
-
209
-
210
-
211
-
212
-
213
-
214
-
215
 |
 |
