ZyXEL GS1500-24P User Guide - Page 51
System
 |
View all ZyXEL GS1500-24P manuals
Add to My Manuals
Save this manual to your list of manuals |
Page 51 highlights
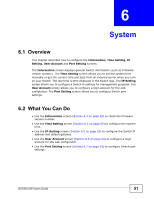
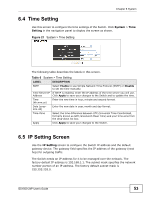
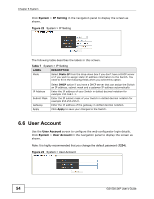
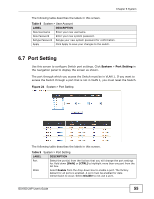
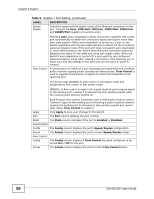
CHAPTER 6 System 6.1 Overview This chapter describes how to configure the Information, Time Setting, IP Setting, User Account and Port Setting screens. The Information screen displays general Switch information (such as firmware version number). The Time Setting screen allows you to set the system time manually or get the current time and date from an external server when you turn on your Switch. The real time is then displayed in the Switch logs. The IP Setting screen allows you to configure a Switch IP address for management purposes. The User Account screen allows you to configure a login account for the web configurator. The Port Setting screen allows you to configure Switch port settings. 6.2 What You Can Do • Use the Information screen (Section 6.3 on page 52) to check the firmware version number. • Use the Time Setting screen (Section 6.4 on page 53) to configure the system time. • Use the IP Setting screen (Section 6.5 on page 53) to configure the Switch IP address and default gateway. • Use the User Account screen (Section 6.6 on page 54) to configure a login account for the web configurator. • Use the Port Setting screen (Section 6.7 on page 55) to configure Switch port settings. GS1500-24P User's Guide 51
-
 1
1 -
2
-
3
-
4
-
5
-
6
-
7
-
8
-
9
-
10
-
11
-
12
-
13
-
14
-
15
-
16
-
17
-
18
-
19
-
20
-
21
-
22
-
23
-
24
-
25
-
26
-
27
-
28
-
29
-
30
-
31
-
32
-
33
-
34
-
35
-
36
-
37
-
38
-
39
-
40
-
41
-
42
-
43
-
44
-
45
-
 46
46 -
 47
47 -
 48
48 -
 49
49 -
 50
50 -
 51
51 -
 52
52 -
 53
53 -
 54
54 -
 55
55 -
 56
56 -
57
-
58
-
59
-
60
-
61
-
62
-
63
-
64
-
65
-
66
-
67
-
68
-
69
-
70
-
71
-
72
-
73
-
74
-
75
-
76
-
77
-
78
-
79
-
80
-
81
-
82
-
83
-
84
-
85
-
86
-
87
-
88
-
89
-
90
-
91
-
92
-
93
-
94
-
95
-
96
-
97
-
98
-
99
-
100
-
101
-
102
-
103
-
104
-
105
-
106
-
107
-
108
-
109
-
110
-
111
-
112
-
113
-
114
-
115
-
116
-
117
-
118
-
119
-
120
-
121
-
122
-
123
-
124
-
125
-
126
-
127
-
128
-
129
-
130
-
131
-
132
-
133
-
134
-
135
-
136
-
137
-
138
-
139
-
140
-
141
-
142
-
143
-
144
-
145
-
146
-
147
-
148
-
149
-
150
-
151
-
152
-
153
-
154
-
155
-
156
-
157
-
158
-
159
-
160
-
161
-
162
-
163
-
164
-
165
-
166
-
167
-
168
-
169
-
170
-
171
-
172
-
173
-
174
-
175
-
176
-
177
-
178
-
179
-
180
-
181
-
182
-
183
-
184
-
185
-
186
-
187
-
188
-
189
-
190
-
191
-
192
-
193
-
194
-
195
-
196
-
197
-
198
-
199
-
200
-
201
-
202
-
203
-
204
-
205
-
206
-
207
-
208
-
209
-
210
-
211
-
212
-
213
-
214
-
215
-
216
-
217
-
218
 |
 |