ZyXEL P-314Plus User Guide - Page 51
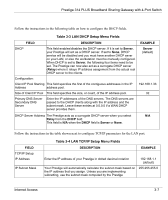
Table 3-3 LAN DHCP Setup Menu Fields, Prestige 314 PLUS Broadband Sharing Gateway with 4-Port Switch
 |
View all ZyXEL P-314Plus manuals
Add to My Manuals
Save this manual to your list of manuals |
Page 51 highlights
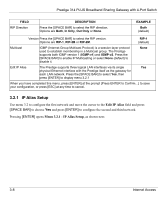
Prestige 314 PLUS Broadband Sharing Gateway with 4-Port Switch Follow the instructions in the following table on how to configure the DHCP fields. Table 3-3 LAN DHCP Setup Menu Fields FIELD DESCRIPTION EXAMPLE DHCP This field enables/disables the DHCP server. If it is set to Server, your Prestige will act as a DHCP server. If set to None, DHCP service will be disabled and you must have another DHCP sever on your LAN, or else the workstation must be manually configured. When DHCP is set to Server, the following four items need to be set. The Prestige can now also act as a surrogate DHCP server (Relay) where it relays IP address assignment from the actual real DHCP server to the clients. Server (default) Configuration: Client IP Pool Starting This field specifies the first of the contiguous addresses in the IP Address address pool. 192.168.1.33 Size of Client IP Pool This field specifies the size, or count, of the IP address pool. 32 Primary DNS Server Secondary DNS Server Enter the IP addresses of the DNS servers. The DNS servers are passed to the DHCP clients along with the IP address and the subnet mask. Leave these entries at 0.0.0.0 if a WAN DHCP server provides them. DHCP Server Address The Prestige acts as a surrogate DHCP server when you select N/A Relay from the DHCP field. This field is N/A when the DHCP field is Server or None. Follow the instructions in the table shown next to configure TCP/IP parameters for the LAN port. FIELD TCP/IP Setup: IP Address IP Subnet Mask Table 3-4 LAN TCP/IP Setup Menu Fields DESCRIPTION EXAMPLE Enter the IP address of your Prestige in dotted decimal notation 192.168.1.1 (default) Your Prestige will automatically calculate the subnet mask based on 255.255.255.0 the IP address that you assign. Unless you are implementing subnetting, use the subnet mask computed by the Prestige Internet Access 3-7
-
 1
1 -
2
-
3
-
4
-
5
-
6
-
7
-
8
-
9
-
10
-
11
-
12
-
13
-
14
-
15
-
16
-
17
-
18
-
19
-
20
-
21
-
22
-
23
-
24
-
25
-
26
-
27
-
28
-
29
-
30
-
31
-
32
-
33
-
34
-
35
-
36
-
37
-
38
-
39
-
40
-
41
-
42
-
43
-
44
-
45
-
 46
46 -
 47
47 -
 48
48 -
 49
49 -
 50
50 -
 51
51 -
 52
52 -
 53
53 -
 54
54 -
 55
55 -
 56
56 -
57
-
58
-
59
-
60
-
61
-
62
-
63
-
64
-
65
-
66
-
67
-
68
-
69
-
70
-
71
-
72
-
73
-
74
-
75
-
76
-
77
-
78
-
79
-
80
-
81
-
82
-
83
-
84
-
85
-
86
-
87
-
88
-
89
-
90
-
91
-
92
-
93
-
94
-
95
-
96
-
97
-
98
-
99
-
100
-
101
-
102
-
103
-
104
-
105
-
106
-
107
-
108
-
109
-
110
-
111
-
112
-
113
-
114
-
115
-
116
-
117
-
118
-
119
-
120
-
121
-
122
-
123
-
124
-
125
-
126
-
127
-
128
-
129
-
130
-
131
-
132
-
133
-
134
-
135
-
136
-
137
-
138
-
139
-
140
-
141
-
142
-
143
-
144
-
145
-
146
-
147
-
148
-
149
-
150
-
151
-
152
-
153
-
154
-
155
-
156
-
157
-
158
-
159
-
160
-
161
-
162
-
163
-
164
-
165
-
166
-
167
-
168
-
169
-
170
-
171
-
172
-
173
-
174
-
175
-
176
-
177
-
178
-
179
-
180
-
181
-
182
-
183
-
184
-
185
-
186
-
187
-
188
-
189
-
190
-
191
-
192
-
193
-
194
-
195
-
196
-
197
-
198
-
199
-
200
-
201
-
202
-
203
-
204
-
205
-
206
-
207
-
208
-
209
-
210
-
211
-
212
-
213
-
214
-
215
-
216
-
217
-
218
-
219
-
220
-
221
-
222
-
223
-
224
-
225
 |
 |
