ZyXEL P-314Plus User Guide - Page 52
IP Alias Setup, Edit IP Alias, Menu 3.2.1 - IP Alias Setup
 |
View all ZyXEL P-314Plus manuals
Add to My Manuals
Save this manual to your list of manuals |
Page 52 highlights
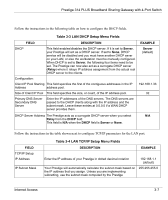
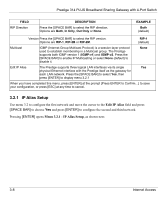
Prestige 314 PLUS Broadband Sharing Gateway with 4-Port Switch FIELD RIP Direction DESCRIPTION Press the [SPACE BAR] to select the RIP direction. Options are Both, In Only, Out Only or None. EXAMPLE Both (default) Version Press the [SPACE BAR] to select the RIP version. Options are RIP-1, RIP-2B or RIP-2M. RIP-1 (default) Multicast IGMP (Internet Group Multicast Protocol) is a session-layer protocol used to establish membership in a Multicast group. The Prestige supports both IGMP version 1 (IGMP-v1) and IGMP-v2. Press the [SPACE BAR] to enable IP Multicasting or select None (default) to disable it. None Edit IP Alias The Prestige supports three logical LAN interfaces via its single Yes physical Ethernet interface with the Prestige itself as the gateway for each LAN network. Press the [SPACE BAR] to select Yes, then press [ENTER] to display menu 3.2.1 When you have completed this menu, press [ENTER] at the prompt [Press ENTER to Confirm...] to save your configuration, or press [ESC] at any time to cancel. 3.2.1 IP Alias Setup Use menu 3.2 to configure the first network and move the cursor to the Edit IP Alias field and press [SPACE BAR] to choose Yes and press [ENTER] to configure the second and third network. Pressing [ENTER] opens Menu 3.2.1 - IP Alias Setup, as shown next. 3-8 Internet Access
-
 1
1 -
2
-
3
-
4
-
5
-
6
-
7
-
8
-
9
-
10
-
11
-
12
-
13
-
14
-
15
-
16
-
17
-
18
-
19
-
20
-
21
-
22
-
23
-
24
-
25
-
26
-
27
-
28
-
29
-
30
-
31
-
32
-
33
-
34
-
35
-
36
-
37
-
38
-
39
-
40
-
41
-
42
-
43
-
44
-
45
-
46
-
 47
47 -
 48
48 -
 49
49 -
 50
50 -
 51
51 -
 52
52 -
 53
53 -
 54
54 -
 55
55 -
 56
56 -
 57
57 -
58
-
59
-
60
-
61
-
62
-
63
-
64
-
65
-
66
-
67
-
68
-
69
-
70
-
71
-
72
-
73
-
74
-
75
-
76
-
77
-
78
-
79
-
80
-
81
-
82
-
83
-
84
-
85
-
86
-
87
-
88
-
89
-
90
-
91
-
92
-
93
-
94
-
95
-
96
-
97
-
98
-
99
-
100
-
101
-
102
-
103
-
104
-
105
-
106
-
107
-
108
-
109
-
110
-
111
-
112
-
113
-
114
-
115
-
116
-
117
-
118
-
119
-
120
-
121
-
122
-
123
-
124
-
125
-
126
-
127
-
128
-
129
-
130
-
131
-
132
-
133
-
134
-
135
-
136
-
137
-
138
-
139
-
140
-
141
-
142
-
143
-
144
-
145
-
146
-
147
-
148
-
149
-
150
-
151
-
152
-
153
-
154
-
155
-
156
-
157
-
158
-
159
-
160
-
161
-
162
-
163
-
164
-
165
-
166
-
167
-
168
-
169
-
170
-
171
-
172
-
173
-
174
-
175
-
176
-
177
-
178
-
179
-
180
-
181
-
182
-
183
-
184
-
185
-
186
-
187
-
188
-
189
-
190
-
191
-
192
-
193
-
194
-
195
-
196
-
197
-
198
-
199
-
200
-
201
-
202
-
203
-
204
-
205
-
206
-
207
-
208
-
209
-
210
-
211
-
212
-
213
-
214
-
215
-
216
-
217
-
218
-
219
-
220
-
221
-
222
-
223
-
224
-
225
 |
 |
