ZyXEL WAP3205 v2 User Guide - Page 126
Wall-mounting Instructions - firmware download
 |
View all ZyXEL WAP3205 v2 manuals
Add to My Manuals
Save this manual to your list of manuals |
Page 126 highlights
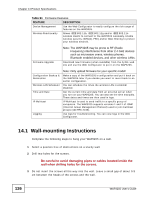
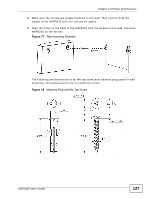
Chapter 14 Product Specifications Table 51 Firmware Features FEATURE DESCRIPTION Device Management Use the Web Configurator to easily configure the rich range of features on the WAP3205. Wireless Functionality Allows IEEE 802.11b, IEEE 802.11g and/or IEEE 802.11n wireless clients to connect to the WAP3205 wirelessly. Enable wireless security (WPA(2)-PSK) and/or MAC filtering to protect your wireless network. Firmware Upgrade Note: The WAP3205 may be prone to RF (Radio Frequency) interference from other 2.4 GHz devices such as microwave ovens, wireless phones, Bluetooth enabled devices, and other wireless LANs. Download new firmware (when available) from the ZyXEL web site and use the Web Configurator to put it on the WAP3205. Configuration Backup & Restoration Wireless LAN Scheduler Time and Date IP Multicast Logging Note: Only upload firmware for your specific model! Make a copy of the WAP3205's configuration and put it back on the WAP3205 later if you decide you want to revert back to an earlier configuration. You can schedule the times the wireless LAN is enabled/ disabled. Get the current time and date from an external server when you turn on your WAP3205. You can also set the time manually. These dates and times are then used in logs. IP Multicast is used to send traffic to a specific group of computers. The WAP3205 supports versions 1 and 2 of IGMP (Internet Group Management Protocol) used to join multicast groups (see RFC 2236). Use logs for troubleshooting. You can view logs in the Web Configurator. 14.1 Wall-mounting Instructions Complete the following steps to hang your WAP3205 on a wall. 1 Select a position free of obstructions on a sturdy wall. 2 Drill two holes for the screws. Be careful to avoid damaging pipes or cables located inside the wall when drilling holes for the screws. 3 Do not insert the screws all the way into the wall. Leave a small gap of about 0.5 cm between the heads of the screws and the wall. 126 WAP3205 User's Guide
-
 1
1 -
2
-
3
-
4
-
5
-
6
-
7
-
8
-
9
-
10
-
11
-
12
-
13
-
14
-
15
-
16
-
17
-
18
-
19
-
20
-
21
-
22
-
23
-
24
-
25
-
26
-
27
-
28
-
29
-
30
-
31
-
32
-
33
-
34
-
35
-
36
-
37
-
38
-
39
-
40
-
41
-
42
-
43
-
44
-
45
-
46
-
47
-
48
-
49
-
50
-
51
-
52
-
53
-
54
-
55
-
56
-
57
-
58
-
59
-
60
-
61
-
62
-
63
-
64
-
65
-
66
-
67
-
68
-
69
-
70
-
71
-
72
-
73
-
74
-
75
-
76
-
77
-
78
-
79
-
80
-
81
-
82
-
83
-
84
-
85
-
86
-
87
-
88
-
89
-
90
-
91
-
92
-
93
-
94
-
95
-
96
-
97
-
98
-
99
-
100
-
101
-
102
-
103
-
104
-
105
-
106
-
107
-
108
-
109
-
110
-
111
-
112
-
113
-
114
-
115
-
116
-
117
-
118
-
119
-
120
-
 121
121 -
 122
122 -
 123
123 -
 124
124 -
 125
125 -
 126
126 -
 127
127 -
 128
128 -
 129
129 -
 130
130 -
 131
131 -
132
-
133
-
134
-
135
-
136
-
137
-
138
-
139
-
140
-
141
-
142
-
143
-
144
-
145
-
146
-
147
-
148
-
149
-
150
-
151
-
152
-
153
-
154
-
155
-
156
-
157
-
158
-
159
-
160
-
161
-
162
-
163
-
164
-
165
-
166
-
167
-
168
-
169
-
170
-
171
-
172
-
173
-
174
-
175
-
176
-
177
-
178
-
179
-
180
-
181
-
182
-
183
-
184
-
185
-
186
-
187
-
188
-
189
-
190
-
191
-
192
-
193
-
194
-
195
-
196
 |
 |
