Brother International MFC-J6710DW Advanced Users Manual - English - Page 69
Auto Crop - scan to pdf
 |
UPC - 012502626633
View all Brother International MFC-J6710DW manuals
Add to My Manuals
Save this manual to your list of manuals |
Page 69 highlights
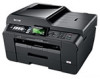
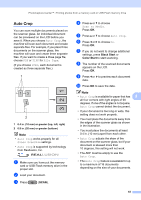
PhotoCapture Center™: Printing photos from a memory card or USB Flash memory drive Auto Crop 8 You can scan multiple documents placed on the scanner glass. An individual document can be previewed on the LCD before you save it. When you choose Auto Crop, the machine will scan each document and create separate files. For example, if you place three documents on the scanner glass, the machine will scan and create three separate files. If you want to create a three page file, choose PDF or TIFF for File Type. (If you choose JPEG, each document is created as three separate files.) 1 321 13 2 2 1 0.4 in. (10 mm) or greater (top, left, right) 2 0.8 in. (20 mm) or greater (bottom) Note • Auto Crop works properly for all Glass ScanSize settings. • Auto Crop is supported by technology from Reallusion, Inc. a Make sure you have put the memory card or USB Flash memory drive in the proper slot. b Load your document. c Press (SCAN). d Press a or b to choose Scan to Media. Press OK. e Press a or b to choose Auto Crop. f Press d or c to choose On. Press OK. g If you do not want to change additional settings, press Black Start or Color Start to start scanning. h The number of the scanned documents appears on the LCD. Press OK. i Press d or c to preview each document data. j Press OK to save the data. Note • Auto Crop is available for paper that has 8 all four corners with right angles of 90 degrees. If one of the angles is not square, Auto Crop cannot detect the document. • If your document is too long or wide, this setting does not work properly. • You must place the documents away from the edges of the scanner glass as shown in the illustration. • You must place the documents at least 0.4 in. (10 mm) apart from each other. • Auto Crop adjusts the skew of the document on the scanner glass, but if your document is skewed more than 10 degrees, this setting will not work. • The ADF must be empty to use the Auto Crop. • The Auto Crop feature is available for up to a maximum of 16 documents depending on the size of your documents. 63
-
 1
1 -
2
-
3
-
4
-
5
-
6
-
7
-
8
-
9
-
10
-
11
-
12
-
13
-
14
-
15
-
16
-
17
-
18
-
19
-
20
-
21
-
22
-
23
-
24
-
25
-
26
-
27
-
28
-
29
-
30
-
31
-
32
-
33
-
34
-
35
-
36
-
37
-
38
-
39
-
40
-
41
-
42
-
43
-
44
-
45
-
46
-
47
-
48
-
49
-
50
-
51
-
52
-
53
-
54
-
55
-
56
-
57
-
58
-
59
-
60
-
61
-
62
-
63
-
 64
64 -
 65
65 -
 66
66 -
 67
67 -
 68
68 -
 69
69 -
 70
70 -
 71
71 -
 72
72 -
 73
73 -
 74
74 -
75
-
76
-
77
-
78
-
79
-
80
-
81
-
82
-
83
-
84
-
85
-
86
-
87
-
88
-
89
 |
 |