Brother International MFC-J6710DW Advanced Users Manual - English - Page 72
Printing Images, DPOF printing, b
 |
UPC - 012502626633
View all Brother International MFC-J6710DW manuals
Add to My Manuals
Save this manual to your list of manuals |
Page 72 highlights
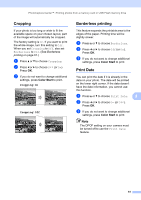
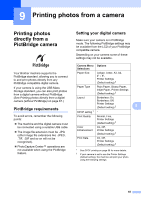
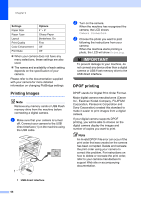
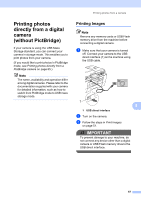
Chapter 9 Settings Paper Size Paper Type Layout Print Quality Color Enhancement Print Date Options 4" 6" Glossy Paper Borderless: On Fine Off Off When your camera does not have any menu selections, these settings are also used. The names and availability of each setting depends on the specification of your camera. Please refer to the documentation supplied with your camera for more detailed information on changing PictBridge settings. Printing Images 9 Note Remove any memory cards or USB Flash memory drive from the machine before connecting a digital camera. a Make sure that your camera is turned off. Connect your camera to the USB direct interface (1) on the machine using the USB cable. 1 1 USB direct interface b Turn on the camera. When the machine has recognized the camera, the LCD shows Camera Connected. c Choose the photo you want to print following the instructions from your camera. When the machine starts printing a photo, the LCD will show Printing. IMPORTANT To prevent damage to your machine, do not connect any device other than a digital camera or USB Flash memory drive to the USB direct interface. DPOF printing 9 DPOF stands for Digital Print Order Format. Major digital camera manufacturers (Canon Inc., Eastman Kodak Company, FUJIFILM Corporation, Panasonic Corporation and Sony Corporation) created this standard to make it easier to print images from a digital camera. If your digital camera supports DPOF printing, you will be able to choose on the digital camera display the images and number of copies you want to print. Note An Invalid DPOF File error can occur if the print order that was created on the camera has been corrupted. Delete and recreate the print order using your camera to correct this problem. For instructions on how to delete or recreate the print order, refer to your camera manufacturer's support Web site or accompanying documentation. 66
-
 1
1 -
2
-
3
-
4
-
5
-
6
-
7
-
8
-
9
-
10
-
11
-
12
-
13
-
14
-
15
-
16
-
17
-
18
-
19
-
20
-
21
-
22
-
23
-
24
-
25
-
26
-
27
-
28
-
29
-
30
-
31
-
32
-
33
-
34
-
35
-
36
-
37
-
38
-
39
-
40
-
41
-
42
-
43
-
44
-
45
-
46
-
47
-
48
-
49
-
50
-
51
-
52
-
53
-
54
-
55
-
56
-
57
-
58
-
59
-
60
-
61
-
62
-
63
-
64
-
65
-
66
-
 67
67 -
 68
68 -
 69
69 -
 70
70 -
 71
71 -
 72
72 -
 73
73 -
 74
74 -
 75
75 -
 76
76 -
 77
77 -
78
-
79
-
80
-
81
-
82
-
83
-
84
-
85
-
86
-
87
-
88
-
89
 |
 |