Canon PIXMA MP450 MP450 User's Guide - Page 66
About Layout and Trimming, About Image Optimize, About Date/File No. print - troubleshooting
 |
View all Canon PIXMA MP450 manuals
Add to My Manuals
Save this manual to your list of manuals |
Page 66 highlights
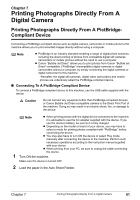
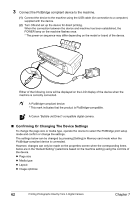
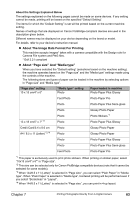
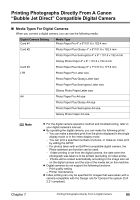
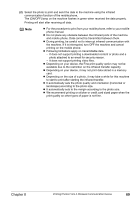
z About "Layout" and "Trimming" For "Layout", when the "Default setting" (selections based on the machine setting) is selected, the machine operates based on the bordered/borderless setting specified in the Memory card mode of the machine. Trimming is performed based on settings on the PictBridge-compliant device. Note z When printing onto Photo Stickers (PS-101) (16-up), use the following settings. 1. Load Photo Stickers (PS-101) in the Auto Sheet Feeder. 2. Select "10 x 15 cm / 4" x 6"" for the "Page size", and "Photo" for the "Media type". 3. Select "N-up" for layout, then select "16". z Some PictBridge compliant devices display the Layout option; 2-up, 4- up, 9-up, and 16-up. In this case always select "16-up". If there are no options on the PictBridge compliant device that correspond to 2-up, 4up, 9-up, or 16-up, printing on stickers is not possible. z When you are using Photo Stickers (PS-101), do not set "Borderless Printing" in "Layout" settings. z About "Image Optimize" When "Default setting" (selections based on the machine setting) is selected, the machine operates based on the settings in tab 2 of the Settings screen specified in Memory card mode of the machine. (See page 29) If you use a Canon PictBridge-compliant device, you can select "VIVID", "NR", "VIVID+NR" or "FACE". (Note that these options cannot be selected on some models.) Note z When "VIVID" is selected, the green and blue portions of photos are printed more vividly. z When "NR" (Noise Reduction) is selected, noise in blue portions, such as the sky, and dark portions is removed. z When "VIVID+NR" is selected, functions of both "VIVID" and "NR" are performed. z When "FACE" is selected, a darkened face on the photo taken against the light is brightened. z About "Date/File No. print" By default, "Off" is selected for this machine. If you select an image which has had the shooting date embedded in it using a camera with the print mode, select "Off" for this function. If you select "Date", "File No.", or "Both", the date and/or file number will be printed over the embedded date. Note z Never disconnect the USB cable during printing. z When disconnecting the USB cable between the device and machine, follow the instructions given in the instruction manual of the device. z Controls of the device cannot be used for the following: - Print quality setting - Printer maintenance z For the device operation method and troubleshooting, refer to your digital device's manual. 64 Printing Photographs Directly From A Digital Camera Chapter 7
-
 1
1 -
2
-
3
-
4
-
5
-
6
-
7
-
8
-
9
-
10
-
11
-
12
-
13
-
14
-
15
-
16
-
17
-
18
-
19
-
20
-
21
-
22
-
23
-
24
-
25
-
26
-
27
-
28
-
29
-
30
-
31
-
32
-
33
-
34
-
35
-
36
-
37
-
38
-
39
-
40
-
41
-
42
-
43
-
44
-
45
-
46
-
47
-
48
-
49
-
50
-
51
-
52
-
53
-
54
-
55
-
56
-
57
-
58
-
59
-
60
-
 61
61 -
 62
62 -
 63
63 -
 64
64 -
 65
65 -
 66
66 -
 67
67 -
 68
68 -
 69
69 -
 70
70 -
 71
71 -
72
-
73
-
74
-
75
-
76
-
77
-
78
-
79
-
80
-
81
-
82
-
83
-
84
-
85
-
86
-
87
-
88
-
89
-
90
-
91
-
92
-
93
-
94
-
95
-
96
-
97
-
98
-
99
-
100
-
101
-
102
-
103
-
104
-
105
-
106
-
107
-
108
-
109
-
110
-
111
-
112
-
113
-
114
-
115
-
116
-
117
-
118
-
119
-
120
-
121
-
122
-
123
-
124
-
125
-
126
-
127
-
128
-
129
-
130
-
131
-
132
-
133
-
134
-
135
-
136
-
137
-
138
-
139
-
140
-
141
-
142
 |
 |