Canon PowerShot A75 ZoomBrowser EX 4.6 Software User Guide - Page 122
Print Settings 1 / 2
 |
View all Canon PowerShot A75 manuals
Add to My Manuals
Save this manual to your list of manuals |
Page 122 highlights
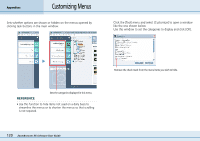
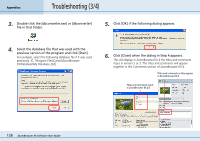
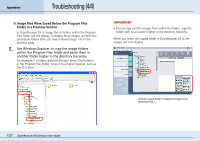
Appendices Print Settings (1/2) You can use ZoomBrowser EX to register print settings on a memory card, including the images to print and the number of copies. IMPORTANT • This feature does not work with unconverted RAW images. If you want to print RAW images, convert them first, copy them to the camera and perform this operation. • Ensure that the camera and computer are connected with an interface cable and that the camera is ready to transfer data before you perform this procedure. REFERENCE • DPOF is a standardized format for recording print settings, such as the image selection and number of copies. After DPOF print settings have been set, you can take a memory card to a camera store or developing laboratory and have the images printed according to the settings. • You can also set the print settings by clicking (Set) in the Camera Window and selecting [Slide/DPOF] in the next menu. How to make DPOF print settings Click the [Camera] menu in the main window and select [Edit Slide/DPOF]. Click the [Print Order (DPOF)] button at the top left of the next window and select the print type. Select the print type. ■ Standard Print Prints the specified number of copies of the images that you selected. ■ Index Print Prints only thumbnails of the images that you selected. ■ Both (Standard/Index) Prints the specified number of copies and thumbnails of the images that you selected. In addition, it produces an index print of small versions of all the images. REFERENCE You can also click [Edit] and then click [Include in index print] to include the image date and file number in the prints. 122 ZoomBrowser EX Software User Guide
-
 1
1 -
2
-
3
-
4
-
5
-
6
-
7
-
8
-
9
-
10
-
11
-
12
-
13
-
14
-
15
-
16
-
17
-
18
-
19
-
20
-
21
-
22
-
23
-
24
-
25
-
26
-
27
-
28
-
29
-
30
-
31
-
32
-
33
-
34
-
35
-
36
-
37
-
38
-
39
-
40
-
41
-
42
-
43
-
44
-
45
-
46
-
47
-
48
-
49
-
50
-
51
-
52
-
53
-
54
-
55
-
56
-
57
-
58
-
59
-
60
-
61
-
62
-
63
-
64
-
65
-
66
-
67
-
68
-
69
-
70
-
71
-
72
-
73
-
74
-
75
-
76
-
77
-
78
-
79
-
80
-
81
-
82
-
83
-
84
-
85
-
86
-
87
-
88
-
89
-
90
-
91
-
92
-
93
-
94
-
95
-
96
-
97
-
98
-
99
-
100
-
101
-
102
-
103
-
104
-
105
-
106
-
107
-
108
-
109
-
110
-
111
-
112
-
113
-
114
-
115
-
116
-
 117
117 -
 118
118 -
 119
119 -
 120
120 -
 121
121 -
 122
122 -
 123
123 -
 124
124 -
 125
125 -
 126
126 -
 127
127 -
128
-
129
-
130
-
131
 |
 |
