Canon PowerShot A75 ZoomBrowser EX 4.6 Software User Guide - Page 94
Creating a My Camera Sound 2/2
 |
View all Canon PowerShot A75 manuals
Add to My Manuals
Save this manual to your list of manuals |
Page 94 highlights
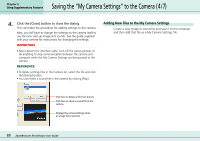
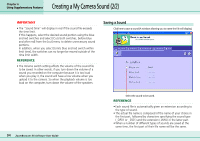
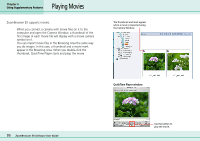
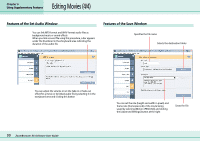
Creating a My Camera Sound (2/2) Chapter 6 Using Supplementary Features IMPORTANT • The "Sound time" will display in red if the sound file exceeds the time limit. If this happens, select the desired sound portion using the blue and red switches and select [Cuts both switches, before blue and after red] from the [cut] menu to delete unnecessary sound portions. In addition, when you select [Limits blue and red switch within limit time], the switches can no longer be moved outside of the time limit width. REFERENCE • The Volume switch setting affects the volume of the sound file to be saved. In other words, if you turn down the volume of a sound you recorded on the computer because it is too loud when you play it, the sound will have a low volume when you upload it to the camera. So when the playback volume is too loud on the computer, turn down the volume of the speakers. Saving a Sound Click here to save a sound (A window allowing you to name the file will display). 94 ZoomBrowser EX Software User Guide Select the sound to be saved. REFERENCE • Each sound file is automatically given an extension according to the type of sound. • The actual file name is composed of the name of your choice in the first part, followed by characters specifying the sound type (_OP01 or _SS01) and the extension (.WAV) in the latter part. • When a number of different types of sounds are saved at the same time, the first part of their file name will be the same.
-
 1
1 -
2
-
3
-
4
-
5
-
6
-
7
-
8
-
9
-
10
-
11
-
12
-
13
-
14
-
15
-
16
-
17
-
18
-
19
-
20
-
21
-
22
-
23
-
24
-
25
-
26
-
27
-
28
-
29
-
30
-
31
-
32
-
33
-
34
-
35
-
36
-
37
-
38
-
39
-
40
-
41
-
42
-
43
-
44
-
45
-
46
-
47
-
48
-
49
-
50
-
51
-
52
-
53
-
54
-
55
-
56
-
57
-
58
-
59
-
60
-
61
-
62
-
63
-
64
-
65
-
66
-
67
-
68
-
69
-
70
-
71
-
72
-
73
-
74
-
75
-
76
-
77
-
78
-
79
-
80
-
81
-
82
-
83
-
84
-
85
-
86
-
87
-
88
-
 89
89 -
 90
90 -
 91
91 -
 92
92 -
 93
93 -
 94
94 -
 95
95 -
 96
96 -
 97
97 -
 98
98 -
 99
99 -
100
-
101
-
102
-
103
-
104
-
105
-
106
-
107
-
108
-
109
-
110
-
111
-
112
-
113
-
114
-
115
-
116
-
117
-
118
-
119
-
120
-
121
-
122
-
123
-
124
-
125
-
126
-
127
-
128
-
129
-
130
-
131
 |
 |