Canon PowerShot A75 ZoomBrowser EX 4.6 Software User Guide - Page 5
Starting ZoomBrowser EX 2/4 - manual
 |
View all Canon PowerShot A75 manuals
Add to My Manuals
Save this manual to your list of manuals |
Page 5 highlights
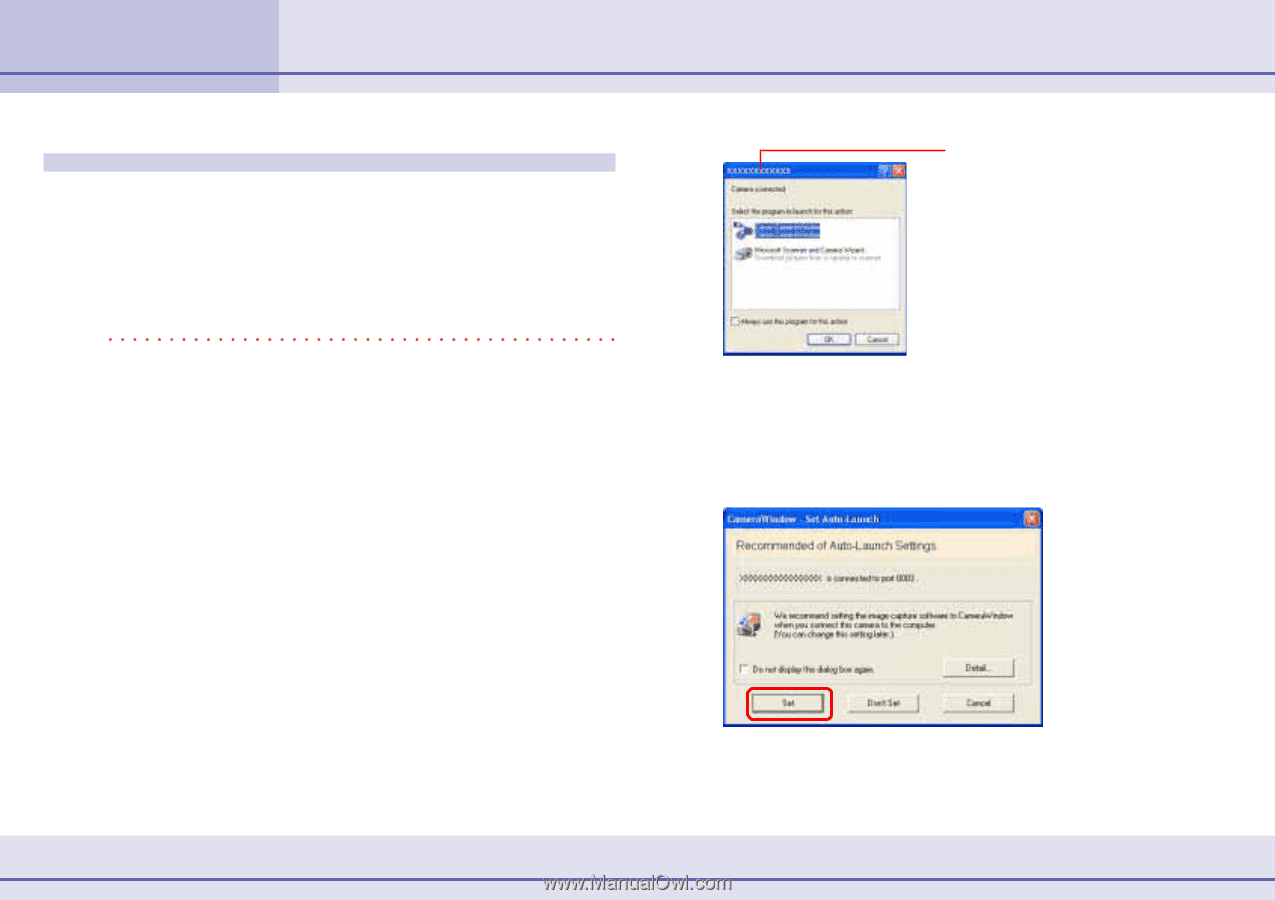
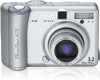
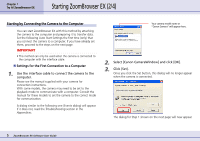
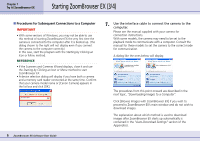
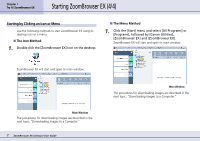
Chapter 1 Try It! ZoomBrowser EX Starting ZoomBrowser EX (2/4) Starting by Connecting the Camera to the Computer You can start ZoomBrowser EX with this method by attaching the camera to the computer and preparing it to transfer data. Set the following Auto Start Settings the first time (only) that you connect the camera to a computer. If you have already set them, proceed to the steps on the next page. IMPORTANT • This method can only be used when the camera is connected to the computer with the interface cable. ■ Settings for the First Connection to a Computer 1. Use the interface cable to connect the camera to the computer. Please see the manual supplied with your camera for connection instructions. With some models, the camera may need to be set to the playback mode to communicate with a computer. Consult the manual for these models to set the camera to the correct mode for communication. A dialog similar to the following one (Events dialog) will appear. If it does not, read the Troubleshooting section in the Appendices. Your camera model name or "Canon Camera" will appear here. 2. Select [Canon CameraWindow] and click [OK]. 3. Click [Set]. Once you click the Set button, this dialog will no longer appear when the camera is connected. The dialog for Step 1 shown on the next page will now appear. 5 ZoomBrowser EX Software User Guide
-
 1
1 -
 2
2 -
 3
3 -
 4
4 -
 5
5 -
 6
6 -
 7
7 -
 8
8 -
 9
9 -
 10
10 -
 11
11 -
12
-
13
-
14
-
15
-
16
-
17
-
18
-
19
-
20
-
21
-
22
-
23
-
24
-
25
-
26
-
27
-
28
-
29
-
30
-
31
-
32
-
33
-
34
-
35
-
36
-
37
-
38
-
39
-
40
-
41
-
42
-
43
-
44
-
45
-
46
-
47
-
48
-
49
-
50
-
51
-
52
-
53
-
54
-
55
-
56
-
57
-
58
-
59
-
60
-
61
-
62
-
63
-
64
-
65
-
66
-
67
-
68
-
69
-
70
-
71
-
72
-
73
-
74
-
75
-
76
-
77
-
78
-
79
-
80
-
81
-
82
-
83
-
84
-
85
-
86
-
87
-
88
-
89
-
90
-
91
-
92
-
93
-
94
-
95
-
96
-
97
-
98
-
99
-
100
-
101
-
102
-
103
-
104
-
105
-
106
-
107
-
108
-
109
-
110
-
111
-
112
-
113
-
114
-
115
-
116
-
117
-
118
-
119
-
120
-
121
-
122
-
123
-
124
-
125
-
126
-
127
-
128
-
129
-
130
-
131
 |
 |