Canon PowerShot A75 ZoomBrowser EX 4.6 Software User Guide - Page 76
Sending Images by E-mail 1/2
 |
View all Canon PowerShot A75 manuals
Add to My Manuals
Save this manual to your list of manuals |
Page 76 highlights
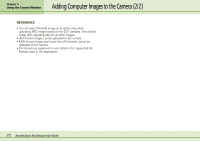
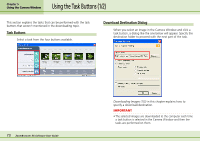
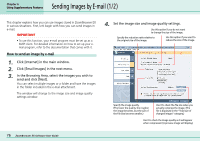
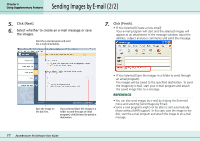
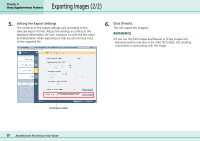
Sending Images by E-mail (1/2) Chapter 6 Using Supplementary Features This chapter explains how you can use images stored in ZoomBrowser EX in various situations. First, let's begin with how you can send images in e-mail. IMPORTANT • To use this function, your e-mail program must be set up as a MAPI client. For detailed information on how to set up your email program, refer to the documentation that comes with it. How to send an image by e-mail 1. Click [Internet] in the main window. 2. Click [Email Images] in the next menu. 3. In the Browsing Area, select the images you wish to send and click [Next]. You can select multiple images or a folder and have the images in the folder included in the e-mail attachment. The window will change to the image size and image quality settings window. 4. Set the image size and image quality settings. Use this option if you do not want to change the size of the image. Specify the reduction ratio relative to the original size of the image. Use this option if you want to reduce the size of the image. Specify the image quality. (The lower the quality, the rougher the image becomes, but the size of the file also becomes smaller.) Use it to check the file size when you actually compress the image. (The file is displayed in the "Total size of changed images" category.) Use it to check the image quality as it will appear when compressed. (A preview image will display.) 76 ZoomBrowser EX Software User Guide
-
 1
1 -
2
-
3
-
4
-
5
-
6
-
7
-
8
-
9
-
10
-
11
-
12
-
13
-
14
-
15
-
16
-
17
-
18
-
19
-
20
-
21
-
22
-
23
-
24
-
25
-
26
-
27
-
28
-
29
-
30
-
31
-
32
-
33
-
34
-
35
-
36
-
37
-
38
-
39
-
40
-
41
-
42
-
43
-
44
-
45
-
46
-
47
-
48
-
49
-
50
-
51
-
52
-
53
-
54
-
55
-
56
-
57
-
58
-
59
-
60
-
61
-
62
-
63
-
64
-
65
-
66
-
67
-
68
-
69
-
70
-
 71
71 -
 72
72 -
 73
73 -
 74
74 -
 75
75 -
 76
76 -
 77
77 -
 78
78 -
 79
79 -
 80
80 -
 81
81 -
82
-
83
-
84
-
85
-
86
-
87
-
88
-
89
-
90
-
91
-
92
-
93
-
94
-
95
-
96
-
97
-
98
-
99
-
100
-
101
-
102
-
103
-
104
-
105
-
106
-
107
-
108
-
109
-
110
-
111
-
112
-
113
-
114
-
115
-
116
-
117
-
118
-
119
-
120
-
121
-
122
-
123
-
124
-
125
-
126
-
127
-
128
-
129
-
130
-
131
 |
 |