Garmin eTrex Summit Owner's Manual (Software Version 3.00 and above) &nbs - Page 40
Menu
 |
View all Garmin eTrex Summit manuals
Add to My Manuals
Save this manual to your list of manuals |
Page 40 highlights
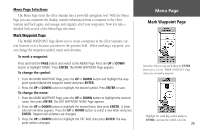
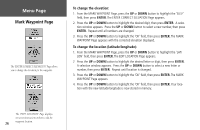
Menu Page Mark Waypoint Page The 'ENTER CORRECT ELEVATION' Page allows you to change the elevation for the waypoint. To change the elevation: 1. From the MARK WAYPOINT Page, press the UP or DOWN button to highlight the 'ELEV' field, then press ENTER. The ENTER CORRECT ELEVATION Page appears. 2. Press the UP or DOWN button to highlight the desired digit, then press ENTER. A selection window appears. Press the UP or DOWN button to select a new number, then press ENTER. Repeat until all numbers are changed. 3. Press the UP or DOWN button to highlight the 'OK' field, then press ENTER. The MARK WAYPOINT Page appears with the corrected elevation displayed. To change the location (latitude/longitude): 1. From the MARK WAYPOINT Page, press the UP or DOWN button to highlight the 'LAT/ LON' field, then press ENTER. The EDIT LOCATION Page appears. 2 Press the UP or DOWN button to highlight the desired letter or digit, then press ENTER. A selection window appears. Press the UP or DOWN button to select a new letter or number, then press ENTER. Repeat until location is changed. 3. Press the UP or DOWN button to highlight the 'OK' field, then press ENTER. The MARK WAYPOINT Page appears. 4. Press the UP or DOWN button to highlight the 'OK' field, then press ENTER. Your location with the new latitude/longitude is now stored in memory. The 'EDIT LOCATION' Page displays on-screen instructions on how to edit the 26 waypoint location.
-
 1
1 -
2
-
3
-
4
-
5
-
6
-
7
-
8
-
9
-
10
-
11
-
12
-
13
-
14
-
15
-
16
-
17
-
18
-
19
-
20
-
21
-
22
-
23
-
24
-
25
-
26
-
27
-
28
-
29
-
30
-
31
-
32
-
33
-
34
-
 35
35 -
 36
36 -
 37
37 -
 38
38 -
 39
39 -
 40
40 -
 41
41 -
 42
42 -
 43
43 -
 44
44 -
 45
45 -
46
-
47
-
48
-
49
-
50
-
51
-
52
-
53
-
54
-
55
-
56
-
57
-
58
-
59
-
60
-
61
-
62
-
63
-
64
-
65
-
66
-
67
-
68
-
69
-
70
-
71
-
72
-
73
-
74
-
75
-
76
-
77
-
78
-
79
-
80
 |
 |